To actually generate (build) the hardware applets (see 'Build'), VisualApplets uses a whole tool chain that works in the background.
For each hardware platform, VisualApplets provides a default build setup that is optimized for the specific hardware platform.
Based on the hardware platform you selected for your design in the design settings, the according default setup for build is proposed by VisualApplets. This setup cannot be changed by the user, but can be replaced by a user-defined setup.
![[Note]](../common/images/admon/note.png) |
You have to replace the default build setup by own settings if ... |
|---|---|
|
|
Recommended Xilinx Tools |
|---|---|
|
See Which Xilinx Toolchain and Version for Which Frame Grabber Platform for detailed information about which Xilinx tool is required to build applets for which hardware platform. mE5 marathon and LightBridge: Although applet build for mE5 marathon and LightBridge is possible with ISE 14.7, Basler recommends to use Xilinx Vivado since applet build (synthesis) with Vivado is much faster for these platforms. |
Each time the program performs the build steps, a certain set of build parameters will be used.
There are several sets of build parameters that come with VisualApplets. You can add additional sets.
For building an applet, one of these sets has to be specified as the “Active configuration”. This configuration will be used and the tool chain will be controlled accordingly.
All setting information is stored in the file “SynthesizeSettings.xml” at your local installation.
|
Activated and Current Parameter Set |
|---|---|
|
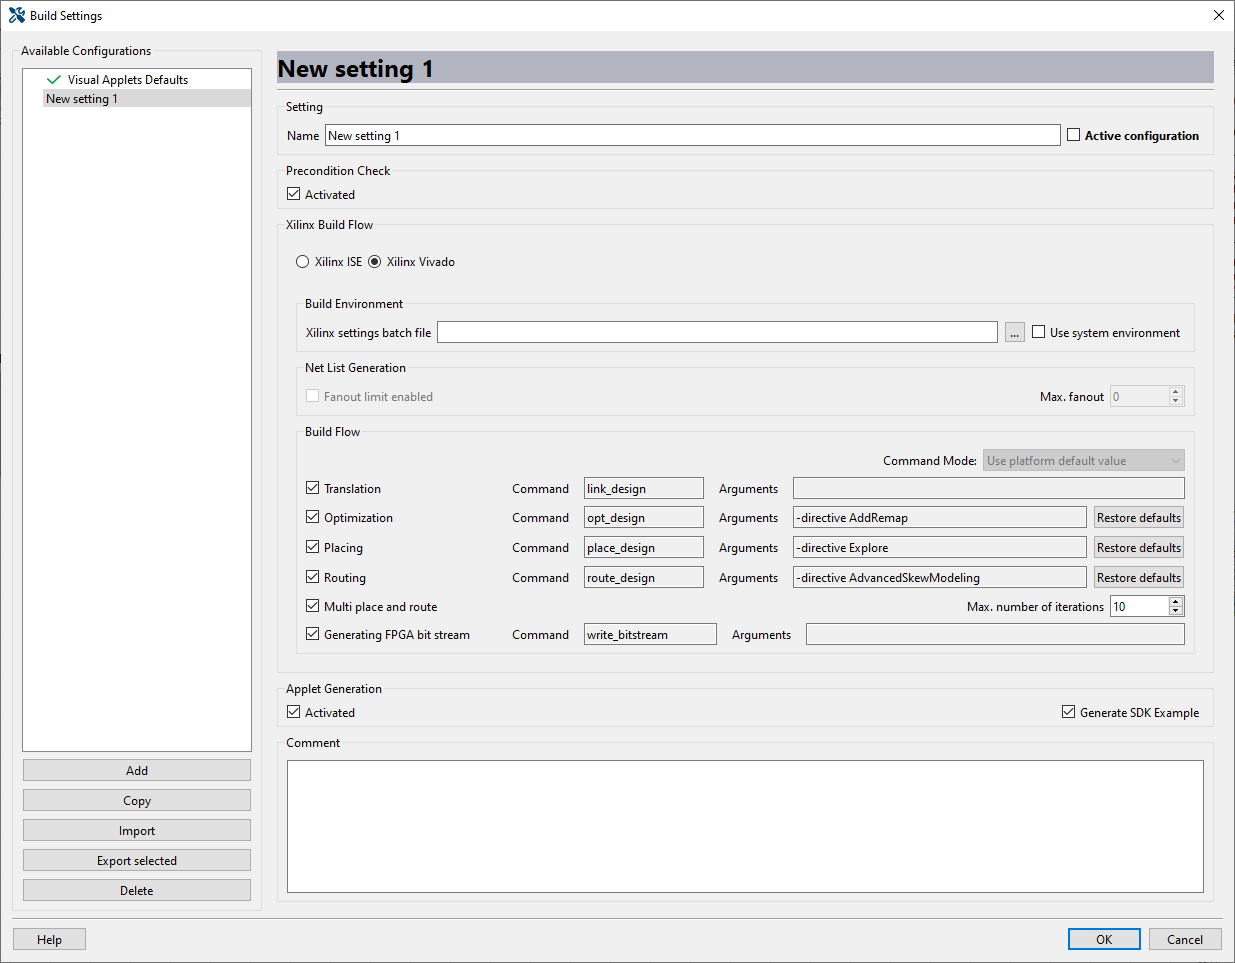
To open the Build Settings dialog, click → . The Dialog opens. The activated parameter set displayed:
In the following, we will refer to the parameter set displayed as the "current parameter set". |
The set of parameters itself consists of parameters for starting the external applications (Xilinx tools) that perform certain steps of the workflow, and of parameters for controlling these tools. You can define a certain set to be the default configuration (for starting a build of the current design) by checking “Active configuration”, and you can add a comment to describe the purpose of this specific set.
-
To open the Build Settings dialog, click menu → .
The Dialog opens. The activated parameter set is displayed.
Before Adding the First Alternative Parameter Set As long as no additional parameter set for the target hardware of your design has been created, the default build settings are displayed.
You cannot make any changes to these default settings, therefore, all input fields are deactivated.
You also cannot uncheck “Active configuration” as there is no alternative to the default yet.
-
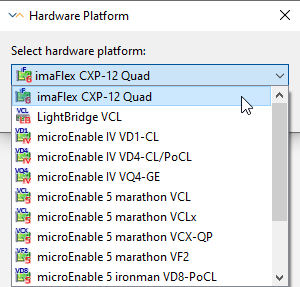
Click to create a new set of parameters.
You will be asked for hardware platform information. You can specify here which parameter set you want to load as a basis for creating your own parameter set. In most cases, it is quite sensible to select here the target hardware of your design.
-
Click .
Now, you can edit the first fields.
-
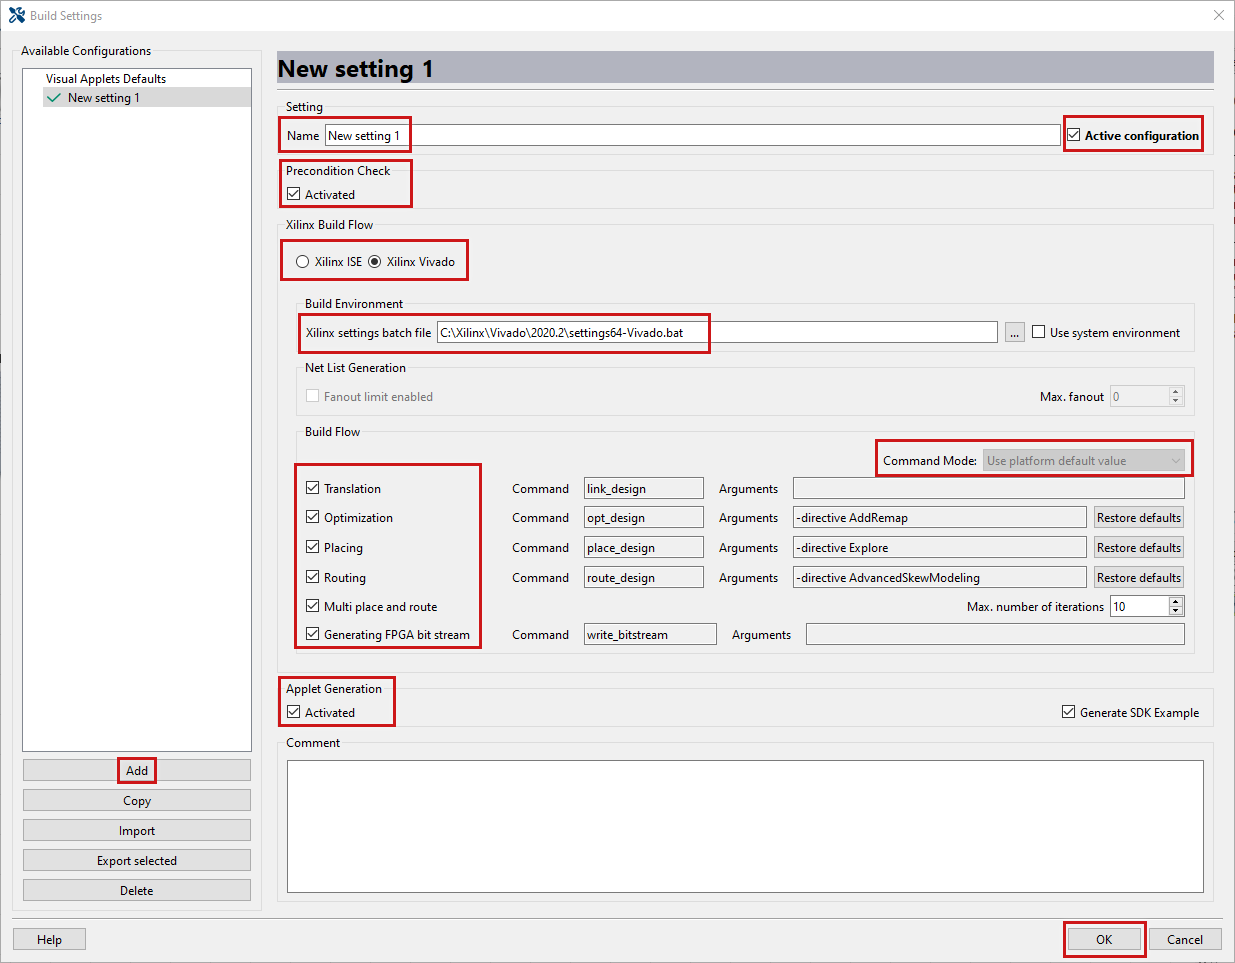
Name: Give a name to your new set of properties for identification. This name will show up in the configuration dialog and in the build protocols.
-
Active configuration: If you want to use this set of parameters when building your applet, check the box Active Configuration.
![[Important]](../common/images/admon/important.png)
Active Configuration The set of parameters you define as Active configuration will be used as often as you execute a build.
When you change the hardware platform you selected as target hardware platform of the design: Define new build settings for this new platform.
-
Precondition Check: In default mode, the Precondition Check is activated. The Precondition Check verifies that the FPGA type on the target hardware of your design is supported by your Xilinx tool chain. In addition, in all designs for mE5 or LightBridge platforms: When this check box is activated, the information in operator AppletProperties is updated at each build, namely the fields BuildTime and AppletUid. Therefore, after a build has been completed, the design is in "unsaved" mode, since the parameter values in the operator AppletProperties have been changed during build.
Avoiding the Update of AppletProperties Under specific circumstances you might not want to update the AppletProperties operator by a build. In this case, simply de-activate the check box Preconditions Check.
-
Xilinx ISE/Xilinx Vivado: Select the Xilinx tool chain you are going to use. Vivado is supported by all marathon and LightBridge platforms. If Vivado is not supported by the target hardware of the open design, this is stated directly in the GUI:
-
Build Environment:
-
When using a newer Xilinx tool (i.e., when developing with Xilinx Vivado or with Xilinx ISE in a version higher than 9.2):
-
De-activate the “Use system environment” checkbox, and
-
from your file system, select the Xilinx settings batch file that sets the environment to launch the external tools.
Please follow the Xilinx documentation to make the best choice.
You find the batch file in the Xilinx installation folder:
-
ISE: \Xilinx\14.7\ISE_DS\settings64.bat.
-
Vivado: \Xilinx\Vivado\2020.2\settings64.bat.
Basler recommends to use the 64-bit Windows operating system when developing applets for microEnable 5 platforms. Make sure you select the batch file that matches the operating system you are using, e.g., "settings64.bat" which is the file for the 64-bit Windows OP.
-
-
If you use an older Xilinx ISE version (version 9.2 or older) and all environment variables are set at the operating system, activate the “Use system environment” checkbox.
-
-
Build Flow: Activate all options under Build Flow. Normally, all steps should be activated.
Basler recommends to set the system under Multi place and route to 20 iterations.
Keep the Command Mode at Use platform default value.
-
Applet Generation: Activate Applet Generation.
-
Comment: Enter a comment that describes the set of parameters you just created. The entries you make here have no effect on the actual build process.
-
Click the OK button.


Example: When developing for microEnable 5 or LightBridge, the following parameter values need to be set:
|
Disabling Build Flow Steps |
|---|---|
|
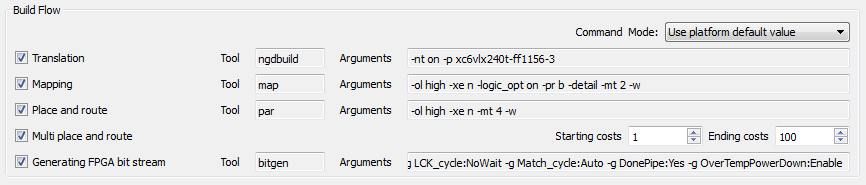
Per default, all build flow steps (translation, mapping, ...) are activated: With the Expert license or the VisualApplets 4 license you can de-select individual steps. However, the build steps depend on each other. They are listed in the order of their dependence:
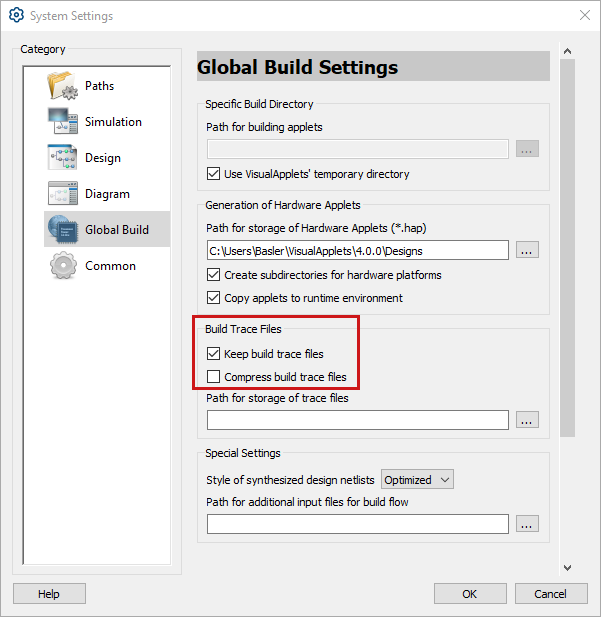
However, a previous step doesn't need to be executed within the same build run. It might as well have been executed in an earlier build run. As long as the files (trace files) that have been generated during an earlier build run are still available, it is possible to deactivate steps that come earlier in the "Build Flow" list and to activate steps that come later in the list. To keep trace files of earlier build runs: Go to menu → → . Under Build Trace Files, activate Keep build trace files. Deactivate Compress build trace files. If you keep the build trace files, and you have carried out all previous build flow steps once before, you can also activate only subsequent steps, e.g.: |


|
Command Mode Options |
|---|---|
|
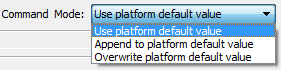
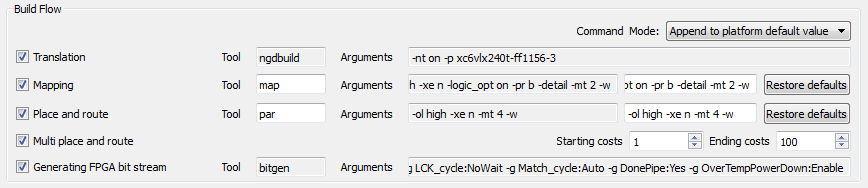
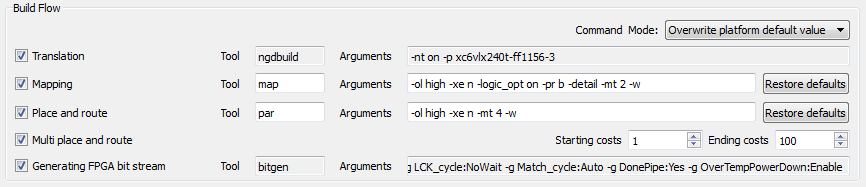
With the Expert license or the VisualApplets 4 license you can change the . To change the , go to Command Mode at the right upper corner of the Build Flow area. In the list, you have three different options:
---------- Use platform default value (Default): If you keep or select this option, VisualApplets displays the default values recommended for the hardware platform you specified as target platform for the open design. VisualApplets also uses these default values when running the Xilinx tools (i.e., when the actual applet is build (synthesized) out of the open design). Since default sets cannot be modified, it is not possible to edit the Arguments fields in the Use platform default value mode. Append to platform default value: If you select this option, you can add information for the Mapping and Place and route tools to the basic arguments provided by VisualApplets. During build, VisualApplets adds the parameters you defined in the Arguments fields to the platform default values when calling the tool. This setting is for experienced users only. Overwrite platform default value: If you select this option, VisualApplets displays the default arguments for Mapping and Place and route for the target hardware platform you selected directly after creating the new applet set. You can define (overwrite) the Mapping and Place and route arguments stated here. VisualApplets now uses only the parameters you specify in these Arguments fields when calling the tools. This setting is for experienced users only. |
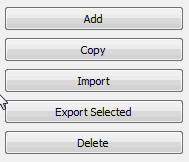
In the Build Settings window, you have some options for handling parameter sets:
Clicking on
-
Add creates a new parameter set which you can modify as you want (based on the hardware platform you select).
-
Copy copies the parameters of the current set, creates a new set and pastes the parameters of the copied set into the new set.
-
Import allows to import a certain set of parameters into the current installation of VisualApplets.
-
Export selected saves the current parameter set to a file. The file can be used for transporting the data to a different PC or installation or for backup reasons. A dialog is displayed where you can specify a file name and location.
-
Delete deletes the current set of parameters.
For mE 5 ironman, mE5 marathon and LightBridge, the checkbox Precondition Check offers a specific function:
-
If Precondition Check is activated, at each start of synthesis (build) the entries for BuildTime and AppletUid are updated. If you want to start a complete build (from netlist generation through to applet generation) you need to activate Precondition Check. Otherwise, later on (when using the applet on the frame grabber) the loaded applet cannot be reliably validated by the runtime environment.
-
Specific option: If you have already completely built an applet, but decide you need another *.hap file for another target operating system: You can build a new OS-specific hap file out of the complete build to make your design usable on other target operating systems (i.e., for another target runtime). Proceed as follows:
-
In menu Settings, select System Settings.
-
In the window that opens, select category Global Build.
-
Here, under Build Trace Files, activate the option Keep build trace files and specify a path.
-
Go to menu Settings, menu item Build Settings.
-
Deactivate option Precondition Check.
-
Deactivate all other options under Xilinx Build Flow.
-
Activate Applet Generation.
-
Under Defaults, activate Active Configuration.
-
Start the build of the OS specific *.hap file.
Especially with complex designs, this option allows you to save time.
-
