Table of Contents
To get a first impression on VisualApplets, this chapter gives you a short introduction into the tool. All steps required to generate an image processing application with VisualApplets are presented. You will learn how fast applications can be realized and how easy it is without the need on FPGA or any other hardware-specific knowledge.
-
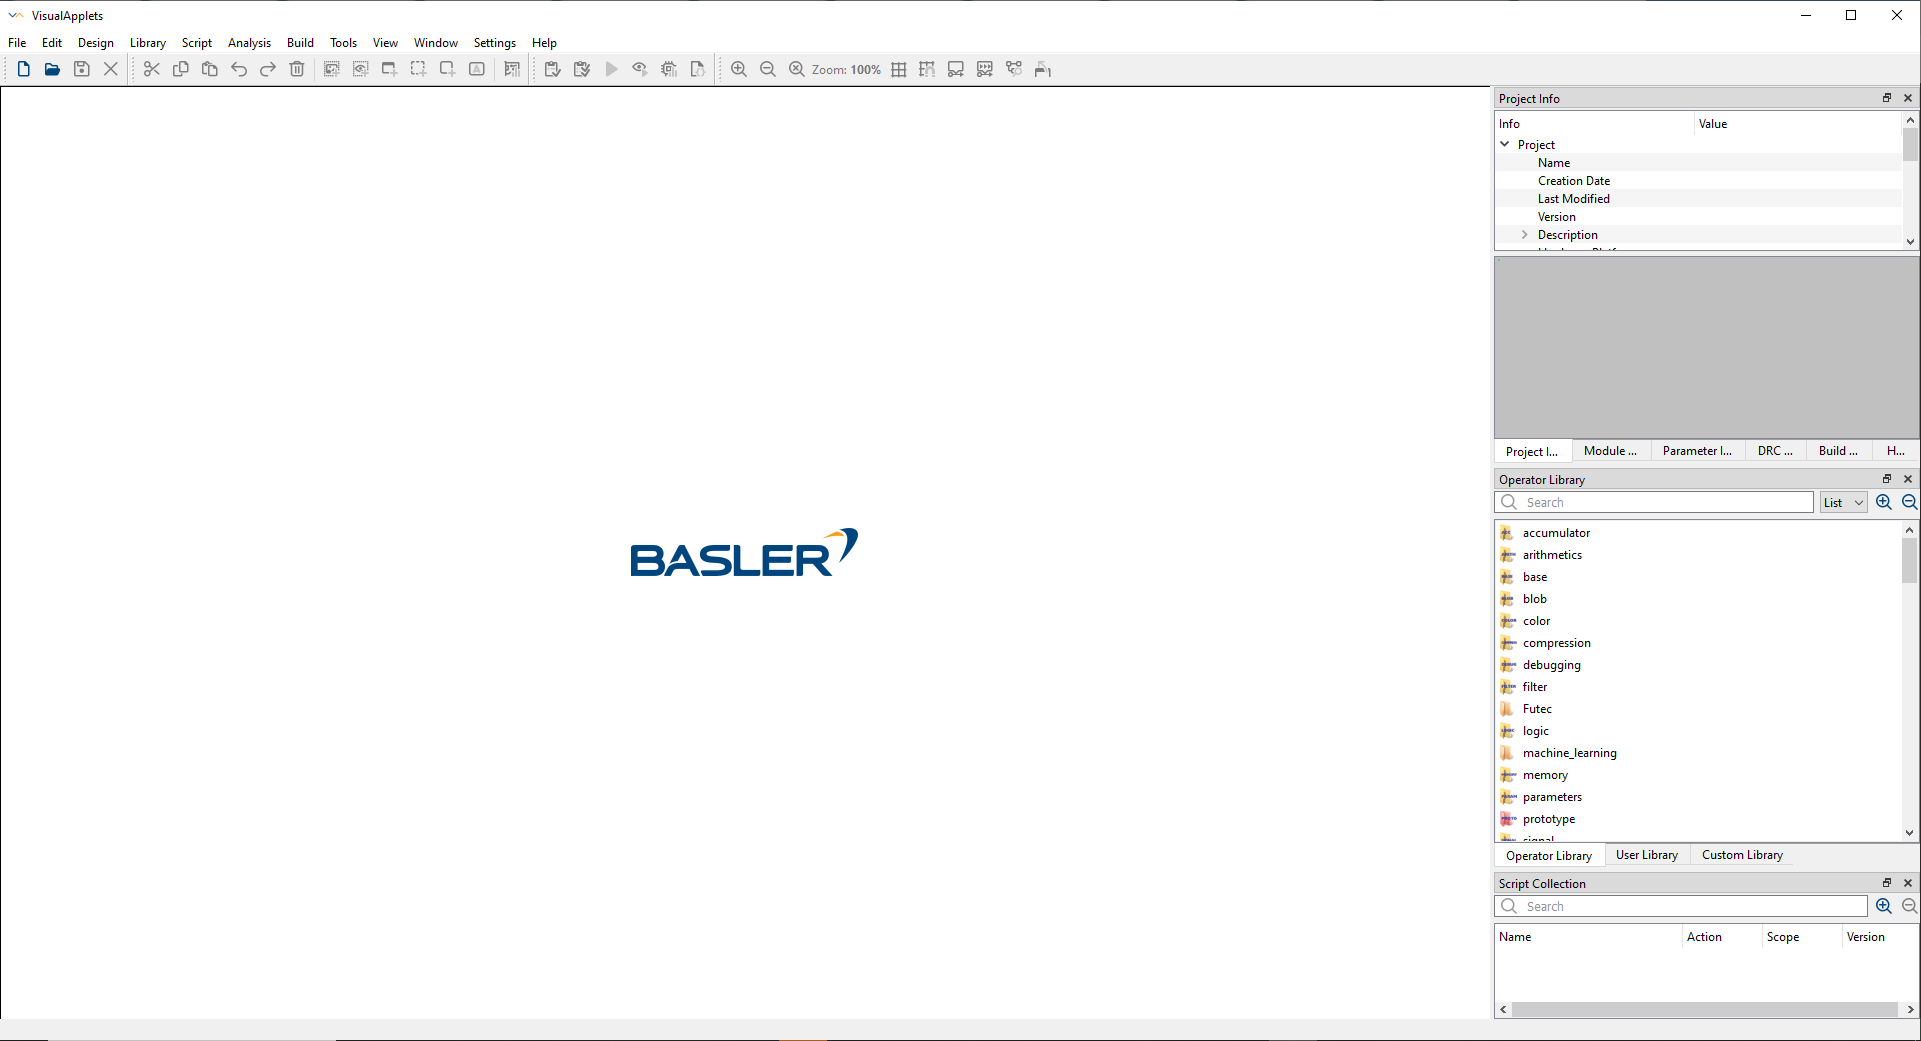
Start VisualApplets by clicking on the VisualApplets program icon in the Windows menu or on the Desktop. At first, the main window will open with no project loaded.
You can now immediately start implementing your first design. The first step will be to start a new project.
-
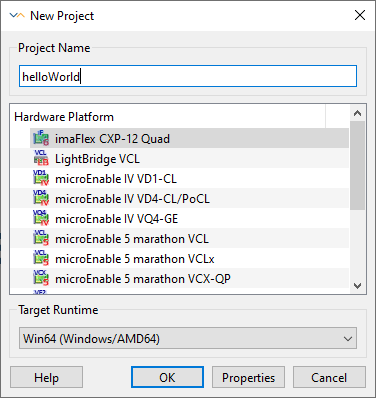
Click on → ( Ctrl+N ) or use the New icon from the File icon bar. A New Project window will open which allows you to specify project name, target hardware platform, and target runtime. If you don't know these settings at the current step of development, just give a name to your project and use the default settings. You can always change these settings later on.
-
To follow our example here, just use the following settings:
-
Project Name: "helloWorld"
-
Hardware Platform: imaFlex CXP-12 Quad frame grabber
-
Target Runtime: Microsoft Windows 64-bit system.
-
-
Confirm your settings by clicking on .
VisualApplets will now start a new project. You will see a blank design window in the center of your program window. (If you selected microEnable 5 as hardware platform, the two obligatory control operators Applet Properties and Board Status are automatically inserted into the empty design.) In the Project Info tab on the right, information regarding your current project like project name, target hardware, target platform etc. is displayed.
In VisualApplets, image processing operations are represented by operators. All these operators can be found in the operator library on the right of the VisualApplets design window. Using drag-and-drop, you can very easily place operators into the design window. An instance of an operator in the design is called a module. Operators can have input and output ports. Operators in a design (i.e., modules) can be connected using these ports. Connections between modules are called links which are represented in the design window by arrows. These modules and links represent the image- (or signal-) processing pipeline; hence, the order of operations is determined by the order of modules.
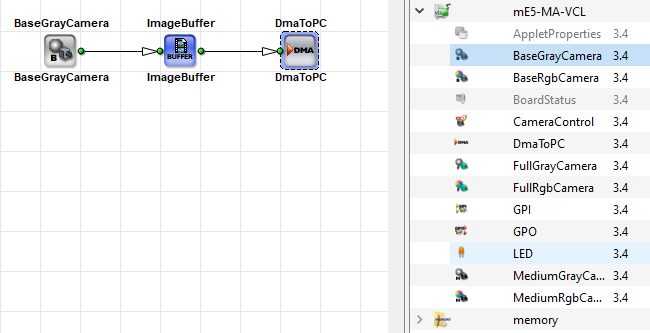
For our first design, we will need the following three operators:
-
Operator CameraGrayAreaBase from the mE5-MA-VCL library
-
Operator ImageBuffer from the Memory library
-
Operator DmaToPC from the mE5-MA-VCL library
To use these operators in your design:
-
Locate the operators in their libraries and drag them into your design window as shown in the following:
The next step will be to connect the modules in your design via links.
Clicking on a port will start a new link which can be finalized with a second click on the target port.
-
To connect the camera module with the buffer module, click on the output port of the camera module and then on the input port of the buffer module.
-
Connect the buffer module with the DMA module in the same way.
Save your Design. If you save your design for the first time, the Save dialog will offer the project name as the name for your design file.
![[Note]](../common/images/admon/note.png) |
File Name and Project Name |
|---|---|
|
If you save your design for the first time, or if you use the Save as... option, the Save/Save as... dialog will offer the project name as the name for your design file. |
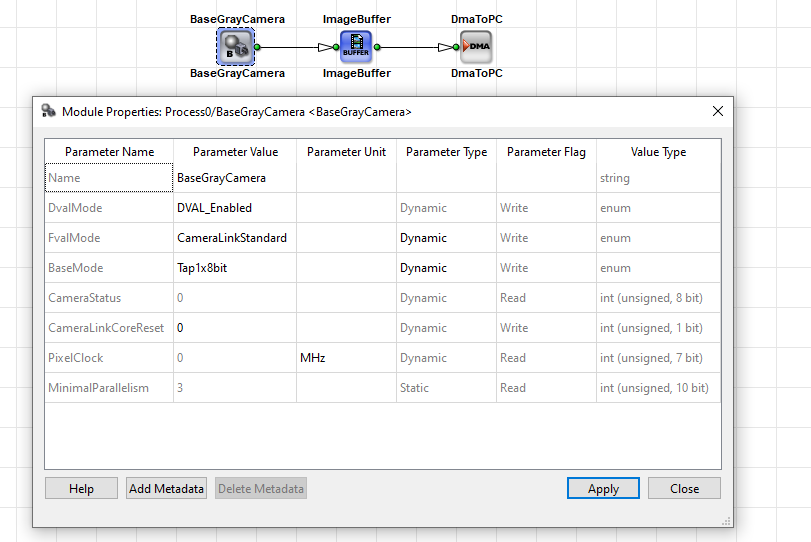
Now you have finished your first design. In the next step, you have to specify the settings of the individual modules and links (otherwise, the design will use the preset default properties).
-
To parametrize a module, just double-click on the module. A dialog window will open where all parameters of the module are listed.
-
Set the properties as you need them for your design. For this first sample applet you are designing right now, simply change the names of your modules to "Camera", "Buffer", and "DMA".
-
Click on .
-
Close the properties windows by clicking on .
-
Save your Design.
|
Operator Parameters |
|---|---|
|
Parameters are always operator-specific; therefore, the setting options differ from operator to operator. |
The next step is to edit the properties of the links of your design. In the sample applet you are creating just now, there is no need to change any of the link properties. You can simply use the default settings.
However, whenever you need to parametrize the links of your design, you should proceed as follows:
-
Double-click on the link you want to parametrize.
-
Enter the desired settings.
-
Click on .
-
Close the properties window by clicking on .
You have now fully implemented your first application which is a simple image acquisition. Proceed by checking your design for errors using the Design Rules Check (DRC) functions of VisualApplets.
-
Click on → ( Ctrl+F7 ) or use the icon Design Rules Check Level 1 from the Build icon bar.
-
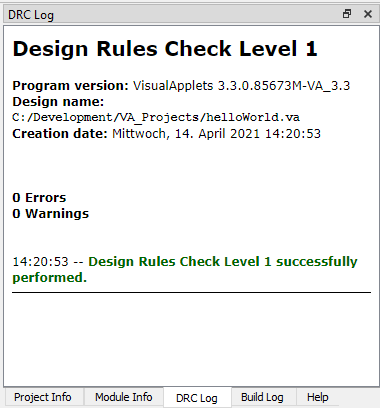
In the Project Info window on the right, change to the DRC Log tab.
Here, The DRC analysis result is displayed as you can see in the following figure:
![[Important]](../common/images/admon/important.png) |
Important |
|---|---|
|
If the DRC detects an error, you have to correct it before continuing with the next step. Detected errors are listed in link format. If you click on one of the listed errors, the respective module or link will be highlighted in the Design Window. |
After successful DRC, save your design:
-
Click on → ( Ctrl+S ) or use the Save icon from the File icon bar.
You need to edit the build settings, if
-
You create designs for a microEnable 5 marathon platform.
-
You work with Xilinx Vivado.
-
You work with a Xilinx ISE version higher than 9.2.
To set the build settings for your specific environment, proceed as follows:
-
Click menu → .
The Build Settings dialog opens.
-
Click on the Add button.
-
Select the target hardware platform (frame grabber) for these build settings on and confirm with OK.
-
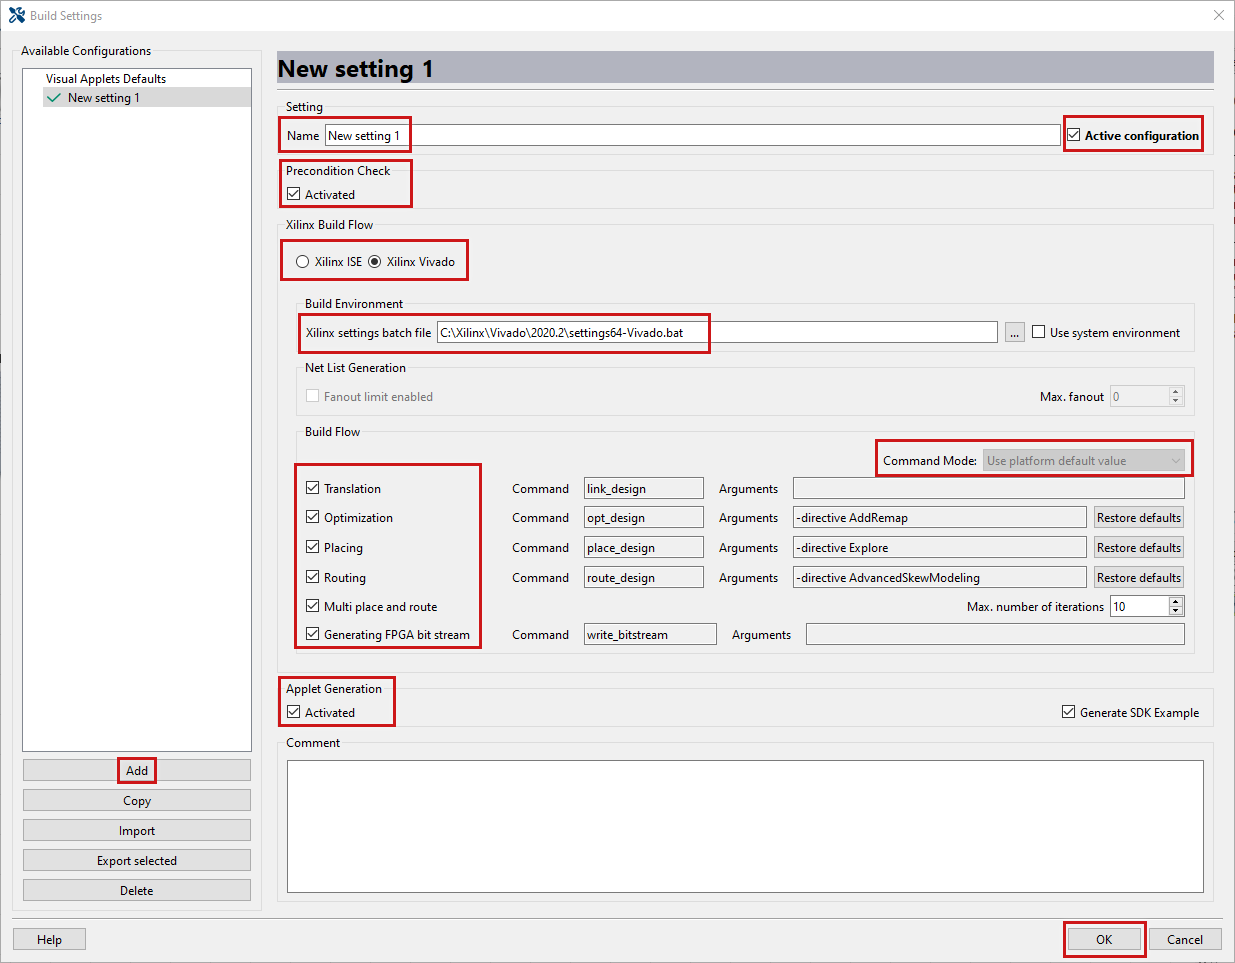
Give a name to the new set of build settings you are just creating.
-
Activate the option Active configuration (directly behind the filed where you entered the name).
-
Leave Precondition Check activated.
-
Under Xilinx Build Flow, select the Xilinx Tool you want to use (Xilinx ISE or Xilinx Vivado).
-
Disable the option Use system environment instead.
-
Select a Xilinx settings batch file from your file system. You find the batch file in the Xilinx installation folder.:
-
ISE: \Xilinx\<version_number>\ISE_DS\settings64.bat.
-
Vivado: \Xilinx\Vivado\<version_number>\settings64.bat.
We recommend to use the 64-bit Windows operating system when developing applets for microEnable 5 platforms. Make sure you select the batch file that matches the operating system you are using, e.g., "settings64.bat" which is the file for the 64-bit Windows OP.
-
-
Keep all other settings as they are.
-
Click OK.
For further details on build settings options, refer to section 'Build Settings'
The last step is to build an applet from your design.
|
Build Preconditions |
|---|---|
|
The build process can only be performed if the XILINX tools are properly installed. Refer to section Installing the Xilinx Toolchain for more information on XILINX tool installation. If you create designs for microEnable 5 marathon frame grabbers, or if you work with a Xilinx ISE version higher than version 9.2, you need to define the build settings before proceeding, see section 'Configuring the Build Settings '. |
To create the bit stream (*.hap file):
-
Click on → ( F7 ) or use the Build icon from the Build toolbar.
The Build dialog opens.
-
Under Xilinx configuration, select the build configuration you want to use (out of the configurations you defined in the Build Settings dialog).
-
Click on Start to actually start the bitstream generation.
VisualApplets will now use the XILINX tools to translate the application into the FPGA bitstream, i.e., the "program" or "applet".
|
Prolonged Build Time Possible |
|---|---|
|
The duration of the Place and Route process depends on the complexity of the design. The build of highly complex designs might take several hours. |
After successful build, the applet is fully generated.
The name of your applet (*.hap file) is the same as the name of the design file (*.va). The project name has no influence on the name of the applet (*.hap file).
At this point, you are done with VisualApplets and can use the applet in real FPGA hardware.
An explanation on how to run a VisualApplets design on hardware you will find in section 'Running Your Applet on Hardware'.
|
Prerequisites: |
|---|---|
|
How you get your applet running depends on the frame grabber generation you are using.
microEnable 5 marathon: With microEnable 5 marathon frame grabbers, you first have to load your *.hap file (applet) via firmware flasher tool onto your frame grabber, prior to selecting and starting the applet (see 'Flashing the Applet on the Frame Grabber (Only mE5)').
imaFlex: With imaFlex platforms, you can immediately select the applet (*.hap file) from your local file system and start it on the frame grabber.
You can
-
directly see and test the image processing results of your applet with the tool microDiagnostics (which comes as part of the Framegrabber SDK) (see https://docs.baslerweb.com/frame-grabbers/managing-applets-micro-diagnostics).
-
start the applet via the application programming interface (see 'Accessing the Applet via SDK').
You need to flash your frame grabber with the new applet, if you use a microEnable 5 marathon frame grabber.
If you are going to use the new applet on an imaFlex frame grabber, just skip this section.
To flash your frame grabber:
-
Start the tool microDiagnostics.
-
Select the frame grabber you want to use.
-
Click the button Flash Selected Board(s). A new window opens.
-
Go to the directory where you store your *.hap file created in VisualApplets, and select the file.
-
Click on Open and confirm by clicking on Yes.
-
Wait until the new firmware is completely installed. You get an according message in microDiagnostics.
-
Follow the instructions in the message.
For detailed information how to flash your specific frame grabber, refer to the User Manual of your specific frame grabber (Flashing Applets onto marathon Frame Grabbers).
To test your applet and to set some first parameters, you can use the tool microDisplay:
-
Save the
*.hapfile you created in VisualApplets into the Framegrabber SDK installation directory:[Framegrabber SDK installation directory]/Hardware Applets. -
Start the tool microDisplay, either directly from VisualApplets by clicking on → ( F5 ), or via Windows START menu.
-
In the dialog I want to…, select Load Applet.
-
In the Load Hardware Applet dialog, select the frame grabber you want to use under Board. Immediately, all applets available for the selected board are displayed.
With microEnable 5, only one applet (the one you flashed your board with) will be available.
-
Select the
*.hapfile you want to use. -
Click on the Load button to load the selected applet (
*.hapfile) onto the frame grabber. -
Close the Load Hardware Applet dialog.
-
Configure the frame grabber using the parameter panel of the microDisplay program window.
When working with more than one camera, first select the port you are going to configure. Configure all ports you are using.
Set the parameters to your needs, e.g., image height and image width. To do so, right-click directly on the value and select Edit.
Configure specific operation modes you want to use (e.g., trigger settings).
-
Start image acquisition on the frame grabber by clicking on the button Grab and display an infinite number of frames.
The grabbed images are now displayed in microDisplay.
-
To stop the acquisition, click on the Stop button in microDisplay.
To start using the Applet in your own software (SDK):
-
In the Framegrabber API, use the call
Fg_Initto start the applet.Specify the path to the location of the
*.hapfile you created with VisualApplets.
|
Starting the Camera |
|---|---|
|
Depending on the type of camera interface, it might be helpful to start GenICam explorer tools as well in order to control the camera. For details, please refer to the Framegrabber SDK documentation. |
You have just successfully implemented your first VisualApplets design. If you are interested in a deeper step-by-step introduction into VisualApplets we recommend to read our tutorial which you can find in Tutorial and Examples.
If you want to learn more about the functionalities of the program, just proceed by reading the next chapters of this user manual in Basic Functionality. Here you will find all functions of VisualApplets explained in detail. In chapter The User Interface of VisualApplets, you can familiarize yourself with the user interface options of VisualApplets.
All information provided in the User Manual you can also access directly in VisualApplets. Click on a button in the program and you will be automatically directed to the respective explanations in the user manual.
If you prefer a directed tool introduction, Basler offers VisualApplets workshops and coaching. Feel free to contact us via Basler Sales.
