The HierarchicalBox operator is a special operator in VisualApplets that allows to structure designs. As the name implies, the operator has the function of a box. You can mark a part of your design and make it the content of a hierarchical box.
The hierarchical box is visible in the design as an operator instance (of operator HierarchicalBox). The content of the hierarchical box you can see and edit in an individual design window.
A hierarchical box contains a combination of operators and links and can connect them to an arbitrary number of input and output links. The use of HierarchicalBox modules allows you to
-
structure your design very clearly, and to
-
administrate groups of modules.
In the design panel, the HierarchicalBox module is displayed as an M-type operator (oval shape); nevertheless, its behavior depends on the operators inside the hierarchical box.
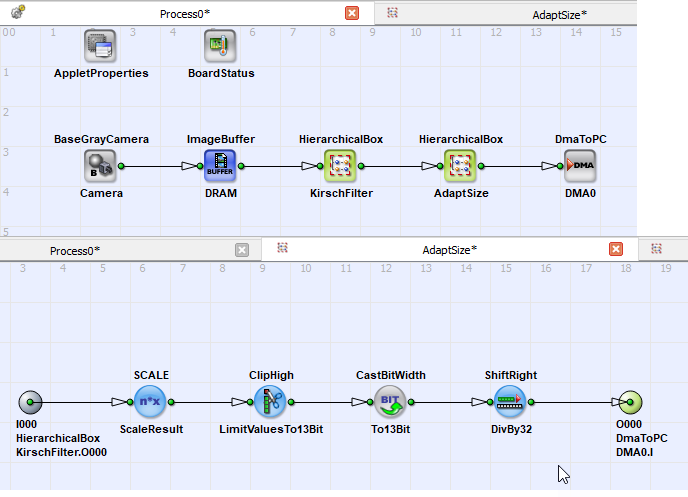
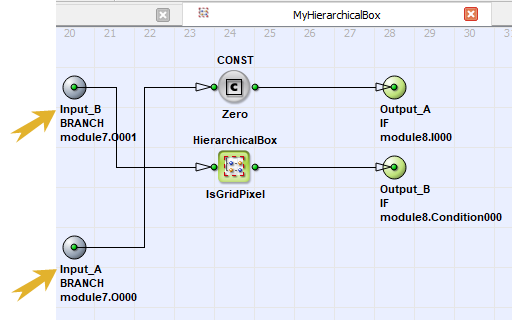
The following figure shows an example of a HierarchicalBox. As you can see, the operators included in the hierarchical box are displayed in a separate design window. Depending on the window settings, both diagrams can be viewed at the same time as shown in the example. See The User Interface of VisualApplets for more information on how to arrange diagram windows.
There are several ways to add a hierarchical box:
-
Making a part of your design a hierarchical box:
-
Select the modules of your design you want to assemble as hierarchical box. (Press the STRG key on your keypad and click on the modules you want to assemble.)
-
Keep the STRG key pressed and right-click on an empty part of the design window to open the context menu.
-
From the context menu, select .
A new hierarchical box is created that contains all selected modules and the according in- and out links.
-
Double-click on a hierarchical box to open the diagram window that shows the hierarchical box implementation.
-
-
Defining an empty hierarchical box:
-
Select the HierarchicalBox operator from the Base library and add it to your design, or
Right-click on an empty area in a diagram and select → , or
select → from the main menu, or
Select the icon
 in the Edit toolbar.
-
In the window that occurs, define the number of input and output links of your new HierarchicalBox.
-
Click .
The HierarchicalBox module is inserted into your diagram; it has the number of input and output ports you just specified.
-
Double-click on the hierarchical box module to open its design window.
-
Add the operators you want to have in your hierarchical box.
-
Connect the design in the box to the input and output ports of the box via links.
-
To go back to the design window of the process that contains the hierarchical-box module:

To step back in the hierarchy:
-
Select → ( Backspace ) or click the Window Up ボタン
 in the View toolbar.
To open the module properties:
-
Right-click on a hierarchical box and from the context menu, select "Properties". Here, you can see and edit the parameters of the hierarchical box that are available for parametrization.
For information how to make parameters deeply nestled within a protected hierarchical box (or within a protected hierarchical box that is part of another protected hierarchical box) visible and available at this level, see the Operator Reference, library "Parameters".
You can use hierarchical boxes more than once by copy & paste. Each instance of a hierarchical box is independent from its siblings,i.e., if you make changes to one of the copied hierarchical boxes, this has no impact on the others.
For information on how to use hierarchical boxes as library elements and protected library elements, see section 'Creating a User Library Element'.
You can add further input and output ports to your hierarchical box anytime. To add a port:
-
Navigate to the design window that shows the hierarchical box module.
-
With the mouse pointer, go to an input port (if you want to insert an input port), or to an output port (if you want to insert an output port) so that the port is highlighted.
-
Right-click on the port.
-
From the context menu, select or .

The new port is inserted. It is given a default name. To give an individual name to the port, use context menu item (see below).
You can delete input or output ports of your hierarchical box anytime. To delete a port:
-
Navigate to the design window that shows the hierarchical box module.
-
With the mouse pointer, go to the port you want to delete so that it is highlighted.
-
Right-click on the port.
-
From the context menu, select .
The port is deleted.
To enhance the readability of your design, you can give names to the input ports and output ports of a hierarchical box:
-
Navigate to the design window that shows the hierarchical box module.
-
With the mouse pointer, go on the port you want to re-name so that it is highlighted.
-
Right-click on the port you want to re-name.
-
From the context menu, select .
-
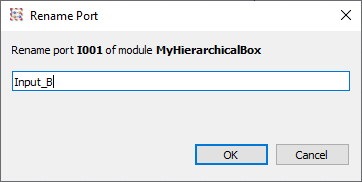
In dialog , enter a name for the port.
-
Click .
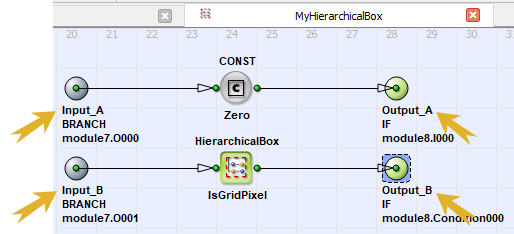
The new name is visible, for example, in the design window of the hierarchical box module:
In quite the same manner as renaming, you can re-order the ports of a hierarchical box module:
-
Navigate to the design window that shows the hierarchical box module.
-
With the mouse pointer, go on the port you want to change the position of so that it is highlighted.
-
Right-click on the port you want to re-order.
-
From the context menu, select or .
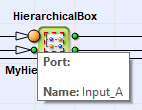
The order of the ports is swapped. This is visible, for example, in the design window of the hierarchical box module:
The re-arrangement of port order has no impact on the functionality of the hierarchical box. The re-arranged ports are linked to the same inner and outer design elements as before.
