C++プログラマーズガイド#
pylonを初めて使用する場合は、まずpylon C++プログラマーズガイドのはじめにセクションを読んで、pylon C++ APIに慣れておくことをBaslerはお勧めします。
C++プログラミングサンプル#
The C++ samples are located in the C:\Program Files\Basler\pylon\Development\Samples\Stereo_ace\C++ folder.
The C++ samples are located in the /opt/pylon/share/pylon/Samples/Stereo_ace/C++/ folder.
The C++ samples are located in the /opt/pylon/share/pylon/Samples/Stereo_ace/C++/ folder.
サンプル構築の前提条件#
- pylon 26.06 以降
- Visual Studio 2019 or above
- CMake 3.3 or above
- CMake 3.3 or above
- オプション:OpenCVライブラリ
- オプション:Point Cloud Library (PCL)
サンプルのビルド#
- Copy the Development\Samples\Stereo_ace\C++ folder to a location where you have write permissions.
- Launch Microsoft Visual Studio.
- Click the Open a local folder button, navigate to the Samples\Stereo_ace\C++ folder, and press the Select button.
Wait until Visual Studio has finished generating the CMake cache. Once the cache generation has succeeded, the samples can be built and executed.
Open a command shell and enter the following commands:
OpenCVまたはPCLが見つからない場合、CMakeは不足しているライブラリを必要とするサンプルのみをスキップします。その他のサンプルは引き続きビルドできます。
サンプルのビルドや実行で問題が発生した場合は、トラブルシューティングのトピックを確認してください。
OpenCVライブラリのインストール#
You can download OpenCV here: https://github.com/opencv/opencv/releases
Make sure that you download a version of the OpenCV library that is compatible with the Visual Studio version you are going to use. If there is no suitable prebuilt version available, you have to build OpenCV from sources using the Visual Studio version you want to use for building your application.
If CMake fails to find OpenCV, set the OpenCV_DIR variable to the folder containing the OpenCVConfig.cmake file.
Examples
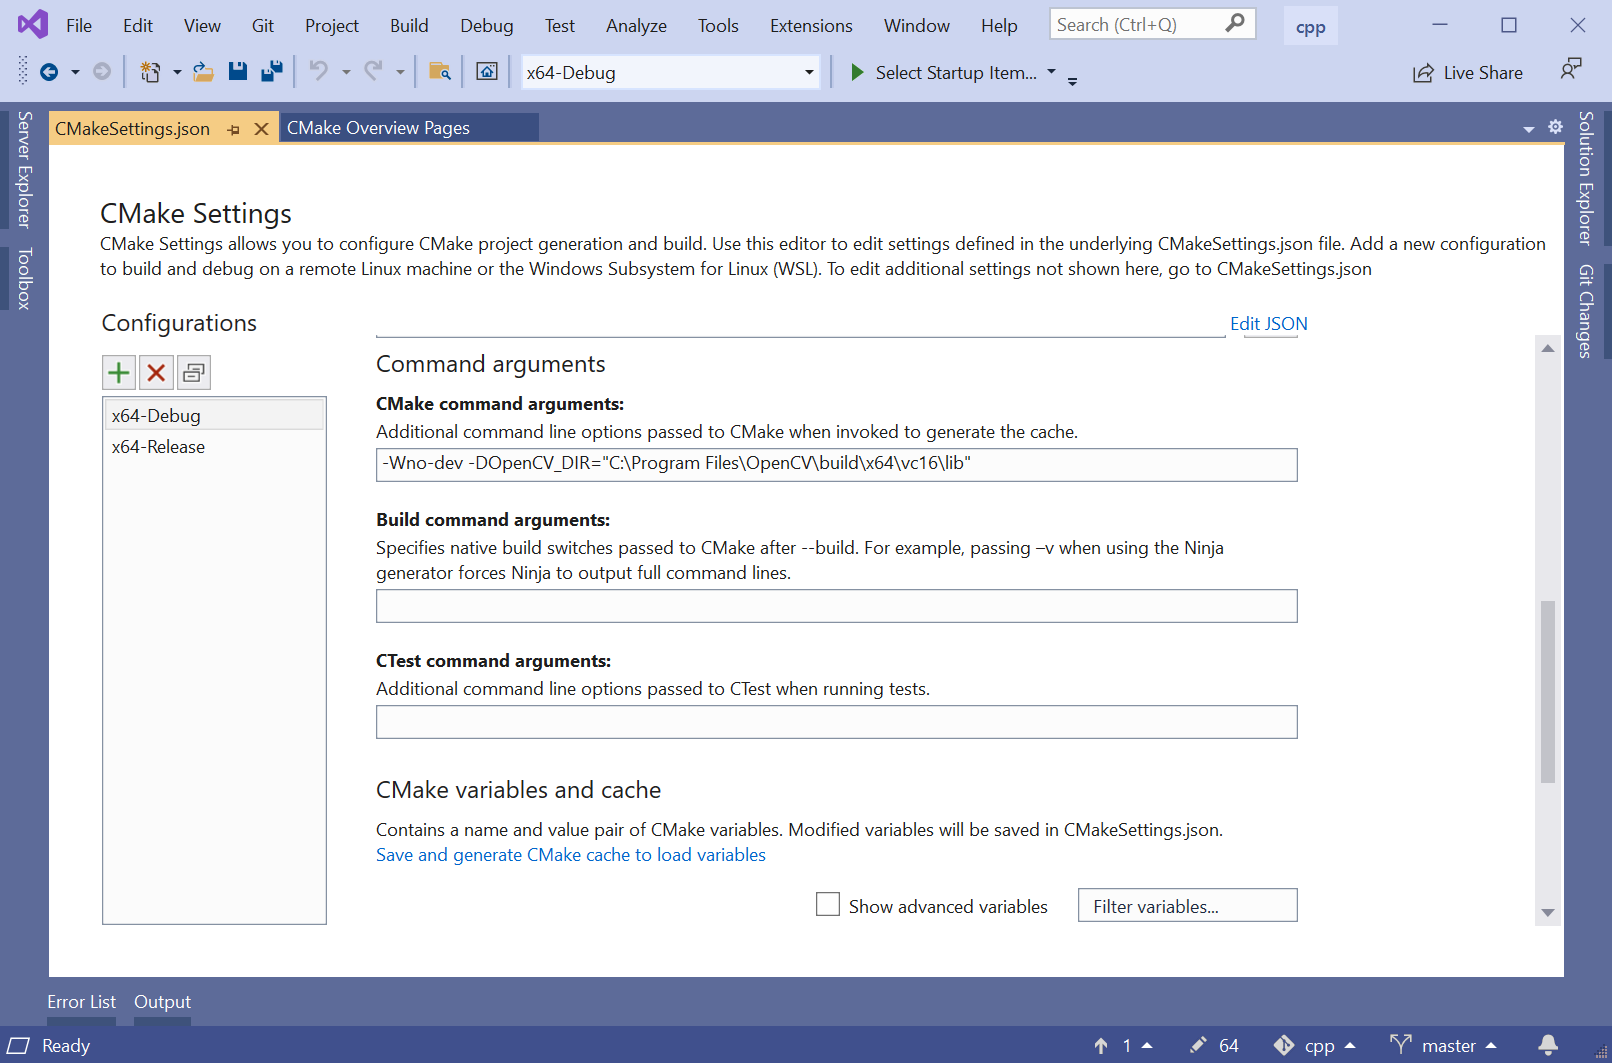
- Open the CMake Settings dialog (Project -> CMakeSettings for "Stereo ace samples")
- Enter the following command in the CMake command arguments field:
-DOpenCV_DIR="C:\Program Files\OpenCV\build\x64\vc16\lib" - Press Ctrl+S to save the changes.
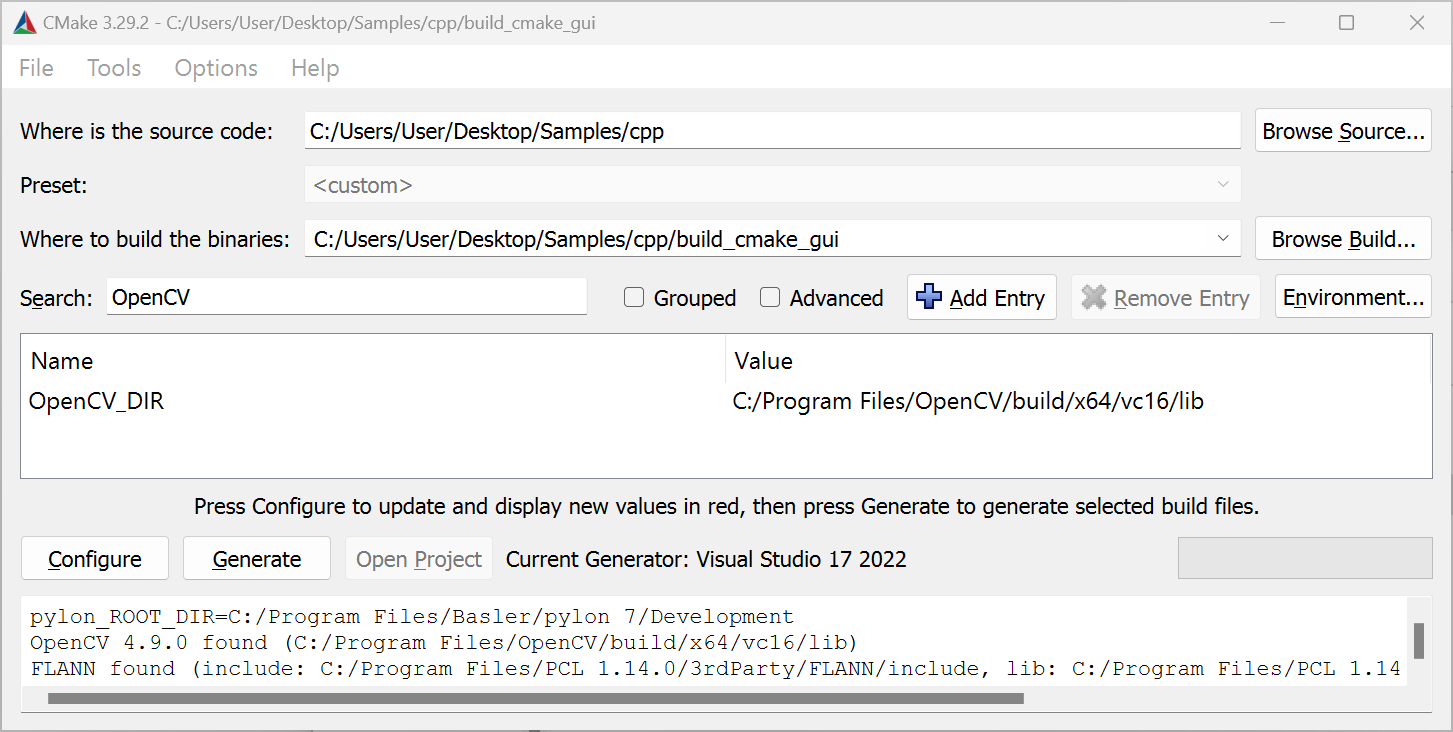
Before you can access the OpenCV_DIR in the CMake GUI, make sure that the Grouped check box is deselected in the CMake GUI.
Adding OpenCV to PATH Environment Variable#
You have to add the OpenCV bin directory to the PATH environment variable.
- Press the Win key.
- Type "environment".
- Click Edit environment variables for your account.
- In the User variables area, select Path.
- Click the Edit button.
- Click New.
- Enter the path of your OpenCV installation, e.g.:
C:\Program Files\OpenCV\build\x64\vc16\bin - Click OK.
If CMake fails to find the OpenCV library, you either have to install the libopencv development package or to build the OpenCV library from sources.
On Ubuntu systems, the libopencv development package can be installed by issuing the following command:
If you build the OpenCV library from sources and install it to a non-standard location, you can use the OpenCV_DIR CMake variable to specify the location where the OpenCVConfig.cmake files are located.
Example:
If CMake fails to find the OpenCV library, you either have to install the OpenCV development package or to build the OpenCV library from sources.
If you build the OpenCV library from sources and install it to a non-standard location, you can use the OpenCV_DIR CMake variable to specify the location where the OpenCVConfig.cmake files are located.
Example:
Point Cloud Libraryのインストール#
You can download the PCL All-in-one Installer for Windows here: https://github.com/PointCloudLibrary/pcl/releases
Make sure that you download a version of the PCL that is compatible with the Visual Studio version you are going to use.
If CMake fails to find the PCL, set the PCL_DIR variable to the folder containing the PCLConfig.cmake file.
Examples
- Open the CMakeSettings.json file (CMake -> Change CMake Settings -> "Stereo ace samples").
- Add
-DPCL_DIR=\"C:\\Program Files\\PCL 1.9.1\\cmake\"to thecmakeCommandArgslist:
- Open the CMake Settings dialog (Project -> CMakeSettings for "Stereo ace samples").
- Enter the following string in the CMake command arguments field:
-DPCL_DIR="C:\Program Files\PCL 1.14.0\cmake". - Press Ctrl+S to save the changes.
Before you can access the PCL_DIR in the CMake GUI, make sure that the Grouped check box is deselected in the CMake GUI.
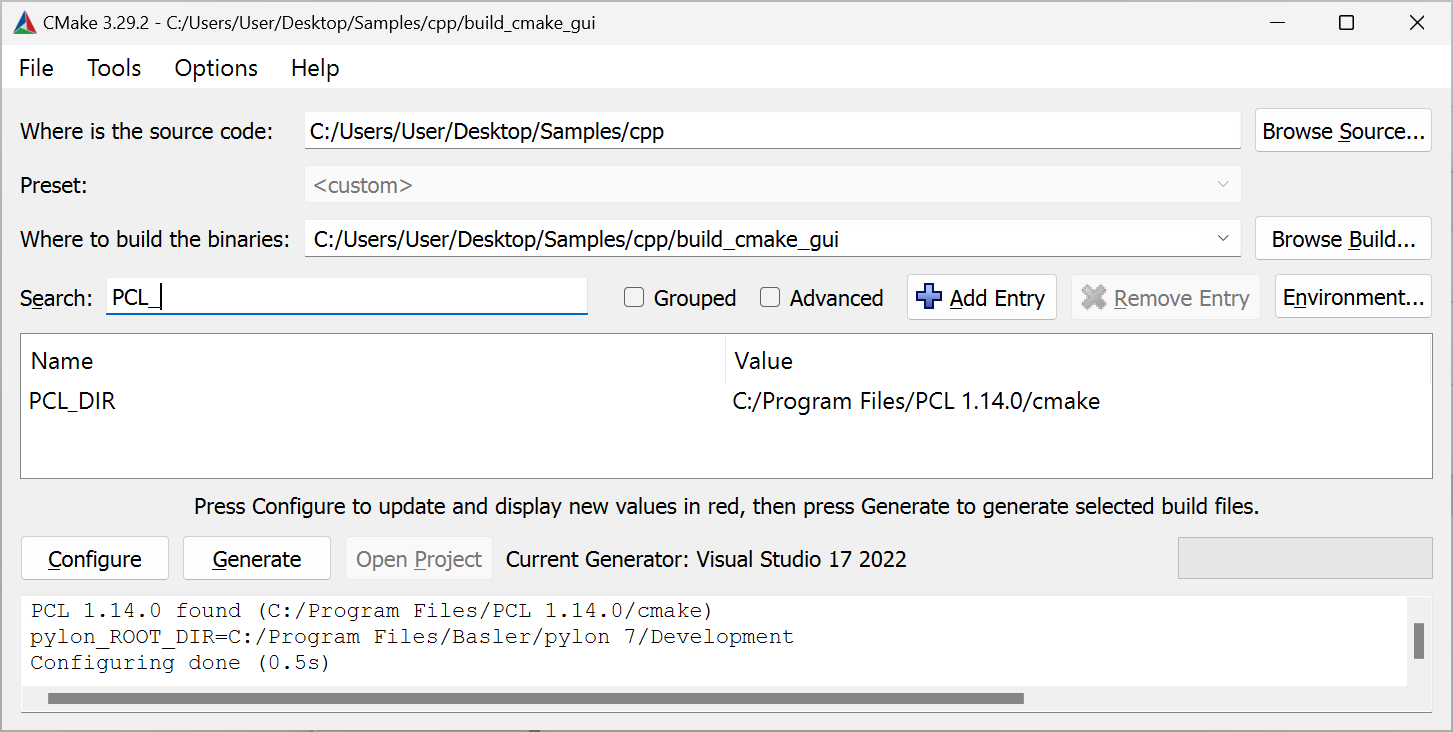
If the PCL is installed using the PCL All-in-one Installer, the installer takes care of adding the PCL bin directory to the PATH environment variable. If you're using a different installation method, you have to add the bin directory to the PATH environment variable yourself.
The PCL All-in-one Installer installs the OpenNI2.dll into the %ProgramFiles%\OpenNI2\Redist folder. The DLL is required at runtime. Either add this folder to your PATH environment variable, or copy the OpenNI2.dll to the folder the PCL binaries are located, e.g., %ProgamFiles%\PCL 1.13.0\bin.
If CMake fails to find the PCL library, you either have to install the libpcl development package or to build the PCL library from sources.
On Ubuntu systems, the libpcl development package can be installed by issuing the following command:
If you build the PCL from sources and install it to a non-standard location, the PCL_DIR CMake variable can be used to specify the location where the PCLConfig.cmake files is located.
Example:
Info
Samples using the Point Cloud Library (PCL) may crash depending on the versions of the PCL and VTK libraries installed on your system. The crash is due to a bug in the VTK libraries that are used by PCL for 3D visualization.
Source: https://github.com/PointCloudLibrary/pcl/issues/5237
Solution: PCL 1.13.1 contains fixes to work around the VTK bug.
Update to PCL 1.13.1 or higher. If required, uninstall the PCL libraries provided by your Linux distribution and build PCL version 1.13.1 or higher from sources (these can be retrieved from https://github.com/PointCloudLibrary/pcl).
If CMake fails to find the PCL library, you either have to install the PCL development package or to build the PCL library from sources.
If you build the PCL from sources and install it to a non-standard location, the PCL_DIR CMake variable can be used to specify the location where the PCLConfig.cmake files is located.
Example:
Info
Samples using the Point Cloud Library (PCL) may crash depending on the versions of the PCL and VTK libraries installed on your system. The crash is due to a bug in the VTK libraries that are used by PCL for 3D visualization.
Source: https://github.com/PointCloudLibrary/pcl/issues/5237
Solution: PCL 1.13.1 contains fixes to work around the VTK bug.
Update to PCL 1.13.1 or higher. If required, uninstall the PCL libraries provided by your Linux distribution and build PCL version 1.13.1 or higher from sources (these can be retrieved from https://github.com/PointCloudLibrary/pcl).
サンプル一覧#
- FirstSample: Stereo aceカメラの操作と3Dデータの取得に関する紹介。
- ParametrizeCamera: カメラパラメータへのアクセス方法について説明しています。
- DeviceRemovalHandling: デバイス取り外し時の処理について説明しています。
- OpenDeviceByIpAddress: IPアドレスのいずれかを使用してStereo aceカメラを開く方法を示しています。
- GrabDepthMap: 深度マップの取得と解釈の方法について説明しています。
- SavePointcloud: OpenCVを使用せずに、カラーポイントクラウドを.plyファイルに保存する方法について説明しています。
- SavePointcloudCV: OpenCVを使用して、輝度画像、視差画像、およびカラーポイントクラウドをファイルに保存する方法について説明しています。
- ShowPointcloud: Stereo aceカメラで取得したポイントクラウドを視覚化する方法について説明しています。
- TriggerLowLatency: カメラの輝度および深度解像度をHigh(2x2 Binning)に設定することで、レイテンシーを削減する方法を示しています。
- LeftAndRightIntensity: Stereo aceカメラから左右の輝度画像を取得する方法を示しています。
詳細については、C++サンプルディレクトリ内のサンプルコードを参照してください。
アプリケーションの構築方法#
Using Visual Studio Solutions#
Refer to the Common Settings for Building Applications with pylon section of the pylon C++ Programmer's Guide to learn how to set up a project for building applications using pylon.
CMake の使用#
Stereo ace用pylon Supplementary Packageには、以下が含まれます。 Findpylon.cmake pylonおよびStereo ace用pylon Supplementary Packageのインストール場所を特定するために使用されるモジュール。この検索モジュールは、以下をエクスポートします。 pylon::pylon CMakeターゲット。このターゲットを引数として渡します。 target_link_libraries。これにより、CMakeがインクルードパスやライブラリパスなどの設定を行います。
基本的な CMakeLists.txt CMakeファイルは次のようになります。
project (hello)

# Locate the CMake find module for pylon ...
# for Unix systems. All other OS PYLON_ROOT will be empty.
list(APPEND CMAKE_PREFIX_PATH $ENV{PYLON_ROOT})
# for Windows systems. All other OS PYLON_DEV_DIR will be empty.
list(APPEND CMAKE_PREFIX_PATH $ENV{PYLON_DEV_DIR})

find_package(pylon 12.0 REQUIRED)

add_executable(hello helloworld.cpp)
target_link_libraries(hello pylon::pylon)
project (hello)

# Locate the CMake find module for pylon ...
# for Unix system. All other OS PYLON_ROOT will be empty
list(APPEND CMAKE_PREFIX_PATH $ENV{PYLON_ROOT})
# for Windows system. All other OS PYLON_DEV_DIR will be empty
list(APPEND CMAKE_PREFIX_PATH $ENV{PYLON_DEV_DIR})

find_package(pylon 12.0 REQUIRED)

add_executable(hello helloworld.cpp)
target_link_libraries(hello pylon::pylon)
project (hello)

# Locate the CMake find module for pylon ...
# for Unix system. All other OS PYLON_ROOT will be empty
list(APPEND CMAKE_PREFIX_PATH $ENV{PYLON_ROOT})
# for Windows system. All other OS PYLON_DEV_DIR will be empty
list(APPEND CMAKE_PREFIX_PATH $ENV{PYLON_DEV_DIR})

find_package(pylon 12.0 REQUIRED)

add_executable(hello helloworld.cpp)
target_link_libraries(hello pylon::pylon)
Stereo ace用Instant Cameraクラス#
pylonには、カメラデバイスにアクセスするためのさまざまなタイプのクラスが用意されています。ローレベルの IPylon デバイスのほかに、カメラ用の便利なハイレベルAPIを提供する、いわゆる Instant Camera クラスがあります。
イメージ Pylon::CInstantCamera クラスは、すべてのBaslerカメラへの汎用アクセスを提供します。
Stereo aceカメラの場合、Stereo ace用pylon Supplementary Packageには Pylon::CStereoAceInstantCamera クラスが含まれています。Baslerは、便利なパラメータアクセスとStereo ace固有の機能を提供するため、Basler Stereo aceカメラにはこのクラスの使用を推奨しています。
次の機能を使用する場合: CBaslerUniversalInstantCamera クラスを使用する代わりに、 CStereoAceInstantCamera クラスを使用しても、Stereo aceカメラが提供するすべてのカメラパラメータの設定および取得を行うことができます。によって提供されるアクセサオブジェクトがない場合は、 CBaslerUniversalInstantCamera クラスを使用します。いわゆる 汎用パラメータアクセス pylon C++ Programmer's Guideの Generic Parameter Access セクションで説明されているように、名前でPropertyにアクセスします。
例:
using namespace Pylon;
GenApi::INodeMap& nodemap = camera.GetNodeMap();
CIntegerParameter depthSeg(nodemap, "BslDepthSeg" );
std::cout << "Segmentation: " << depthSeg.GetValue() << std::endl;
Stereo aceカメラを開いてアクセスする#
Stereo aceカメラオブジェクトを作成して開くには、3つのステップがあります。
- アクセスするカメラのカメラオブジェクトを作成します。
通常、次のクラスのインスタンスを作成する必要があります。Pylon::CStereoAceInstantCameraクラス。 - 必要に応じてStereo ace固有の設定イベントハンドラーを登録します(詳細については、DeviceRemovalHandling.cppサンプルを参照してください)。
- アプリケーションで次のメソッドを呼び出します。
Open()メソッドを使用して、カメラデバイスとの接続を確立します。
次の例は、これらのステップを示しています。
#include <pylon/PylonIncludes.h>
#include <pylon/StereoAceInstantCamera.h>
using namespace Pylon;

// ...

// Before using any pylon methods, the pylon runtime must be initialized.
PylonInitialize();

try {
    // 1: Create a camera object for the first available Stereo ace camera.
    CUniversalInstantInterface instantInterface(
        CInterfaceInfo().SetDeviceClass(Pylon::BaslerGenTlStaDeviceClass));
    CStereoAceInstantCamera camera(instantInterface.CreateFirstDevice());

    // 2. Register a default configuration if available (see samples).
    // camera.RegisterConfiguration(...);

    // 3. Open the camera, i.e., establish a connection to the camera device.
    camera.Open();

    // Use the camera.
    std::cout << "Connected to camera "
        << camera.GetDeviceInfo().GetFriendlyName() << std::endl;
    // ...

    // Close the connection.
    camera.Close();
} catch (const GenICam::GenericException& e) {
    std::cerr << "Exception occurred: " << std::endl
        << e.GetDescription() << std::endl;
}

// Releases all pylon resources.
PylonTerminate();
エラーが発生した場合は、次から継承された例外がスローされます。 GenICam::GenericException がスローされます。
一般的なエラー状態:
- Stereo aceカメラが見つからない場合:
CreateFirstDevice()関数が例外をスローします。 - 別のアプリケーションによって既に開かれているなどの理由でカメラを開くことができない場合:
Open()メソッドが例外をスローします。
次のサブセクションでは、カメラオブジェクトの作成およびオープン方法に関する詳細な情報を提供します。
最初に見つかったStereo aceカメラのカメラオブジェクトの作成#
設定するピクセルのカラーコンポーネントを指定するには、 Pylon::CTlFactory::CreateFirstDevice() メソッドを使用して、最初に見つかったStereo aceカメラのカメラオブジェクトを作成します。競合を防ぐために、常にStereo aceカメラのpylonデバイスクラス識別子を指定してください。 CreateFirstDevice() からカメラオブジェクトを作成します:
CUniversalInstantInterface instantInterface(
    CInterfaceInfo().SetDeviceClass(Pylon::BaslerGenTlStaDeviceClass));
CStereoAceInstantCamera camera(instantInterface.CreateFirstDevice());
Stereo aceカメラが見つからない場合は、カメラおよびネットワークアダプターのIP設定を確認してください。ネットワークの設定の詳細については、Basler Product DocumentationのNetwork Configurationトピックを参照してください。
特定のStereo aceカメラのカメラオブジェクトの作成#
特定のStereo aceカメラを開く場合は、デバイスクラスに加えて他のPropertyを指定できます。
シリアル番号で特定のStereo aceカメラを開くには、次の行を使用します。
CUniversalInstantInterface instantInterface(
    CInterfaceInfo().SetDeviceClass(Pylon::BaslerGenTlStaDeviceClass));
CStereoAceInstantCamera camera(instantInterface.CreateFirstDevice(
    CDeviceInfo().SetSerialNumber("40410842")));
ユーザー定義名でStereo aceカメラを開くには、次の行を使用します。
CUniversalInstantInterface instantInterface(
    CInterfaceInfo().SetDeviceClass(Pylon::BaslerGenTlStaDeviceClass));
CStereoAceInstantCamera camera(instantInterface.CreateFirstDevice(
    CDeviceInfo().SetUserDefinedName("MyCamera")));
User-Defined Names
を使用して、カメラにユーザー定義名を割り当てることができます。 DeviceUserID パラメータ。これは pylon 3D Viewer または pylon API で実行できます:
IPアドレスによるデバイスの作成
現在、以下の方法でカメラのIPアドレスを指定することはできません: CreateFirstDevice() 関数。その理由は現在、以下の理由によります: Pylon::CDeviceInfo() クラスには、カメラのIPアドレスに関する情報が含まれていません。
イメージ OpenDeviceByIpAddress サンプルは、IPアドレスを使用して Stereo ace カメラを開く方法を示しています。
目的の Stereo ace カメラが見つからない場合は、プロパティに使用している値が正しいか確認し、カメラおよびネットワークアダプターのIP設定を確認してください。ネットワークの設定方法の詳細については、Basler製品ドキュメントの ネットワーク設定 のトピックを参照してください。
Stereo aceカメラの列挙#
次のコードスニペットは、接続されているすべての Stereo ace カメラのリストを取得する方法を示しています。リストの各要素について、カメラが開き、いくつかのカメラパラメータ値が出力されます。
#include <pylon/PylonIncludes.h>
#include <pylon/StereoAceInstantCamera.h>
#include <ostream>
using namespace Pylon;

// ....

// Before using any pylon methods, the pylon runtime must be initialized.
PylonInitialize();

// ....

// Enumerate all Stereo ace cameras.
CTlFactory& TlFactory = CTlFactory::GetInstance();
DeviceInfoList_t lstDevices;
DeviceInfoList_t filter;
filter.push_back(CDeviceInfo().SetDeviceClass(BaslerGenTlStaDeviceClass));
TlFactory.EnumerateDevices(lstDevices, filter);
if (!lstDevices.empty()) {
    DeviceInfoList_t::const_iterator it;
    for (it = lstDevices.begin(); it != lstDevices.end(); ++it) {
        std::cout << it->GetFullName();

        // Open camera, i.e., establish a connection to the camera device.
        CStereoAceInstantCamera camera(CTlFactory::GetInstance().CreateDevice(*it));
        // Optionally register configuration(s) here.
        camera.Open();

        // Print out some information.
        std::cout << "Connected to camera "
            << camera.GetDeviceInfo().GetFriendlyName() << std::endl;
        std::cout << "IP Address: "
            << camera.GevCurrentIPAddress.GetValue() << std::endl;
        std::cout << "User-defined name: "
            << camera.DeviceUserID.GetValue() << std::endl;
        std::cout << "Serial Number: "
            << camera.DeviceSerialNumber.GetValue() << std::endl;
}  // The connection will be closed automatically when leaving the scope here.
else {
    std::cerr << "No devices found!" << std::endl;
}
カメラコンフィグレーションハンドラーの登録#
pylon Instant Camera クラスを使用すると、特定のイベント(例えば、以下のイベントが発生したときなど)でカメラ設定を適用するために使用できる設定イベントハンドラーオブジェクトを登録できます: Open() メソッドが呼び出されます。
次の例は、追加の設定を適用する設定イベントハンドラーを登録する方法を示しています:
class MyConfigurationHandler : public StereoAceConfigurationEventHandler
{
public:
    // Sets exposure time to minimum possible value.
    void OnOpened(CStereoAceInstantCamera& camera) override
    {
        camera.ExposureTime.SetToMinimum();
    }
};

// ....

// Then, register configuration event handlers.
camera.RegisterConfiguration(
      new MyConfigurationHandler,
      RegistrationMode_Append, Cleanup_Delete);

// ....

camera.Open(); // Configurations will be applied.
pylonカメライベントハンドラークラスの詳細については、pylon C++ Programmer's Guide の Instant Camera Event Handler Basics セクションを参照してください。
設定イベントハンドラーを提供して目的の設定を適用したくない場合は、次のメソッドを呼び出した後、いつでも変更したいパラメータを設定できます: CStereoAceInstantCamera::Open() メソッド。
カメラパラメータ値の設定および取得方法については、カメラのパラメータ設定 セクションを参照してください。
カメラへの接続#
カメラオブジェクトを作成し、設定イベントハンドラーを登録した後、次のメソッドを呼び出すことでカメラとの接続が確立されます: CStereoAceInstantCamera::Open() メソッド。
接続は、次のメソッドが呼び出されるまで維持されます: CStereoAceInstantCamera::Close() メソッドが呼び出されます。のデストラクタ CStereoAceInstantCamera 自動的に呼び出されます Close() 明示的に呼び出されていない場合。
カメラからのハートビートリクエストが定期的に受信されない場合、カメラは接続を切断します。ハートビートリクエストの欠落は、アプリケーションがクラッシュした場合や、デバッガーによって中断された場合に発生します。
カメラのパラメータ設定#
pylon APIを使用してカメラパラメータにアクセスする方法を習得するには、pylon C++ Programmer's Guide の Accessing Parameters セクションを参照してください。
pylon C++ サンプルの Parametrize_NativeParameterAccess および Parametrize_GenericParameterAccess は、pylonを使用してカメラパラメータにアクセスするための一般的な方法を示しています。
次のコードサンプルは、使用して、よく使用される Stereo ace 固有のカメラパラメータを設定および取得する方法を示しています: CStereoAceInstantCamera クラス。
// Include files to use the pylon API
#include <pylon/PylonIncludes.h>
#include <pylon/StereoAceInstantCamera.h>

// Namespaces for using the pylon API and the Stereo ace camera parameters
using namespace Pylon;
using namespace StereoAceCameraParams_Params;


// Set the exposure time of the camera.
camera.ExposureTime.SetValue(5000); // us

// Set the gain.
camera.Gain.SetValue(0.0);

// Set the illumination mode (e.g., AlwaysActive, AlternateActive, Off).
camera.BslIlluminationMode.SetValue(BslIlluminationMode_AlwaysActive);

// Set the illumination strength (0.0 ... 1.0).
camera.BslIlluminationStrength.SetValue(1.0);

// Set the minimum and maximum depth for the working area.
camera.BslDepthMinDepth.SetValue(200); // mm
camera.BslDepthMaxDepth.SetValue(2000); // mm

// Set the output resolutions.
CEnumParameter(camera.GetNodeMap(), "BslDepthResolution").SetValue("High");
CEnumParameter(camera.GetNodeMap(), "BslIntensityResolution").SetValue("Full");

// The producer derives the internal binning and scaling settings automatically.

// Print out current parameter values.
std::cout << "Exposure Time            : "
    << camera.ExposureTime.GetValue() << std::endl;
std::cout << "Gain                     : "
    << camera.Gain.GetValue() << std::endl;
std::cout << "Illumination Mode        : "
    << camera.BslIlluminationMode.GetValue() << std::endl;
std::cout << "Illumination Strength    : "
    << camera.BslIlluminationStrength.GetValue() << std::endl;
std::cout << "Min Depth                : "
    << camera.BslDepthMinDepth.GetValue() << std::endl;
std::cout << "Max Depth                : "
    << camera.BslDepthMaxDepth.GetValue() << std::endl;
std::cout << "Depth Resolution         : "
    << CEnumParameter(camera.GetNodeMap(), "BslDepthResolution").ToString() << std::endl;
std::cout << "Intensity Resolution     : "
    << CEnumParameter(camera.GetNodeMap(), "BslIntensityResolution").ToString() << std::endl;
pylon 3D Viewer には Documentation ペインが用意されています。Features ペインでカメラパラメータを選択すると、Documentation ペインに、選択したパラメータに関する情報や、そのカメラパラメータの値を取得および設定する方法を示す C++ および C# のコードスニペットが表示されます。
データの取得#
pylon APIを使用したデータの取得方法については、pylon C++プログラマーガイドの画像の取得セクションを参照してください。
pylonでは、取得された画像はGrabResultsと呼ばれるデータ構造として表されます。Stereo aceカメラによって取得されたGrabResultsには、複数のコンポーネントが含まれています。デフォルトでは、各GrabResultには輝度画像、視差マップ、および追加情報が格納されます。
// Enable disparity maps by enabling the Disparity component and setting the
// appropriate pixel format.
camera.ComponentSelector.SetValue(ComponentSelector_Disparity);
camera.ComponentEnable.SetValue(true);
詳細については、Basler製品ドキュメントの Component Selector および Pixel Format のトピックを参照してください。
グラブーループ#
pylonは、グラブループを設定するためのさまざまなアプローチをサポートし、メモリバッファを処理するためのさまざまなストラテジを提供します。
詳細については、pylon C++プログラマーガイドの画像の取得セクションを参照してください。
次のコードスニペットは、以下を使用した一般的なグラブループを示しています。 CStereoAceInstantCamera クラス:
#include <pylon/PylonIncludes.h>
#include <pylon/StereoAceInstantCamera.h>

using namespace Pylon;
using namespace StereoAceCameraParams_Params;


PylonInitialize();

CUniversalInstantInterface instantInterface(
    CInterfaceInfo().SetDeviceClass(Pylon::BaslerGenTlStaDeviceClass));
CStereoAceInstantCamera camera(instantInterface.CreateFirstDevice());
camera.Open();

size_t nBuffersGrabbed = 0;

// This smart pointer will receive the grab result data.
CGrabResultPtr ptrGrabResult;

camera.StartGrabbing();

while (camera.IsGrabbing() && nBuffersGrabbed < 10) {
    // Wait for an image and then retrieve it. A timeout of 1000 ms is used.
    camera.RetrieveResult(1000, ptrGrabResult, TimeoutHandling_ThrowException);

    // Data grabbed successfully?
    if (ptrGrabResult->GrabSucceeded()) {
        nBuffersGrabbed++;
        // Access the data.
        // ...existing code...
    } else {
        // Error handling
        std::cerr << "Grab error occurred: "
            << ptrGrabResult->GetErrorDescription() << std::endl;
    }
}
// Clean-up
camera.StopGrabbing();
camera.Close();
コンポーネントへのアクセス#
GrabResultの個々の画像コンポーネントにアクセスするには、次のメソッドを使用します。 Pylon::CGrabResultData::GetFirstImageDataComponent() メソッドを使用して、目的のコンポーネントタイプを指定します。このメソッドは、深度値などの画像データとそのメタデータを保持する Pylon::CPylonDataComponent を返します。
パラメーターを throwIfNotFound 引数を false に渡すと、欠落しているコンポーネントに対して例外をスローする代わりに無効なコンポーネントが返されます。データにアクセスする前に、常に CPylonDataComponent::IsValid() メソッドを使用して、要求されたコンポーネントが見つかったかどうかを確認してください。
複数のコンポーネントを含むGrabResultsへのアクセス方法についての詳細は、pylon C++プログラマーズガイドの「Advanced Topics」章の Multi-Component Grab Results セクションを参照してください。
例:
if (ptrGrabResult->GrabSucceeded()) {
    const auto intensityComponent =
        ptrGrabResult->GetFirstImageDataComponent(
            EComponentType::ComponentType_Intensity, 0, false);
    if (!intensityComponent.IsValid()) {
        throw std::runtime_error(
            "Buffer doesn't contain an intensity component.");
    }

    const auto disparityComponent =
        ptrGrabResult->GetFirstImageDataComponent(
            EComponentType::ComponentType_Disparity, 0, false);
    if (!disparityComponent.IsValid()) {
        throw std::runtime_error(
            "Buffer doesn't contain a disparity component.");
    }

} else {
    std::cerr << "Grab error: " << ptrGrabResult->GetErrorCode() << " "
              << ptrGrabResult->GetErrorDescription() << std::endl;
}