Flat-Field Correction(pylon Viewer)#
This feature complements the Column-Based Flat-Field Correction camera feature. An easy-to-use 3-step wizard guides you through the process of calibrating your camera.
The feature is only available on Basler boost V cameras.
仕組み#
Non-uniformities in images are caused by dark currents and differing light sensitivities of the sensor pixels. This is a common effect in digital imaging. Flat-field correction minimizes these image artifacts by correcting the original pixel values.
To calibrate the camera, a sequence of dark field and bright field images are captured and evaluated to generate the correction data for removing dark signal non-uniformities (DSNU) and photo response non-uniformities (PRNU) from the images you acquire.
After the correction data have been generated, you have to upload them to the camera's flash memory. To use the correction data during image acquisition, you have to enable the desired flat-field correction mode. To do this, follow the instructions in the Flat-Field Correction topic.
始める前に#
You need the following items before you start the calibration:
- An appropriate object to completely cover the lens, e.g., the lens cap
- A target with a uniform background, e.g., a white sheet of paper
情報
- Acquire the dark and bright field images in your actual application environment.
- Calibration must be repeated if you change any part of the imaging system, including the camera unit, lighting, or optics.
カメラのキャリブレーション#
- Open the camera in the Devices pane.
- Right-click the camera.
If the camera supports the feature, the Flat-Field Correction option is available in the shortcut menu. - Click Flat-Field Correction to open the wizard.
Step 1: Dark Signal Non-Uniformity (DSNU) Correction#
- Cover the lens, e.g., by placing a plastic cap on the lens, to prevent any light hitting the sensor.
- Click Generate Correction Data.
A series of 3 to 5 dark images is taken and evaluated. The resulting correction data are generated and placed in the clipboard. - Nextをクリックします。
情報
To generate good correction data, the Width and Height parameters will be set to their maximum values and the pixel format will be set to Mono 8. When you close the wizard, the original settings will be restored.
Step 2: Photo Response Non-Uniformity (PRNU) Correction#
- Point the camera at a bright, homogeneously illuminated surface, e.g., by placing a white sheet of paper in the camera's entire field of view.
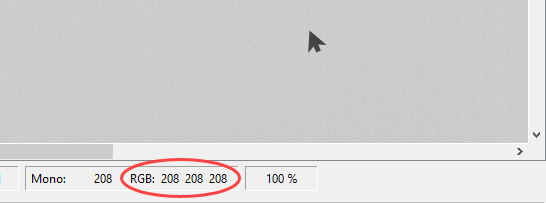
- In the feature tree, adjust the exposure time to achieve a gray value level close to 70 % (RGB 200, 200, 200).
- Acquire an image.
-
Check the RGB values by pointing the mouse at individual pixels in the image display area.
Alternatively, you can open the histogram to determine the mean gray value.
-
If you're not happy with the gray value level, keep adjusting the exposure time, acquiring images, and checking the gray value level until you're satisfied.
- Click Generate Correction Data.
A series of 3 to 5 bright images is taken and evaluated. The resulting correction data are generated and placed in the clipboard.
Step 3: Upload Correction Data#
- Click Upload to upload the DSNU and PRNU correction data to the camera.
- After the correction data have been uploaded successfully, click Finish to close the wizard.
The correction data have been uploaded to the camera's flash memory.
次のステップ#
When you're ready to perform flat-field correction, follow the instructions in the Flat-Field Correction topic to enable the desired correction mode.