はじめに(Smart blaze)#
Smart blazeカメラの初期セットアップとIP設定の詳細については、カメラのインストール(blaze)のトピックを参照してください。
情報
このドキュメント全体を通して、以下を置き換えてください ${cameraip} で設定したIPアドレスを使用します pylon IP Configurator。便宜上、次の行をコンピューターの ~/.bashrc ファイルに追加できます(IPアドレスをご自身の実際のIPアドレスに置き換えてください)。
これにより、このトピックのコマンドを変更せずにそのままターミナルにコピー&ペーストして実行できるようになります。この行を追加した後は、設定を再読み込みすることを忘れないでください。
カメラのセットアップとIP設定#
Smart blaze VM Web Interfaceへのアクセス#
Smart blazeには、Debian Trixieベースのデフォルトの仮想マシンが付属しています。
Smart blaze VM Control web interfaceを使用して、VMの制御やステータスの確認を行うことができます。Webインターフェイスにアクセスするには、ターミナルに次のコマンドを入力します。
これによりデフォルトのWebブラウザが開き、Smart blaze VM ControlのログインWebインターフェイスが表示されます。ログインするにはデフォルトのパスワードを入力します。デフォルトのパスワードはカメラのラベルに記載されています。セキュリティ上の理由から、Baslerでは初回ログイン後にパスワードを変更することをお勧めします。変更するには、WebインターフェイスのChange Passwordボタンをクリックします。
現在のパスワードを入力すると、Smart blaze VM ControlのWebインターフェイスが表示されます。
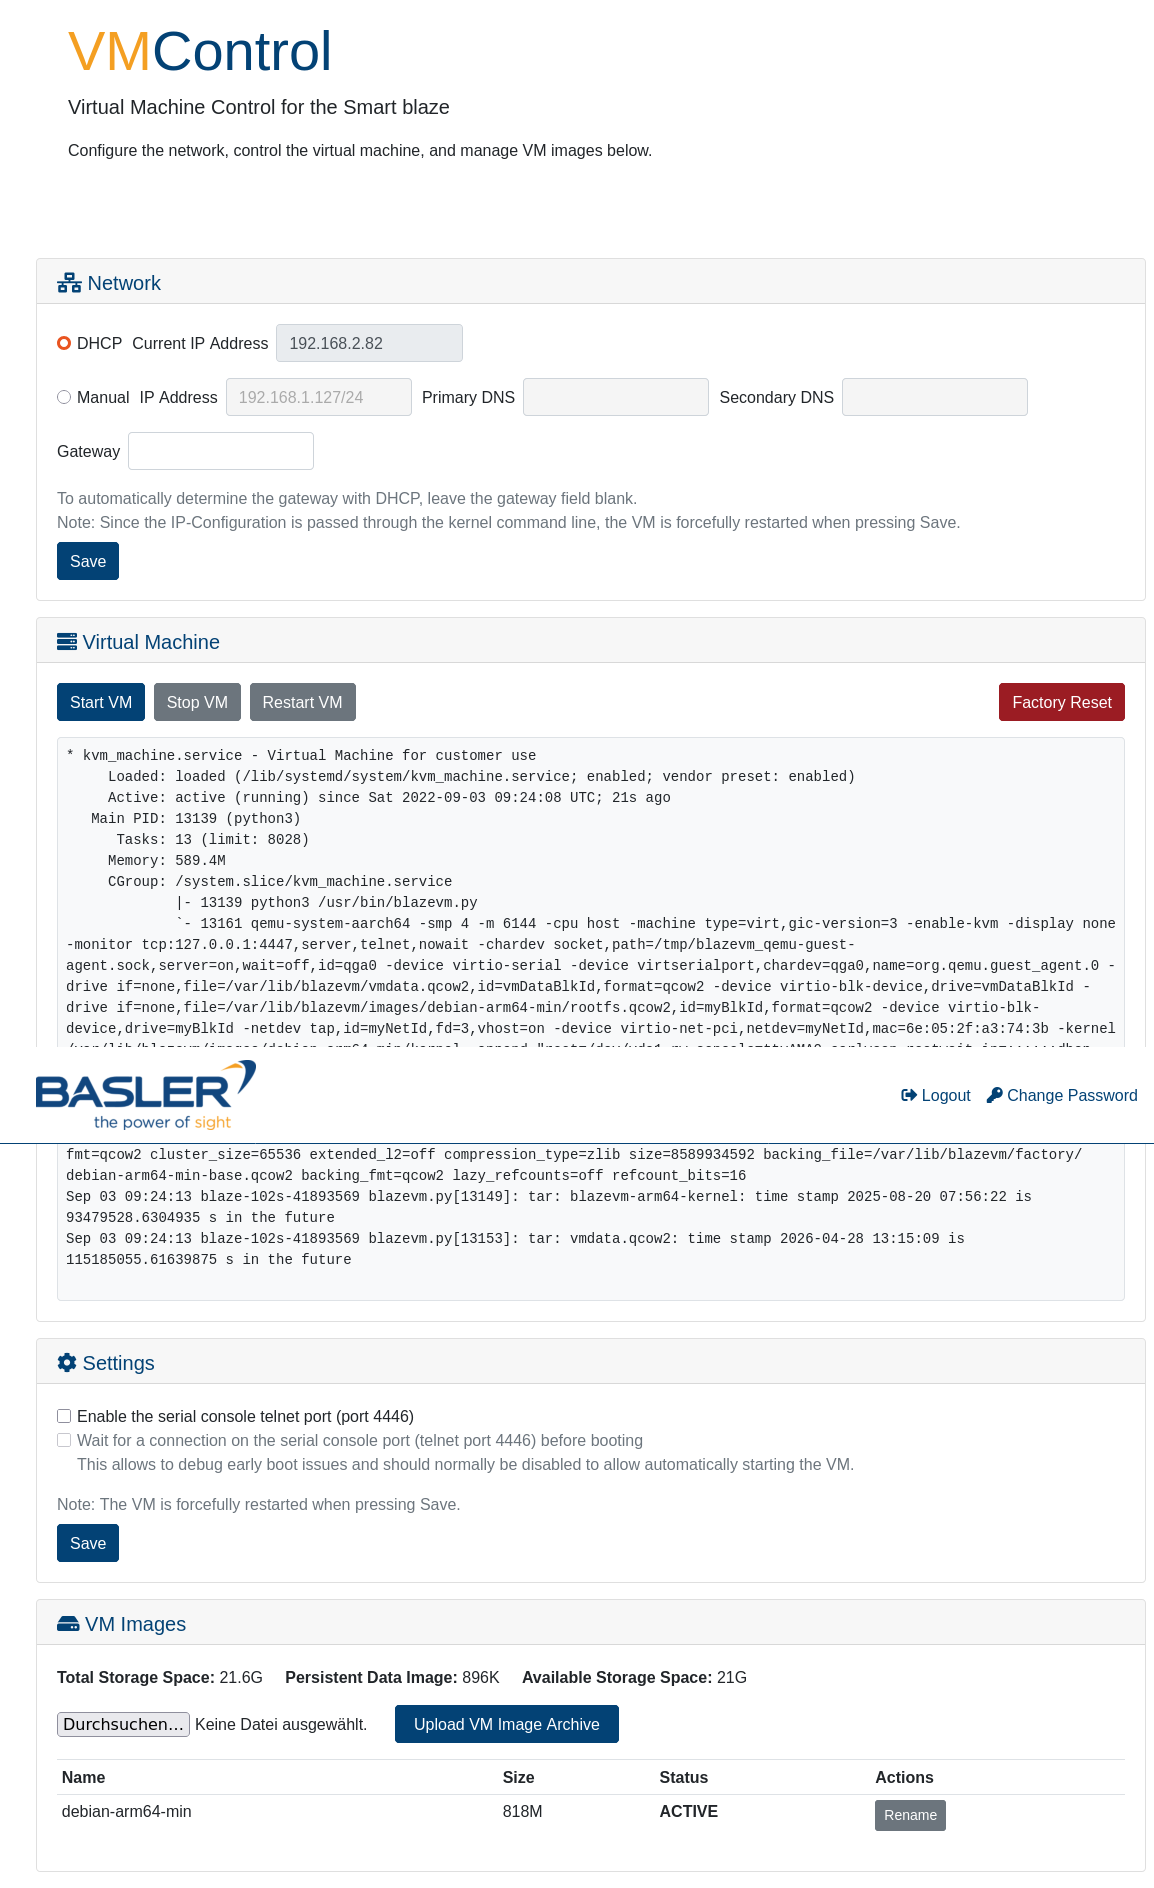
VMの実行中、ステータス情報にkvm_machine.serviceがロードされ、アクティブになっていることが示されます。情報エリアには文字列Active: active (running)が含まれている必要があります。
デフォルトのVMを初めて使用する前に、ポップアップ表示されるメッセージダイアログで手動により起動を確認する必要があります。
VMへのIPアドレスの割り当て#
デフォルトでは、VMはDHCP経由でIPアドレスの取得を試みます。カメラがコンピュータに直接接続されており、DHCPサーバーを利用できない場合、この処理は失敗します。その場合は、Smart blaze VM Control Webインターフェイスを使用して、静的IPアドレスを手動で設定してください。
-
手動でのIPアドレス設定を行う際、IP Address入力フィールドにIPアドレスを入力するフォーマットは次のとおりです。
a.b.c.d/maskbits
末尾のマスクビット値は、サブネットマスクで設定されるビット数を定義します。例:
192.168.1.127/24を入力すると、次の設定がVMに適用されます。
IPアドレス:192.168.1.127
サブネットマスク:255.255.255.0 -
手動IP設定用のプライマリおよびセカンダリドメインネームサーバー(DNS)を次の形式で入力するか、空欄のままにします。
a.b.c.d - ゲートウェイを次の形式で入力するか、空欄のままにします。
a.b.c.d
フィールドを空欄のままにすると、DHCPによって提供されたゲートウェイが使用されます。値を入力した場合は、そのゲートウェイが手動IP設定に使用されます。
DHCPセットアップのための現在のIPアドレスの表示#
機能しているDHCP設定がある場合、VMはDHCPサーバーからIPアドレスを自動的に取得します。割り当てられたIPアドレスを確認するには、いくつかの方法があります。
Smart blaze VM Control Web Interfaceの使用(推奨)#
VMにqemu-guest-agentパッケージがインストールされている場合、Smart blaze VM Control WebインターフェイスはVMの現在のIPアドレスを自動的に表示できます。qemu-guest-agentは、ゲストVM内で実行され、ネットワーク構成を含むゲストVMに関する情報をホストシステムに提供するヘルパーデーモンです。
情報
qemu-guest-agentがVMにインストールされ実行されている場合、IPアドレスをSmart blaze VM Control Webインターフェイスに表示できます。エージェントがインストールされていない場合、Webインターフェイスは、VMがネットワーク経由でblazeホストシステムと通信する場合にのみ、VMの現在のIPアドレスを取得できます。
qemu-guest-agentパッケージは、VMのビルドプロセス中にインストールされるように設定されています。これは、blazevm.xmlファイルで指定されています。このファイルは、デフォルトのインストールディレクトリ(/opt/pylon/share/pylon/Samples/blaze/smartblaze/vm/elbe/blazevm.xml)にあります。
カスタムVMイメージをビルドする場合は、設定ファイルのパッケージリストにqemu-guest-agentが含まれていることを確認してください。
エージェントがインストールされ起動された後、Smart blaze VM Control Webインターフェイスは、ステータス情報エリアにVMの現在のIPアドレスを自動的に表示します。
ルーター設定の確認#
VMにどのIPアドレスが割り当てられたかを確認するもう一つの方法は、ルーターのDHCPクライアントリストまたは設定インターフェイスを確認することです。
Telnet経由でのVM Boot Consoleへの接続#
qemu-guest-agentがインストールされていない場合や、直接アクセスしたい場合は、VMのブートコンソールに接続します。これを有効にするには、WebインターフェイスでEnable the serial console telnet portチェックボックスがオンになっていることを確認してください。その後、Telnet経由でコンソールにアクセスできます。
次のユーザー名でログインします root およびカメラのラベルに記載されているパスワードを使用してログインします。次のコマンドを入力してIPアドレスを確認します。
出力は次のようになります(実際のIPアドレスは異なります)。
1: lo: <LOOPBACK,UP,LOWER_UP> mtu 65536 qdisc noqueue state UNKNOWN group default qlen 1000
    link/loopback 00:00:00:00:00:00 brd 00:00:00:00:00:00
    inet 127.0.0.1/8 scope host lo
       valid_lft forever preferred_lft forever
2: eth0: <BROADCAST,MULTICAST,UP,LOWER_UP> mtu 1500 qdisc pfifo_fast state UP group default qlen 1000
    link/ether 3e:41:20:7e:d2:ba brd ff:ff:ff:ff:ff:ff
    inet 192.168.1.127/24 brd 192.168.1.255 scope global eth0
       valid_lft forever preferred_lft forever
SSH経由でのVMへの接続#
情報
次と同様に ${cameraip} 変数、 ${vmip} は、カメラ上で実行されているVMのIPアドレスを参照するために、このマニュアル全体で使用されます。利便性を高めるために、次の行を ~/.bashrc ファイルに追加してください(IPアドレスに合わせて調整してください)。
VMのIPアドレスを取得したら、次のユーザー名を使用してSSH経由でVMに接続できます root およびカメラのラベルに印刷されているパスワードです:
次のコマンドを実行して、 htop 仮想マシン内で何が実行されているかを確認できます:
$ htop
    0[|                                   0.7%] Tasks: 15, 2 thr, 66 kthr; 1 running
    1[|                                   0.6%] Load average: 0.00 0.00 0.00
    2[|                                   2.0%] Uptime: 17:37:58
    3[|                                   0.6%]
  Mem[|||||||                      71.5M/5.79G]
  Swp[                                   0K/0K]

  [Main] [I/O]
    PID USER       PRI  NI  VIRT   RES   SHR S  CPU%-MEM%   TIME+  Command
    643 root        20   0  4740  3156  2428 R   2.6  0.1  0:00.16 htop -M
      1 root        20   0  164M 11032  8308 S   0.0  0.2  1:06.60 /sbin/init
    141 root        20   0 33368 10308  9300 S   0.0  0.2  0:01.34 /lib/systemd/systemd-journal
    162 root        20   0 24824  5752  4108 S   0.0  0.1  0:01.34 /lib/systemd/systemd-udevd
    163 systemd-ti  20   0 90448  6804  5924 S   0.0  0.1  1:44.70 /lib/systemd/systemd-timesyn
    179 systemd-ti  20   0 90448  6804  5924 S   0.0  0.1  0:58.75 /lib/systemd/systemd-timesyn
    193 avahi       20   0  7224  3172  2820 S   0.0  0.1  0:00.13 avahi-daemon: running [Blaze
    194 messagebus  20   0  8304  3436  3000 S   0.0  0.1  0:00.24 /usr/bin/dbus-daemon --syste
    198 root        20   0 16876  6852  5940 S   0.0  0.1  0:01.25 /lib/systemd/systemd-logind
    200 avahi       20   0  7116   308     0 S   0.0  0.0  0:00.00 avahi-daemon: chroot helper
    203 root        20   0  2640   764   688 S   0.0  0.0  0:00.00 /sbin/agetty -o -p -- \u --n
    205 root        20   0  2684   812   736 S   0.0  0.0  0:00.01 /sbin/agetty -o -p -- \u --k
    208 root        20   0 16280  8776  7488 S   0.0  0.1  0:00.09 sshd: /usr/sbin/sshd -D [lis
F1Help  F2Setup F3SearchF4FilterF5Tree  F6SortByF7Nice -F8Nice +F9Kill  F10Quit
より安全で便利なアクセスを実現するために、認証用のキーペアを設定します。まだキーを作成していない場合は、 ~/.ssh/id_rsa コンピュータ上で、次の手順に従ってキーペアを作成できます:
-
次のコマンドを実行し、すべてのプロンプトを確認します:
-
パブリックキーをVMにコピーします。
rootパスワードを使用して、最後に一度だけ確認を行う必要があります。
これで、毎回パスワードを入力することなく、このマシンからVMに接続できるようになりました。
この認証を使用することで、次を使用してファイルをVMに転送することもできます: scp ツール。より効率的な代替手段は、 rsync ユーティリティです。これはすでにVMにインストールされています。
Smart blaze VM用のソフトウェア開発#
Smart blaze VM向けのソフトウェアを開発するために、Smart blaze SDKには2つのクロス開発環境オプションが用意されています:
- ELBE SDK:ELBE(Embedded Linux Build Environment)には、クロス開発ツールチェーンと、ターゲットのルートファイルシステムに応じた必要なすべての開発パッケージが含まれています。
- Docker container:クロス開発ツールチェーンと必要なすべてのパッケージが含まれています。
blaze C++サンプルのビルド#
pylon Supplementary Package for blazeには、Basler pylon SDKを使用してカメラを制御する方法を示すいくつかのC++サンプルが含まれています。
まだ行っていない場合は、開発用コンピュータに最新のpylon SDKとLinux用のpylon Supplementary Package for blazeをインストールしてください。これらのパッケージはBaslerウェブサイトから入手できます。
次のビルド環境から選択できます:
ELBE SDKを使用したサンプルのビルド#
まだ行っていない場合は、Cross-Building Using ELBE SDKに記載されている説明に従って、ELBE SDKを作成およびインストールしてください。
サンプルをビルドしてカメラVMにコピーするには、次のコマンドを実行します:
cp -r /opt/pylon/share/pylon/Samples/blaze/cpp ./blaze_samples
cd blaze_samples
. /opt/elbe-sdk-aarch64-linux-gnu-BlazeVM-1.2/environment-setup-elbe-aarch64-linux-gnu-BlazeVM-1.2
# Adjust the path for the CMake toolchain file from the Smart blaze SDK as needed.
export CMAKE_TOOLCHAIN_FILE=/opt/pylon/share/pylon/Samples/blaze/smartblaze/vm/elbe/cross-toolchain.cmake
cmake -B build .
cmake --build build -j$(nproc)
ssh root@${vmip} mkdir -p samples
scp $(find build/ -type f -executable | egrep -w -v "ColorAndDepth|CMakeFiles") root@${vmip}:samples
Dockerコンテナを使用したサンプルのビルド#
まだ行っていない場合は、 dockerDo に記載されている説明に従ってエイリアスを作成します: Dockerコンテナでのコマンドの実行.
サンプルをビルドしてカメラVMにコピーするには、次のコマンドを実行します。コンテナにはすでに環境変数が定義されています: CMAKE_TOOLCHAIN_FILEこれは、ARM64クロスコンパイラツールチェーンを使用するようCMakeに指示します。
dockerDo cp -r /opt/pylon/share/pylon/Samples/blaze/cpp ./blaze_samples
cd blaze_samples
dockerDo cmake -B build .
dockerDo cmake --build build -j$(nproc)
ssh root@${vmip} mkdir -p samples
scp $(find build/ -type f -executable | egrep -w -v "ColorAndDepth|CMakeFiles") root@${vmip}:samples
blaze C++サンプルの実行#
最初のサンプルは、検出した最初の blaze カメラを開き、10フレームをキャプチャして、いくつかのピクセル値を出力するだけです。サンプルを実行するには:
-
VMへのSSHシェルを開きます:
-
そのシェル内でサンプルを開始します。
次のような出力が表示されるはずです:root@BlazeCustomerVM:~# ./samples/FirstSample Connected to camera Basler blaze-102S (40560199) User-defined name: Serial Number: 40560199 x= 11.9 y= 27.4 z=1753.7 intensity=51091 confidence=25577 x= 11.9 y= 27.4 z=1754.9 intensity=51006 confidence=25471 x= 11.9 y= 27.4 z=1755.7 intensity=51011 confidence=25478 x= 11.9 y= 27.4 z=1756.5 intensity=50728 confidence=25126 x= 11.9 y= 27.4 z=1757.1 intensity=50965 confidence=25420 x= 11.9 y= 27.5 z=1757.7 intensity=50963 confidence=25417 x= 11.9 y= 27.5 z=1758.3 intensity=50963 confidence=25417 x= 11.9 y= 27.5 z=1758.9 intensity=50859 confidence=25289 x= 11.9 y= 27.5 z=1759.5 intensity=50820 confidence=25240 x= 11.9 y= 27.5 z=1760.1 intensity=50803 confidence=25219 Press Enter to exit.
インタラクティブなSSHシェルを開かずに、直接サンプルを実行するには、 GENICAM_GENTL64_PATH 環境変数を設定する必要があります:
ネットワークフォワーディング#
カメラをパソコンに直接接続した場合、カメラ上のVMはインターネット接続を持っていません。(例えば、Debianアーカイブから追加のパッケージをインストールするなどして)VMでインターネットアクセスが必要な場合は、パソコン上でNAT転送ルールを設定する必要があります: apt-get)
function setIptables() {
    echo "iptables: $@"
    if ! sudo iptables -C "$@"; then
        sudo iptables -A "$@";
    fi
}
DEVICE_WITH_CAMERA=eth0   # The network device on your PC to which the camera is connected
DEVICE_WITH_INTERNET=eth1 # The network device on your PC which provides the internet connection
OWN_IP=192.168.1.2        # Your PC's IP address on $DEVICE_WITH_CAMERA
VM_NET_PREFIX=24

setIptables FORWARD -s ${vmip} -o $DEVICE_WITH_INTERNET -i $DEVICE_WITH_CAMERA -j ACCEPT
setIptables FORWARD -i $DEVICE_WITH_INTERNET -d ${vmip} -m state --state RELATED,ESTABLISHED -j ACCEPT
setIptables POSTROUTING -t nat -o $DEVICE_WITH_INTERNET -j MASQUERADE

ssh root@${vmip} ip r add default via $OWN_IP dev eth0
ssh root@${vmip} bash -c "'echo nameserver 8.8.8.8 >> /etc/resolv.conf'"
これらの設定を行うことで、追加のパッケージをインストールできるようになります:
ssh root@${vmip} apt-get update
ssh root@${vmip} apt-get install chocolate-doom
ssh -X root@${vmip} /usr/games/chocolate-doom
X11フォワーディング#
一部のプログラミングサンプルでは、OpenCVのビジュアライゼーションウィンドウを使用してカメラでキャプチャした画像を表示します。開発中にキャプチャした画像や処理済みの画像を表示することは非常に役立ちます。これは、パフォーマンス低下と引き換えにX11フォワードを使用することで実現できます。X11フォワードにより、仮想マシン上で実行されているアプリケーションが、ローカルマシンのディスプレイにグラフィカルユーザーインターフェイスを表示できるようになります。
X11フォワードを有効にするには:
-
設定するピクセルのカラーコンポーネントを指定するには、
-Xまたは-YSSH経由で接続する際にオプションを指定します: -
画像ウィンドウを開くサンプルを開始します:
PC上でウィンドウが開き、カメラからのグレースケール深度画像が表示されるはずです。
情報
ターミナルに次のようなエラーが表示される場合があります:
これは、X11フォワードに追加の時間がかかり、取得ループが遅くなってフレームドロップが発生するためです。フレームレートを低く設定することで、これを回避できます。
フレームレートを下げて調整する方法については、Controlling the Frame Rateを参照してください。
X11フォワード中でもフレームドロップのリスクなしで動作するもう1つの動作モードは、ソフトウェアトリガー機能を使用して、現在のフレームの処理が完了した後にのみ次のフレームがトリガーされるようにすることです。これにより、アプリケーションが次の要求を行う前に待機するため、フレームレートが低下します。
blaze Pythonサンプルの実行#
Pythonサンプルでは、OpenCVまたはOpen3Dを使用します。Pythonサンプルを実行するには:
-
X11フォワードを指定してSSHシェルを開きます:
-
そのシェル内で、サンプルディレクトリに移動します:
-
サンプルを実行します。次のような出力と、OpenCVまたはOpen3Dのビジュアライゼーションウィンドウが表示されるはずです:
Using device  blaze-102S
OperatingMode:  LongRange
FastMode:  False
FilterSpatial:  True
FilterTemporal:  True
FilterStrength:  220
OutlierRemoval:  True
ConfidenceThreshold:  320
GammaCorrection:  True
Min. Depth [mm]:  0
Max. Depth [mm]:  9990
To exit, press ESC in one of the image windows
$ python3 ShowPointCloud/show_point_cloud.py Using device blaze-102S [Open3D DEBUG] GLFW init. To exit, press ESC in one of the image windows. To save a point cloud as .pcd file, press S in one of the image windows. [Open3D DEBUG] Add geometry and update bounding box to [(-1565.8367, -1279.5530, 0.0000) - (1694.7946, 50.7543, 2803.0823)] [Open3D DEBUG] Global colormap init.