C++プログラマーズガイド#
pylonを初めて使用する場合は、まずpylon C++プログラマーガイドの入門セクションを読んで、pylon C++ APIに慣れることをBaslerはお勧めします。
情報
このトピックのすべての情報は、すべてのblazeおよびSmart blazeカメラモデルに適用されます。簡潔にするため、すべてのモデルを指して「blaze」を使用しています。
C++プログラミングサンプル#
To open the folder containing the programming samples for blaze cameras, press the Win key, go to the Basler folder, and choose blaze Samples. A File Explorer window opens. The C++ programming samples are located in the cpp folder.
The C++ samples are located in the /opt/pylon/share/pylon/Samples/blaze/cpp folder.
サンプル構築の前提条件#
- Visual Studio 2017 or above
- Optional: OpenCV library
- Optional: Point Cloud Library (PCL)
- Optional: Boost libraries
- CMake 3.3 or above
- Optional: Aravis
On an Ubuntu system, you can install the prerequisites by issuing the following command:
Info
There is no Debian package available for the Aravis library. Aravis must be built from sources instead.
サンプルの構築方法#
情報
サンプルのビルドを行う前に、サンプルが含まれているフォルダを、読み取りおよび書き込み権限のある任意の場所にコピーしてください。
CMakeは、C++サンプルをビルドするためのビルドシステムとして使用されます。
Windows#
- Start Visual Studio.
- On the start page, choose the Open Folder or Open a local folder option, and navigate to the folder you copied the samples to.
- Open the cpp subfolder and click the Select Folder button.
Visual Studio runs CMake in the background. It will take a moment until you can build the samples by selecting Build All in the Build menu.
When you don't want to use Visual Studio's CMake integration, you can use the cmake-gui tool to generate Visual Studio solution and project files that you can open with Visual Studio.
If there is no CMake >= 3.3 installed, download a CMake Windows installer from the CMake website. Launch the .msi installer and follow the instructions.
To generate Visual Studio project and solution files for the blaze samples:
- Start cmake-gui.
- Click the Browse Source… button, and navigate to the folder you copied the samples to.
- Open the cpp folder by clicking the Select folder button.
- Specify a folder where the binaries will be built by clicking the Browse Build… button and choosing or creating a folder of your choice.
Basler advises against choosing the root folder of the source tree, i.e., the folder this document is located in. Common practice is to create a subfolder (e.g., namedbuild). - Click the Configure button.
A dialog opens. - Choose the desired Visual Studio version and platform.
Make sure that the selected platform (x86 or x64) matches the architecture that the OpenCV and PCL libraries are built for. - Click the Finish button to close the dialog.
The configuration procedure starts. - Once the configuration procedure has succeeded, click the Generate button to create the Visual Studio project and solution files.
The files will be generated in the build folder that you specified earlier. - Navigate to that build folder and open the .sln file.
Now, you can build the samples by selecting Build All in the Build menu.
サンプルのビルドや実行で問題が発生した場合は、トラブルシューティングのトピックを参照してください。
Linux#
サンプルをビルドするには、シェルを開き、サンプルをコピーしたフォルダーに移動します。次に、cppサブフォルダーに移動し、次のコマンドを実行します。
CMakeがpylon SDKを見つけられない場合は、pylon SDKとpylon Supplementary Package for blazeが正しくインストールされているかどうかを確認してください。
ソフトウェアを/opt/pylon以外の場所にインストールした場合は、PYLON_ROOT環境変数がpylonおよび追加パッケージをインストールしたフォルダーに設定されていることを確認してください。
例:
CMakeがOpenCVライブラリまたはPCLを見つけられない場合は、OpenCVライブラリおよびPCLの開発パッケージがインストールされていることを確認してください。
サンプルのビルドや実行で問題が発生した場合は、トラブルシューティングのトピックを参照してください。
OpenCVライブラリのインストール#
Windows#
OpenCVはGitHubからダウンロードできます。
使用する予定のVisual Studioバージョンと互換性のあるバージョンのOpenCVライブラリをダウンロードするようにしてください。適切なビルド済みバージョンがない場合は、アプリケーションのビルドに使用する予定のVisual Studioバージョンを使用して、ソースからOpenCVをビルドする必要があります。
CMakeがOpenCVを見つけられない場合は、OpenCV_DIR変数をOpenCVConfig.cmakeファイルを含むフォルダーに設定してください。
例
- Open the CMakeSettings.json file (CMake -> Change CMake Settings -> blazeCppSamples).
- Add the following to the cmakeCommandArgs list:
-DOpenCV_DIR=\"C:\\Program Files\\OpenCV\\build\\x64\\vc16\\lib\"
- Open the CMake Settings dialog (Project -> CMakeSettings for blazeCppSamples).
- Enter the following in the CMake command arguments field:
-DOpenCV_DIR="C:\Program Files\OpenCV\build\x64\vc16\lib" - Press Ctrl S to save the changes.
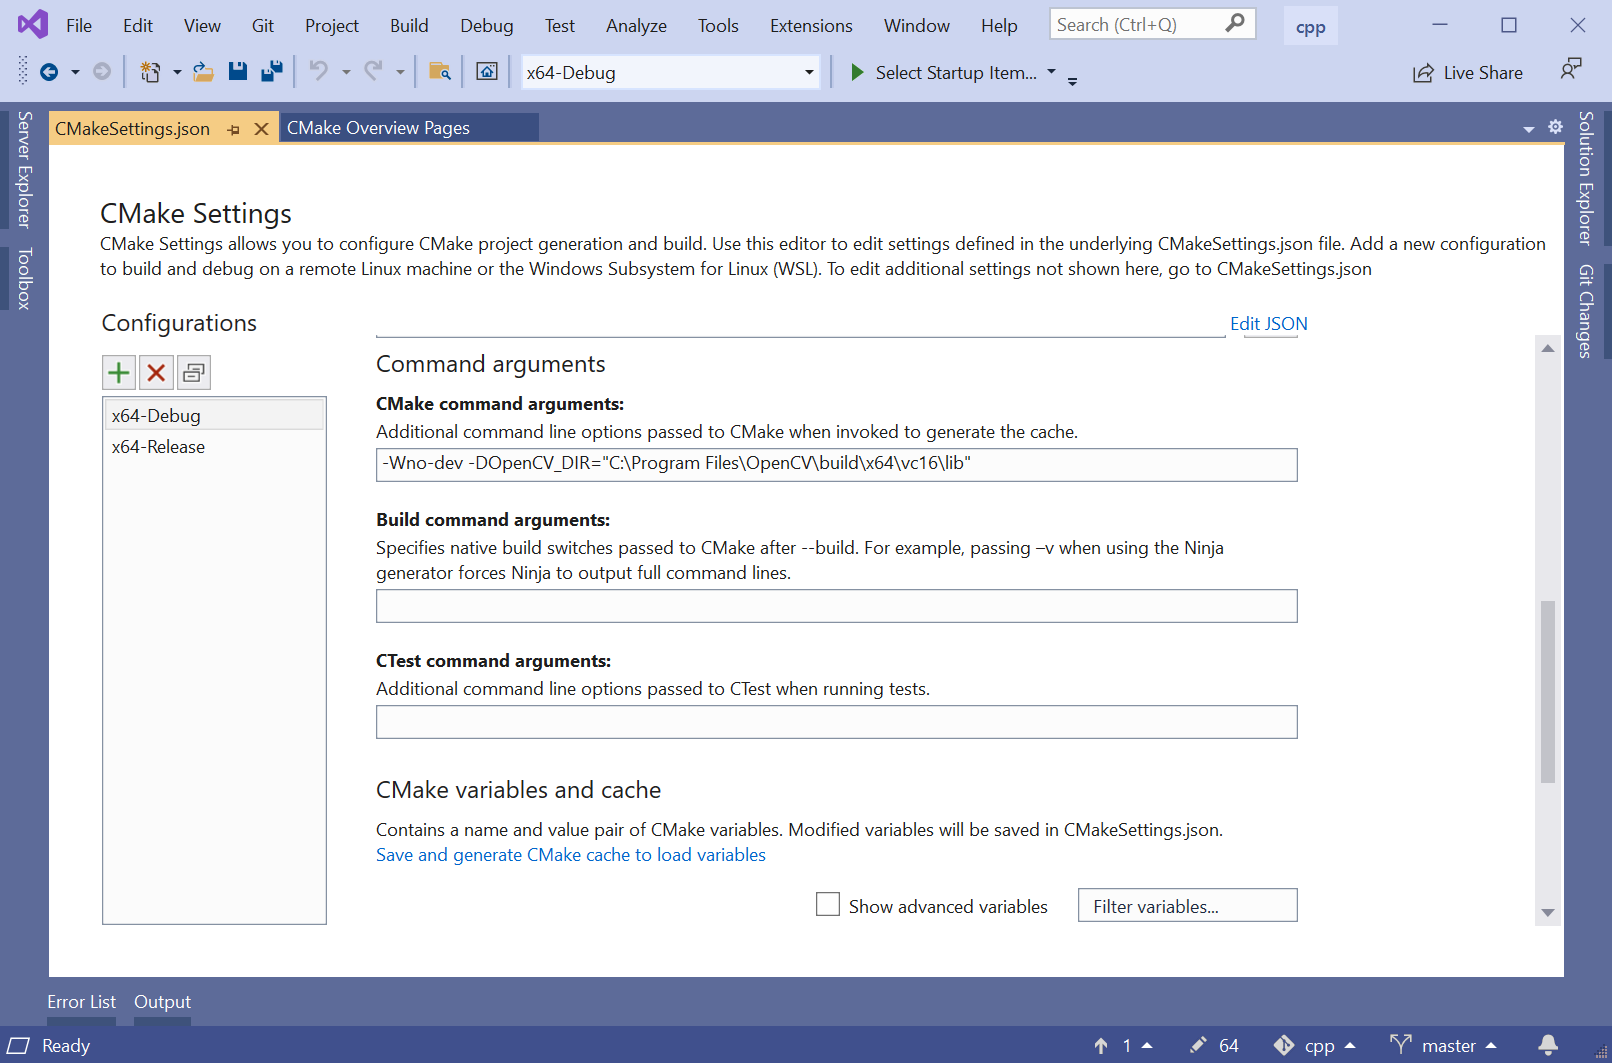
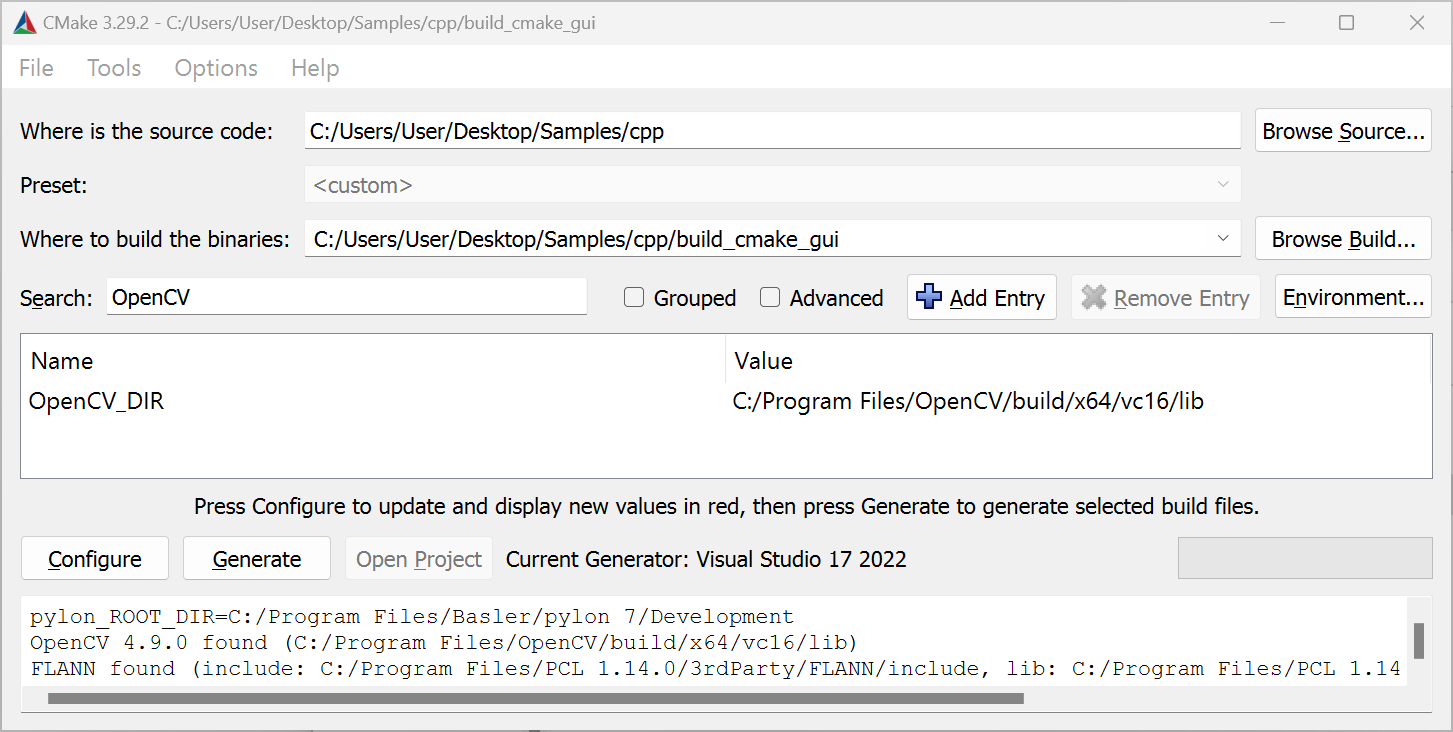
Before you can access the OpenCV_DIR in the CMake GUI, make sure that the Grouped check box is deselected in the CMake GUI.
OpenCVをPATH環境変数に追加する#
OpenCVの bin ディレクトリを PATH 環境変数に追加します。
- Winキーを押します。
- 「environment」と入力します。
- アカウントの環境変数の編集をクリックします。
- 環境変数…ボタンをクリックします。
- ユーザー環境変数エリアで、Pathを選択します。
- 編集ボタンをクリックします。
- 新規をクリックします。
- OpenCVのインストールパスを入力します(例: C:\Program Files\OpenCV\build\x64\vc16\bin)。
- OKをクリックします。
Linux#
CMakeがOpenCVライブラリを見つけられない場合は、libopencv開発パッケージをインストールするか、ソースからOpenCVライブラリをビルドする必要があります。
Ubuntuシステムでは、libopencv開発パッケージを次のコマンドを実行してインストールできます。
ソースからOpenCVライブラリをビルドし、標準以外の場所にインストールする場合、 OpenCV_DIR CMake変数を使用して、次の場所を指定できます: OpenCVConfig.cmake ファイルが格納されている場所です。
例:
Point Cloud Libraryのインストール#
Windows#
Windows用PCL All-in-oneインストーラーは、GitHubからダウンロードできます。
使用するVisual Studioのバージョンと互換性のあるPCLのバージョンをダウンロードするようにしてください。
CMakeがPCLの検出に失敗した場合は、 PCL_DIR 変数を PCLConfig.cmake ファイル。
例
- Open the CMakeSettings.json file (CMake -> Change CMake Settings -> blazeCppSamples)
- Add the following to the
cmakeCommandArgslist:-DPCL_DIR=\"C:\\Program Files\\PCL 1.9.1\\cmake\"
- Open the CMake Settings dialog (Project -> CMakeSettings for blazeCppSamples).
- Enter the following in the CMake command arguments field:
-DPCL_DIR="C:\Program Files\PCL 1.12.1\cmake" - Press Ctrl S to save the changes.
- Open the CMake Settings dialog (Project -> CMakeSettings for blazeCppSamples).
- Enter the following in the CMake command arguments field:
-DPCL_DIR="C:\Program Files\PCL 1.14.0\cmake" - Press Ctrl S to save the changes.
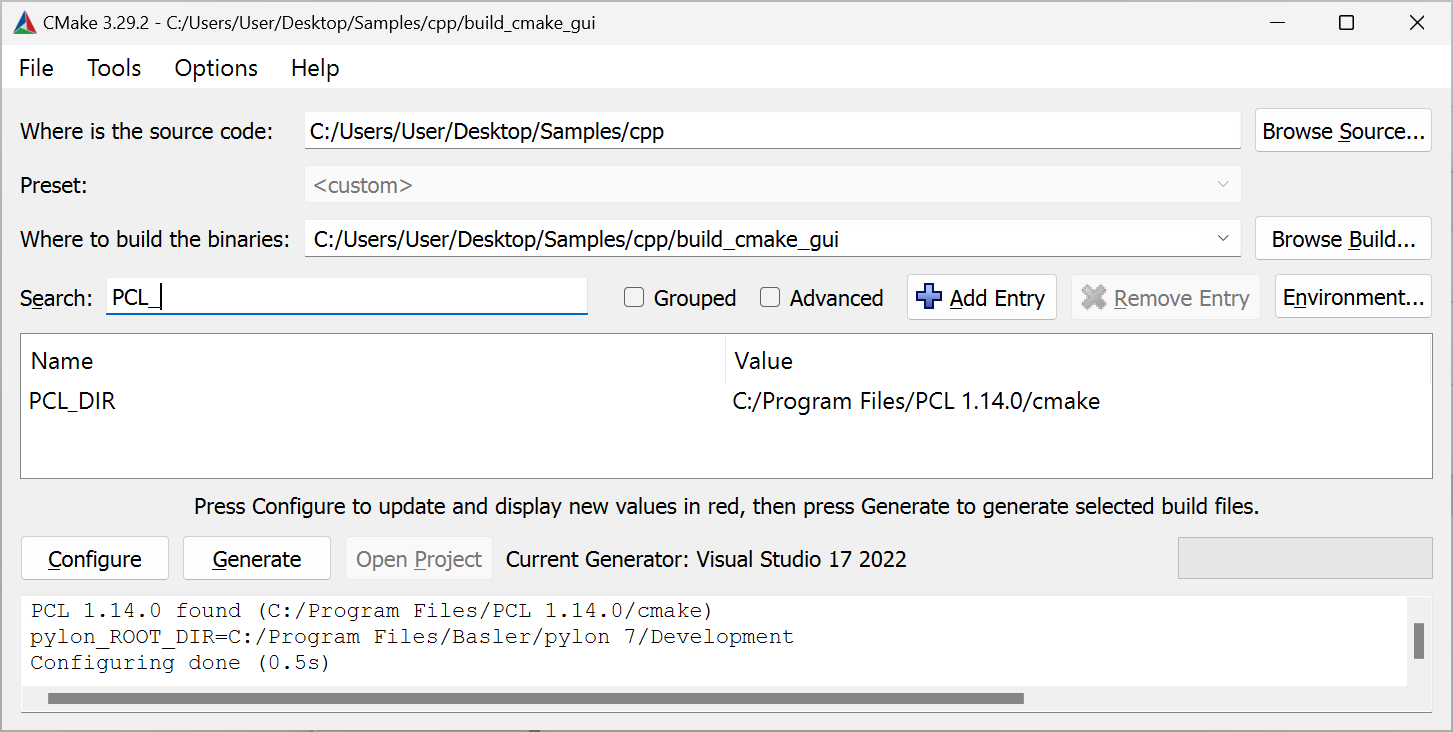
Before you can access the PCL_DIR in the CMake GUI, make sure that the Grouped check box is deselected in the CMake GUI.
が含まれているフォルダに設定します。PCL All-in-oneインストーラーを使用してPCLをインストールした場合、インストーラーによってPCLの bin ディレクトリを PATH 環境変数が自動的に追加されます。別のインストール方法を使用している場合は、 bin ディレクトリを PATH 環境変数を自分で追加する必要があります。
PCL All-in-oneインストーラーは、 OpenNI2.dll を %ProgramFiles%\OpenNI2\Redist フォルダにインストールします。実行時にはDLLが必要になります。このフォルダを PATH 環境変数に追加するか、 OpenNI2.dll に追加するか、PCLバイナリが格納されているフォルダを次のように指定します: %ProgamFiles%\PCL 1.13.0\bin.
Linux#
CMakeがPCLライブラリの検出に失敗した場合は、libpcl開発パッケージをインストールするか、ソースからPCLライブラリをビルドする必要があります。
Ubuntuシステムでは、次のコマンドを実行してlibpcl開発パッケージをインストールできます:
ソースからPCLをビルドし、標準以外の場所にインストールした場合は、 PCL_DIR CMake変数を使用して、次の場所を指定できます: PCLConfig.cmake ファイルが格納されている場所です。
例:
注意
Point Cloud Library(PCL)を使用するサンプルは、システムにインストールされているPCLおよびVTKライブラリのバージョンによってクラッシュする場合があります。このクラッシュは、3DビジュアライゼーションのためにPCLで使用されているVTKライブラリのバグが原因です。
出典:https://github.com/PointCloudLibrary/pcl/issues/5237
解決策:PCL 1.13.1には、VTKのバグを回避するための修正が含まれています。
PCL 1.13.1以降にアップデートしてください。必要に応じて、Linuxディストリビューションが提供するPCLライブラリをアンインストールし、PCLバージョン1.13.1以降をソースからビルドしてください(これらはGitHubから取得できます)。
Boostライブラリのインストール#
Windows#
Point Cloud Library(PCL)をソースからビルドした場合、または上記のようにAll-in-oneインストーラーを使用してインストールした場合、PCLのビルドに使用されたBoostライブラリは、blazeサンプルのビルドにも自動的に使用されます。
利用可能なPCLライブラリがない一方で、Boostライブラリを必要とするblazeサンプルをビルドする場合は、Boostライブラリをソースからビルドするか、sourceforge.netからダウンロードできる事前ビルド済みバイナリなどを使用してインストールする必要があります。使用しているVisual Studioのバージョンと、アプリケーションをビルドするアーキテクチャに適したインストーラーをダウンロードしてください。
CMakeがインストールされたBoostライブラリの検出に失敗した場合は、 Boost_DIR CMake変数を設定する必要があります。この変数は、 BoostConfig.cmake ファイル。
例
- Open the CMakeSettings.json file (CMake -> Change CMake Settings -> blazeCppSamples).
- Add the following to the
cmakeCommandArgslist:-DBoost_DIR=\"C:\\local\\boost_1_84_0\\lib64-msvc-14.1\\cmake\\Boost-1.84.0\"
- Open the CMake Settings dialog (Project -> CMakeSettings for blazeCppSamples).
- Enter the following in the CMake command arguments field:
-DBoost_DIR="C:\local\boost_1_84_0\lib64-msvc-14.2\cmake\Boost-1.84.0" - Press Ctrl S to save the changes.
- Open the CMake Settings dialog (Project -> CMakeSettings for blazeCppSamples).
- Enter the following in the CMake command arguments field:
-DBoost_DIR="C:\local\boost_1_84_0\lib64-msvc-14.3\cmake\Boost-1.84.0" - Press Ctrl S to save the changes.
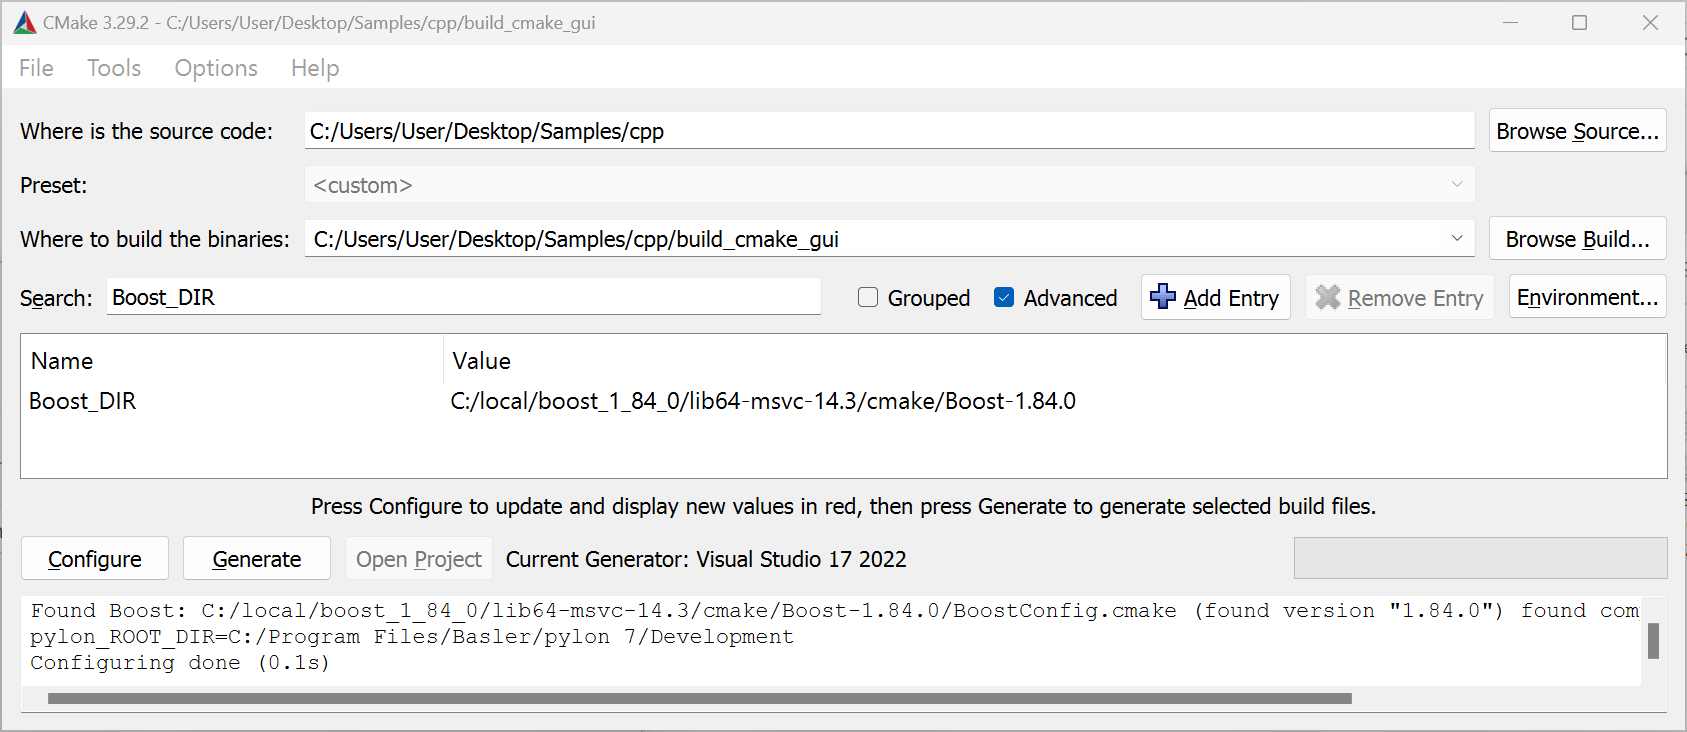
Before you can access the Boost_DIR in the CMake GUI, make sure that the Advanced check box is selected and the Grouped check box is deselected in the CMake GUI.
Linux#
が含まれているディレクトリを指している必要があります。
Ubuntuシステムでは、次のコマンドを実行してlibboost開発パッケージをインストールできます:
サンプル一覧#
- FirstSample: blazeカメラの操作の概要を説明し、3Dポイントクラウドデータの取得方法に焦点を当てています。pylonを使用したグラブーループの実装方法の詳細は、pylon C++サンプルスイートの以下のサンプルを参照してください:
- Grab_Strategies
- Grab_UsingBufferFactory
- Grab_UsingGrabLoopThread
- ParametrizeCamera: カメラパラメータへのアクセス方法について説明しています。
- DeviceRemovalHandling: デバイスの取り外しを検出して処理する方法を示します。
- GrabDepthMap: グレースケール画像として表現された3D情報を提供するデプスマップを取得して解釈する方法を示します。
- ConvertPointCloud2DepthMap: 3Dポイントクラウドとデプスマップを同時に処理したい場合は、3Dポイントクラウドからデプスマップを抽出する方法を示すサンプルを参照してください。このサンプルでは、デプスマップにレインボーカラーマッピングを適用する方法も示しています。
- ShowPointCloud_PCL: Point Cloud Library (PCL) を使用して、Basler blazeカメラで取得したポイントクラウドを視覚化する方法を示します。
- ConvertAndFilter_PCL: ShowPointCloudと同様に、3DポイントクラウドにPCLフィルターを適用する方法を示します。
- SavePointCloud: GrabSingleImageの便利メソッドと、ポイントクラウドを.pcdテキストファイルに保存する方法を示します。
- SaveAndLoadPointCloudUsingPCL: PCLを使用してポイントクラウドをファイルに効率よく保存する方法を示します。また、ファイルからポイントクラウドをロードする方法も示しています。
- FeatureDumper: すべてのカメラパラメータとそのPropertyを一覧表示します。GenApiの使用方法に関する高度な例として機能します。
- DistortionCorrection: 独自のキャリブレーションデータを使用するためにDistortion Correctionを無効にする方法を示します。
- ExtrinsicTransformation: ポイントクラウド内のメインプレーンを検出し、外部変換を計算してカメラに渡す方法を示します。
- MultiCam/ColorAndDepth/ColorAndDepthPtp: Basler blazeとBasler GigEカラーカメラの両方から画像を取得し、画像とデプスデータにアクセスする方法を示します。カメラはPTPとSynchronous Free Run機能を使用して同期されます。
- MultiCam/ColorAndDepth/Calibration: Basler GigEカラーカメラとBasler blazeカメラで構成されるシステムをキャリブレーションする方法を示します。
- MultiCam/ColorAndDepth/ColorAndDepthFusion: Basler GigEカラーカメラとBasler blazeのデータをカラーポイントクラウドに統合(融合)する方法を示します。
- MultiCam/ColorAndDepth/RgbdCamera: と同様に、 ColorAndDepthFusionこのサンプルでは、Basler blazeとBasler GigEカラーカメラのデータをカラーポイントクラウドに統合する方法を示しています。このサンプルでは、
RgbdCameraクラスを利用して、2Dカラーカメラとblazeを組み合わせ、2台のカメラを1台のRGB-Dカメラのようにインターフェース接続することができます。組み合わせた2台のカメラは、PTP (IEEE1588) とSynchronous Free Run機能を使用して同期トリガーされます。ソースコードのRgbdCameraクラスは同じフォルダーにあります。独自のアプリケーションでRgbdCameraクラスを使用するには、RgbdCamera.hおよびRgbdCamera.cppファイルをプロジェクトに追加します。さらに、Multicam/MultiCamHelperフォルダーの.hおよび.cppファイルも追加する必要があります。 - MultiCam/DepthFusion/Calibration: 複数のBasler blazeカメラで構成されるシステムをキャリブレーションする方法を示します。
- MultiCam/DepthFusion/DepthFusion: デプスデータをマージして、任意の数のカメラからの統合されたポイントクラウドを表示する方法を示します。
- MultiCam/MultiChannel/MultiChannelFreeRun: 複数のblazeカメラを、光源が互いに干渉しないように同時に動作させる方法を示します。カメラはフリーランモードで動作します。
- MultiCam/MultiChannel/MultiChannelSwTrigger: 複数のblazeカメラを、光源が互いに干渉しないように同時に動作させる方法を示します。カメラはソフトウェアトリガーを使用してトリガーされます。
- MultiCam/SynchronousFreeRun/SynchronousFreeRun: PTPクロック同期と Synchronous Free Run 機能を使用して、複数のblazeカメラを光源が互いに干渉しないように同時に動作させる方法を示します。
- MultiCam/MultiCamHelper: PTP (IEEE1588) を使用して複数のカメラのクロックを簡単に同期させ、複数のカメラから画像を同期して取得できるようにする便利クラスを提供するライブラリです。このライブラリは、複数のカメラから画像を取得するために Synchronous Free Run 機能を使用するすべてのサンプルで使用されます。ライブラリをプロジェクトに追加するには、このフォルダーから .h ファイルと .cpp ファイルをプロジェクトに追加するだけです。
- Aravis/BasicSample: (Linux のみ) オープンソースの Aravis ライブラリを使用して blaze カメラの設定およびデータ取得を行う方法を示します。
- Aravis/PointCloudSample: (Linux のみ) Aravis ライブラリを使用して取得したデータから 3次元座標(ポイントクラウド)を計算する方法を示します。また、このサンプルでは、OpenCV を使用してポイントクラウドを保存および視覚化する方法も示します。
アプリケーションの構築方法#
Windows#
Visual Studioソリューションの使用#
Refer to the Common Settings for Building Applications with pylon section of the pylon C++ Programmer's Guide to learn how to set up a project for building applications using pylon.
Refer to the Common Settings for Building Applications with pylon section of the pylon C++ Programmer's Guide to learn how to set up a project for building applications using pylon.
CMake の使用#
pylon Supplementary Package for blaze には、 Findpylon.cmake pylon および pylon Supplementary Package for blaze のインストール場所を特定するために使用されるモジュールが含まれています。find モジュールは、 pylon::pylon CMakeターゲット。このターゲットを引数として渡します。 target_link_libraries。これにより、CMakeがインクルードパスやライブラリパスなどの設定を行います。
基本的な CMakeLists.txt CMakeファイルは次のようになります。
project (hello)

# Locate the CMake find module for pylon ...
# for Unix system. All other OS PYLON_ROOT will be empty
list(APPEND CMAKE_PREFIX_PATH $ENV{PYLON_ROOT})
# for Windows system. All other OS PYLON_DEV_DIR will be empty
list(APPEND CMAKE_PREFIX_PATH $ENV{PYLON_DEV_DIR})

find_package(pylon 7.1 REQUIRED)

add_executable(hello helloworld.cpp)
target_link_libraries(hello pylon::pylon)
project (hello)

# Locate the CMake find module for pylon ...
find_path(pylon_cmake Findpylon.cmake
    HINTS "$ENV{PYLON_DEV_DIR}/lib/cmake"
          "$ENV{ProgramFiles}/Basler/pylon 7/Development/lib/cmake"
          "$ENV{ProgramFiles}/Basler/pylon 6/Development/lib/cmake"
)
# ... and extend the CMake module path accordingly.
list(APPEND CMAKE_MODULE_PATH ${pylon_cmake})
# Locate pylon.
find_package(pylon 6.2 REQUIRED)

add_executable(hello helloworld.cpp)
target_link_libraries(hello pylon::pylon)
Linux#
CMake の使用#
project (hello)

# Locate the CMake find module for pylon ...
# for Unix system. All other OS PYLON_ROOT will be empty
list(APPEND CMAKE_PREFIX_PATH $ENV{PYLON_ROOT})
# for Windows system. All other OS PYLON_DEV_DIR will be empty
list(APPEND CMAKE_PREFIX_PATH $ENV{PYLON_DEV_DIR})

find_package(pylon 7.1 REQUIRED)

add_executable(hello helloworld.cpp)
target_link_libraries(hello pylon::pylon)
project (hello)

# Locate the CMake find module for pylon ...
find_path(pylon_cmake Findpylon.cmake
    HINTS "/opt/pylon/lib/cmake"
)
# ... and extend the CMake module path accordingly.
list(APPEND CMAKE_MODULE_PATH ${pylon_cmake})
# Locate pylon.
find_package(pylon 6.2 REQUIRED)

add_executable(hello helloworld.cpp)
target_link_libraries(hello pylon::pylon)
Makeファイルの利用#
pylon を使用してアプリケーションをビルドするためのコンパイラとリンカーの設定調整方法については、pylon C++ Programmer's Guide のCommon Settings for Building Applications with pylon セクションを参照してください。
blazeカメラ用Instant Cameraクラス#
pylonには、カメラデバイスにアクセスするためのさまざまなタイプのクラスが用意されています。ローレベルの IPylon デバイスのほかに、カメラ用の便利なハイレベルAPIを提供する、いわゆる Instant Camera クラスがあります。
イメージ Pylon::CInstantCamera クラスは、blaze カメラを含むすべての Basler カメラへの汎用的なアクセスを提供します。
イメージ Pylon::CBaslerUniversalInstantCamera クラスは、汎用的な Pylon::CInstantCamera クラスを拡張し、IntelliSense / コード補完を使用してカメラのパラメータを簡単に設定および取得できるようにするパラメータアクセサオブジェクトを追加します。
イメージ Pylon::CBaslerUniversalInstantCamera クラスは、すべての blaze カメラ機能に対するパラメータアクセサを提供しません。そのため、pylon Supplementary Package for blaze には Pylon::CBlazeInstantCamera クラスが含まれています。Basler では、Basler blaze カメラでこのクラスを使用することを推奨しています。
もし CBaslerUniversalInstantCamera クラスを使用する代わりに、 CBlazeInstantCamera クラスを選択した場合でも、blaze カメラが提供するすべてのカメラパラメータの設定と取得を行うことができます。もし CBaslerUniversalInstantCamera クラスを使用します。いわゆる 汎用パラメータアクセス pylon C++ Programmer's Guideの Generic Parameter Access セクション: pylon C++ Programmer's Guide.
例:
using namespace Pylon;
GenApi::INodeMap& nodemap = camera.GetNodeMap();
CIntegerParameter filterStrength(nodemap, "FilterStrength" );
std::cout << "Filter strength: " << filterStrength.GetValue() << std::endl;
blazeカメラを開いてアクセスする#
blazeカメラオブジェクトを作成して開くには、3つのステップが必要です。
- アクセスするカメラのカメラオブジェクトを作成します。
通常、次のクラスのインスタンスを作成する必要があります。Pylon::CBlazeInstantCameraクラス。 - デフォルト設定を適用する blaze 固有の
Pylon::CBlazeDefaultConfiguration設定イベントハンドラーを登録します。
Open3Dを使用して点群を計算および可視化する例については、 カメラコンフィグレーションハンドラーの登録 blaze 設定イベントハンドラークラスの詳細については、セクションを参照してください。 - アプリケーションで次のメソッドを呼び出します。
Open()メソッドを使用して、カメラデバイスとの接続を確立します。
次の例は、これら3つのステップを示しています。
#include <pylon/PylonIncludes.h>
using namespace Pylon;

// ....

// Before using any pylon methods, the pylon runtime must be initialized.
PylonInitialize();

try {
  // 1: Create a camera object for the first available blaze camera.
  CBlazeInstantCamera camera(CTlFactory::GetInstance().CreateFirstDevice(
      CDeviceInfo().SetDeviceClass(BaslerGenTlBlazeDeviceClass))
  );

  // 2. Register the default configuration.
  camera.RegisterConfiguration(
    new CBlazeDefaultConfiguration,
    RegistrationMode_ReplaceAll,
    Cleanup_Delete);

  // 3. Open the camera, i.e., establish a connection to the camera device.
  camera.Open();

  // Use the camera.
  std::cout << "Connected to camera "
    << camera.GetDeviceInfo().GetFriendlyName() << std::endl;
  // .....

  // Close the connection.
  camera.Close();
} catch (const GenICam::GenericException& e) {
  std::cerr << "Exception occurred: " << std::endl
    << e.GetDescription() << std::endl;
}

// Releases all pylon resources.
PylonTerminate();
エラーが発生した場合は、次から継承された例外がスローされます。 GenICam::GenericException がスローされます。
一般的なエラー状態:
- blaze カメラが見つかりません:
CreateFirstDevice()関数が例外をスローします。 - カメラを開くことができません(例: blaze Viewer などの別のアプリケーションによってすでに開かれているため):
Open()メソッドが例外をスローします。
次のサブセクションでは、カメラオブジェクトの作成およびオープン方法に関する詳細な情報を提供します。
最初に検出されたblazeカメラのカメラオブジェクトの作成#
設定するピクセルのカラーコンポーネントを指定するには、 Pylon::CTlFactory::CreateFristDevice() メソッドを使用して、最初に見つかったカメラのカメラオブジェクトを作成します。システムに接続されている、またはネットワーク経由でアクセス可能な別のタイプのカメラ用として CreateFirstDevice() がカメラクラスを作成するのを防ぐために、常に blaze カメラ用の pylon デバイスクラス識別子を指定する必要があります:
CBlazeInstantCamera camera(CTlFactory::GetInstance().CreateFirstDevice(
    CDeviceInfo().SetDeviceClass(BaslerGenTlBlazeDeviceClass)));
);
blaze カメラが見つからない場合は、カメラおよびネットワークアダプターの IP 構成設定を確認してください。ネットワークの設定方法の詳細については、Network Configuration のトピックを参照してください。
特定のblazeカメラのカメラオブジェクトの作成#
pylon C++ Programmer's GuideのAdvanced TopicsトピックにあるCreating Specific Camerasセクションには、特定のカメラの選択に関する情報が記載されています。
シリアル番号を指定するなどして特定のblazeカメラを開くには、blazeカメラ用のpylonデバイスクラス識別子を渡すことに加えて、 CreateFirstDevice()に対して、さらにPropertyを指定することができます。
次のコードスニペットは、シリアル番号を指定してblazeカメラを開く方法を示しています。
CBlazeInstantCamera camera(CTlFactory::GetInstance().CreateFirstDevice(
  CDeviceInfo()
  .SetDeviceClass(BaslerGenTlBlazeDeviceClass)
  .SetSerialNumber("23298299")
));
ユーザー定義の名前でblazeカメラを開くには、次の行を使用します。
CBlazeInstantCamera camera(CTlFactory::GetInstance().CreateFirstDevice(
  CDeviceInfo()
  .SetDeviceClass(BaslerGenTlBlazeDeviceClass)
  .SetUserDefinedName("MyCamera")));
User-Defined Names
を使用して、カメラにユーザー定義名を割り当てることができます。 DeviceUserID パラメータ。これを行うには、blaze Viewer、pylon IP Configurator、またはpylon APIを使用します。
IPアドレスによるデバイスの作成
現在、以下の方法でカメラのIPアドレスを指定することはできません: CreateFirstDevice() 関数。その理由は現在、以下の理由によります: Pylon::CDeviceInfo() クラスには、カメラのIPアドレスに関する情報が含まれていません。
特定のIPアドレスを持つカメラを作成して開くには、まずすべてのカメラを列挙し、返されたリストを反復処理して、各カメラを開いてからIPアドレスやその他のネットワーク関連情報を照会する必要があります。この手順については、Enumerate blaze Camerasセクションで説明しています。
目的のblazeカメラが見つからない場合は、Propertyに正しい値を使用しているかどうかを確認し、カメラとネットワークアダプターのIP設定を確認してください。ネットワークの設定の詳細については、ネットワーク設定トピックを参照してください。
blazeカメラの列挙#
次のコードサンプルは、接続されているすべてのblazeカメラのリストを取得する方法を示しています。リストの各要素に対してカメラが開き、いくつかのカメラパラメータの値が出力されます。
#include <pylon/PylonIncludes.h>
#include <ostream>
using namespace Pylon;

// ....

// Before using any pylon methods, the pylon runtime must be initialized.
PylonInitialize();

// ....

// Enumerate all blaze cameras.
CTlFactory& TlFactory = CTlFactory::GetInstance();
DeviceInfoList_t lstDevices;
DeviceInfoList_t filter;
filter.push_back(CDeviceInfo().SetDeviceClass(BaslerGenTlBlazeDeviceClass));
TlFactory.EnumerateDevices(lstDevices, filter);
if (!lstDevices.empty()) {
    DeviceInfoList_t::const_iterator it;
    for (it = lstDevices.begin(); it != lstDevices.end(); ++it) {
        std::cout << it->GetFullName();

    // Open camera, i.e., establish a connection to the camera device.
    CBlazeInstantCamera camera(CTlFactory::GetInstance().CreateDevice(*it));
    camera.RegisterConfiguration(
      new CBlazeDefaultConfiguration,
      RegistrationMode_ReplaceAll, Cleanup_Delete);
    camera.Open();

    // Print out some information.
    std::cout << "Connected to camera "
      << camera.GetDeviceInfo().GetFriendlyName() << std::endl;
    std::cout << "IP Address: "
      << camera.GevCurrentIPAddress.GetValue() << std::endl;
    std::cout << "User-defined name: "
      << camera.DeviceUserID.GetValue() << std::endl;
    std::cout << "Serial Number: "
      << camera.DeviceSerialNumber.GetValue() << std::endl;
}  // The connection will be closed automatically when leaving the scope here.
else {
    std::cerr << "No devices found!" << std::endl;
}
カメラコンフィグレーションハンドラーの登録#
pylon Instant Camera クラスを使用すると、特定のイベント(例えば、以下のイベントが発生したときなど)でカメラ設定を適用するために使用できる設定イベントハンドラーオブジェクトを登録できます: Open() メソッドが呼び出されます。
pylon Supplementary Package for blazeには、 Pylon::CBlazeDefaultConfiguration クラスが含まれています。Baslerでは、作成する CBlazeInstantCamera クラスのインスタンスごとに、常にこのコンフィギュレーションを登録することを推奨しています。
camera.RegisterConfiguration(
      new CBlazeDefaultConfiguration,
      RegistrationMode_ReplaceAll, Cleanup_Delete);
イメージ CBlazeDefaultConfiguration::OnOpened() メソッドは、データストリームに深度、輝度、信頼度情報が含まれるように設定します。深度情報はポイントクラウドとして送信されます。ポイントクラウドには、各センサーピクセルの3D座標が含まれます。また、 CBlazeDefaultConfiguration::OnOpened() メソッドは、カメラをいわゆるフリーランモードにします。フリーランモードでは、取り込み開始後にソフトウェアトリガーやハードウェアトリガーを必要とせず、カメラが継続的にデータをストリーミングします。
デフォルトのコンフィギュレーションが登録されている場合、 CBlazeDefaultConfiguration::OnOpened() メソッドは自動的に CBlazeInstantCamera::Open().
イメージ CBlazeDefaultConfiguration クラスはヘッダーオンリークラスです。pylon SDKのincludesフォルダにある BlazeDefaultConfiguration.h ファイルを開いてコードを確認できます。
- Windows:
%Program Files%\pylon\Development\include\pylon - Linux:
/opt/pylon/include/pylon
複数のコンフィギュレーションイベントハンドラークラスを登録できます。
次の例は、追加の設定を適用する設定イベントハンドラーを登録する方法を示しています:
class MyConfigurationHandler : public CBlazeConfigurationEventHandler
{
public:
    // Sets exposure time to minimum possible value.
    void OnOpened(CBlazeInstantCamera& camera) override
    {
        camera.ExposureTime.SetToMinimum();
    }
};

// ....

// Register the default configuration first.
camera.RegisterConfiguration(
      new CBlazeDefaultConfiguration,
      RegistrationMode_ReplaceAll, Cleanup_Delete);

// Then, register additional configuration event handlers.
camera.RegisterConfiguration(
      new MyConfigurationHandler,
      RegistrationMode_Append, Cleanup_Delete);

// ....

camera.Open(); // Configurations will be applied.
pylonカメライベントハンドラークラスの詳細については、pylon C++ Programmer's GuideのInstant Camera Event Handler Basicsセクションを参照してください。
コンフィギュレーションイベントハンドラーを提供して目的の設定を適用する必要はありません。代わりに、 CBlazeInstantCamera::Open() メソッド。
カメラパラメータの設定および取得方法については、Accessing Parametersセクションを参照してください。
カメラへの接続#
カメラオブジェクトを作成し、設定イベントハンドラーを登録した後、次のメソッドを呼び出すことでカメラとの接続が確立されます: CBlazeInstantCamera::Open() メソッド。
接続は、次のメソッドが呼び出されるまで維持されます: CBlazeInstantCamera::Close() メソッドが呼び出されます。のデストラクタ CBlazeInstantCamera 自動的に呼び出されます Close() 明示的に呼び出されていない場合。
カメラがハートビートリクエストを定期的に受信しない場合、カメラは接続を閉じます。ハートビートリクエストの欠落は、アプリケーションがクラッシュした場合やデバッガーによって中断された場合に発生します。詳細については、アプリケーションのデバッグと GigE Vision ハートビートの制御セクションを参照してください。
パラメータへのアクセス#
pylon APIを使用したカメラパラメータへのアクセスの詳細については、pylon C++ Programmer's GuideのAccessing Parametersセクションを参照してください。
pylon C++サンプルのParametrize_NativeParameterAccessおよびParametrize_GenericParameterAccessは、pylonを使用してカメラパラメータにアクセスする一般的な方法を示しています。
次のコードサンプルは、頻繁に使用されるblaze固有のカメラパラメータの設定および取得方法を示しています。 CBlazeInstantCamera クラス。
// Include files to use the pylon API
#include <pylon/PylonIncludes.h>
#include <pylon/BlazeInstantCamera.h>

// Namespaces for using the pylon API and the blaze camera parameters
using namespace Pylon;
using namespace BlazeCameraParams_Params;

// ...

// Set the operating mode of the camera. The choice you make here
// affects the working range of the camera, i.e., the Minimum Working
// Range and Maximum Working Range parameters.
OperatingModeEnums oldOperatingMode = camera.OperatingMode.GetValue();
camera.OperatingMode.SetValue(OperatingMode_LongRange);

// Exposure time of the camera. If the operating mode is changed, the
// exposure time is set to the recommended default value.
camera.ExposureTime.SetValue(750); // us

// Enable and configure image filtering.

// The spatial noise filter uses the values of neighboring pixels to
// filter out noise in an image.
camera.SpatialFilter.SetValue(true);

// The temporal noise filter uses the values of the same pixel at
// different points in time to filter out noise in an image.
camera.TemporalFilter.SetValue(true);
camera.TemporalFilterStrength.SetValue(220);

// The outlier removal removes pixels that differ significantly from
// their local environment.
camera.OutlierRemoval.SetValue(true);

// Some properties have restrictions.
// We use API functions that automatically perform value corrections.
// Alternatively, you can use GetInc() / GetMin() / GetMax() to make sure you
// set a valid value.
camera.ConfidenceThreshold.SetValue(321, IntegerValueCorrection_Nearest);

// Not all functions are available in older cameras.
// Therefore, we must use "Try" functions that only perform the action
// when parameters are writable. Otherwise, we would get an exception.
camera.MultiCameraChannel.TrySetValue(1);

std::cout << "Operating Mode           : "
    << camera.OperatingMode.GetValue() << std::endl;
std::cout << "Exposure Time            : "
    << camera.ExposureTime.GetValue() << std::endl;
std::cout << "Spatial Filter           : "
    << camera.SpatialFilter.GetValue() << std::endl;
std::cout << "Temporal Filter          : "
    << camera.TemporalFilter.GetValue() << std::endl;
std::cout << "Temporal Filter Strength : "
    << camera.TemporalFilterStrength.GetValue() << std::endl;
std::cout << "Outlier Removal          : "
    << camera.OutlierRemoval.GetValue() << std::endl;
std::cout << "Confidence Threshold     : "
    << camera.ConfidenceThreshold.GetValue() << std::endl;
if (camera.MultiCameraChannel.IsReadable())
    std::cout << "Multi-Camera Channel : "
    << camera.MultiCameraChannel.GetValue() << std::endl;

// Restore the old operating mode.
camera.OperatingMode.SetValue(oldOperatingMode);

// Close the camera.
camera.Close();
blaze ViewerにはDocumentationペインがあります。Featuresペインでカメラパラメータを選択すると、Documentationペインに、選択したパラメータに関する情報、およびそのカメラパラメータの値を取得・設定する方法を示すC++とC#のコードスニペットが表示されます。
データの取得#
pylon APIを使用したデータの取得方法の詳細については、pylon C++ Programmer's GuideのGrabbing Imagesセクションを参照してください。
pylon では、取得した画像が GrabResults と呼ばれるデータ構造として表現されます。2D カメラによって取得された GrabResults には、単一のグレー値またはカラー画像が含まれます。
blaze カメラによって取得された GrabResults には、複数のコンポーネントが含まれます。デフォルトでは、各 GrabResult に強度画像、信頼度マップ、および深度情報が保存されます。
レンジコンポーネントに設定されているPixel Formatに応じて、深度データは2D深度マップまたは3Dポイントクラウドとして表すことができます。デフォルトでは、深度データはポイントクラウドとして表されます。
深度マップを有効にするには、レンジコンポーネントのPixel Formatを次のように設定します。 PixelFormat_Coord3D_16C:
// Enable depth maps by enabling the Range component and setting the
// appropriate pixel format.
camera.ComponentSelector.SetValue(ComponentSelector_Range);
camera.ComponentEnable.SetValue(true);
camera.PixelFormat.SetValue(PixelFormat_Coord3D_C16);
ポイントクラウドを有効にするには、レンジコンポーネントのPixel Formatを次のように設定します。 PixelFormat_Coord3D_ABC32f:
// Enable point clouds by enabling the Range component and setting the
// appropriate pixel format.
camera.ComponentSelector.SetValue(ComponentSelector_Range);
camera.ComponentEnable.SetValue(true);
camera.PixelFormat.SetValue(PixelFormat_Coord3D_ABC32f);
詳細については、Component SelectorおよびPixel Formatのトピックを参照してください。
情報
カメラに深度情報をポイントクラウドとデプスマップの両方として同時に送信させることはできません。
デプスマップからポイントクラウドを計算する方法については、測定結果の処理トピックで説明されています。
この変換は、blazeカメラ向けのGrabDepthMap C++プログラミングサンプルにも示されています。
ポイントクラウドからデプスマップを取得する方法は、blazeカメラ向けのConvertPointCloud2DepthMap C++プログラミングサンプルに示されています。
グラブーループ#
pylonは、グラブループを設定するためのさまざまなアプローチをサポートし、メモリバッファを処理するためのさまざまなストラテジを提供します。
詳細については、pylon C++ Programmer's GuideのGrabbing Imagesセクションを参照してください。
次のコードスニペットは、一般的なグラブループを示しています。
#include <pylon/PylonIncludes.h>
#include <pylon/BlazeInstantCamera.h>

using namespace Pylon;
using namespace BlazeCameraParams_Params;

// ....
PylonInitialize();

CBlazeInstantCamera camera(CTlFactory::GetInstance().CreateFirstDevice(
  CDeviceInfo().SetDeviceClass(BaslerGenTlBlazeDeviceClass)));
camera.RegisterConfiguration(
  new CBlazeDefaultConfiguration, RegistrationMode_ReplaceAll, Cleanup_Delete);
camera.Open();

size_t nBuffersGrabbed= 0;

// This smart pointer will receive the grab result data.
CGrabResultPtr ptrGrabResult;

camera.StartGrabbing();

while (camera.IsGrabbing() && nBuffersGrabbed < 10) {
  // Wait for an image and then retrieve it. A timeout of 1000 ms is used.
  camera.RetrieveResult(1000, ptrGrabResult, TimeoutHandling_ThrowException);

  // Data grabbed successfully?
  if (ptrGrabResult->GrabSucceeded()) {
      nBuffersGrabbed++;
      // Access the data.
      // ....
  } else {
    // Error handling
    std::cerr << "Grab error occurred: " << ptrGrabResult->GetErrorDescription() << std::endl;
  }
}
// Clean-up
camera.StopGrabbing();
camera.Close();
コンポーネントへのアクセス#
GrabResultの個々のコンポーネントにアクセスするには、 Pylon::CPylonDataContainer および Pylon::CPylonDataComponent クラス。コンテナには1つ以上のコンポーネントを格納できます。コンテナを使用して、コンポーネントの数を照会したり、特定のコンポーネントを取得したりできます。コンテナ内の各コンポーネントには、深度値などの実際のデータと、そのメタデータが保持されます。
設定するピクセルのカラーコンポーネントを指定するには、 Pylon::CGrabResultData::GetDataContainer() メソッドを使用すると、GrabResultの CPylonDataContainerにアクセスできます。コンポーネントのインデックスを指定してコンポーネントにアクセスするには、 Pylon::CPylonDataContainer::GetDataComponent() メソッドを使用します。
pylonが複数のコンポーネントを含むGrabResultへのアクセスを提供する仕組みの詳細については、pylon C++ Programmer's GuideのAdvanced TopicsトピックにあるMulti-Component Grab Resultsセクションを参照してください。
例:
#pragma pack(push, 1)
struct Point
{
    float x;
    float y;
    float z;
};
#pragma pack(pop)

// ...

// By registering the CBlazeDefaultConfiguration, depth, intensity, and confidence data will be delivered.
// Depth data is represented as point clouds.
camera.RegisterConfiguration(new CBlazeDefaultConfiguration, RegistrationMode_ReplaceAll, Cleanup_Delete);
camera.Open();

//....

if (ptrGrabResult->GrabSucceeded())
{
  // Get access to the container.
  auto container = ptrGrabResult->GetDataContainer();

  // Access the container's components.
  // Iterate through all components in the container.
  for (size_t i = 0; i < container.GetDataComponentCount(); ++i)
  {
      // Get one component from the container.
      const Pylon::CPylonDataComponent component = container.GetDataComponent(i);
      if ( !component.IsValid() )
          continue;

      // Is this the intensity component?
      if ( component.GetComponentType() == Pylon::ComponentType_Intensity )
      {
          const Pylon::EPixelType pixelType = component.GetPixelType();

          // Get a pointer to the pixel data.
          const void* pPixels = component.GetData();

          // Process intensity values here (pixel data).
          // [...]
      }
  }

  auto rangeComponent = container.GetDataComponent(0);
  auto intensityComponent = container.GetDataComponent(1);
  auto confidenceComponent = container.GetDataComponent(2);

  // Retrieve the 3D coordinates corresponding to the center pixel.
  const auto width = rangeComponent.GetWidth();
  const auto height = rangeComponent.GetHeight();
  const uint32_t u = (int)(0.5 * width);
  const uint32_t v = (int)(0.5 * height);
  auto pPoint =
    reinterpret_cast<const Point*>(rangeComponent.GetData()) + u + v * width;
  uint16_t* pIntensity =
    (uint16_t*)intensityComponent.GetData() +  v * width + u;
  uint16_t* pConfidence
    = (uint16_t*)confidenceComponent.GetData() + v * width + u;
  if (pPoint->z != 0)
      std::cout << "x=" << pPoint->x
        << " y=" << pPoint->y
        << " z=" << pPoint->z << "\n";
  else
      std::cout << "x=   n/a y=   n/a z=   n/a\n";
  std::cout << " intensity=" << *pIntensity
            << " confidence=" << *pConfidence << "\n";
}
else
{
    // Error handling
    std::cerr << "Grab error occurred: " << ptrGrabResult->GetErrorDescription() << std::endl;
}
ComponentSelector および ComponentEnable カメラパラメータを使用すると、個々のコンポーネントを有効/無効にすることができます。blazeカメラの場合、コンテナ内のコンポーネントの順序は常に次のようになります。
- 範囲
- 輝度
- 信頼性
たとえば、RangeコンポーネントとConfidenceコンポーネントが有効で、Intensityコンポーネントが無効になっている場合、 container.GetDataComponent(0) はRangeコンポーネントを取得し、 container.GetDataComponent(1) はConfidenceコンポーネントを返します。アクセスしようとすると container.GetDataComponent(2) Intensityコンポーネントが無効になっているためコンテナには2つのコンポーネントしかなく、エラーになります。
画像取得結果を処理するアプリケーションの部分で、どのコンポーネントが届くか事前に分からない場合は、コンテナを反復処理し、各コンポーネントのタイプを確認して、より汎用的な方法でコンポーネントにアクセスする必要があります。 CPylonDataComponent::GetComponentType() メソッド。
例:
camera.RetrieveResult(1000, ptrGrabResult, TimeoutHandling_ThrowException);
// Data grabbed successfully?
if (ptrGrabResult->GrabSucceeded()) {
  // Access the data.
  auto container = ptrGrabResult->GetDataContainer();

  CPylonDataComponent rangeComponent;
  CPylonDataComponent intensityComponent;
  CPylonDataComponent confidenceComponent;

  // Iterate through all components in the container.
  for (size_t i = 0; i < container.GetDataComponentCount(); ++i) {
      const Pylon::CPylonDataComponent component = container.GetDataComponent(i);
      if (!component.IsValid())
          continue;
      switch (component.GetComponentType())
      {
      case ComponentType_Intensity:
          intensityComponent = component;
          break;
      case ComponentType_Confidence:
          confidenceComponent = component;
          break;
      case ComponentType_Range:
          rangeComponent = component;
          break;
      }
  }
  if (rangeComponent.IsValid()) {
    const auto width = rangeComponent.GetWidth();
    const auto height = rangeComponent.GetHeight();
    // Process depth data.
  }
  if (intensityComponent.IsValid()) {
    // Process intensity image.
  }
  if (confidenceComponent.IsValid())
  {
    // Process confidence data.
  }
}
深度データの解釈#
Processing Measurement Resultsトピックでは、Rangeコンポーネントに格納されている深度データの形式に関する情報を提供しています。
アプリケーションのデバッグとGigE Visionハートビートの制御#
blazeカメラのようなGigE Visionカメラでは、カメラを制御しているアプリケーションがまだ実行中かどうかをカメラが確認できるように、アプリケーションが定期的にカメラにアクセスする必要があります。そのため、トランスポート層は定期的にネットワークリクエスト(ハートビート)をカメラに送信します。カメラのハートビートタイムアウト設定で指定された期間内にカメラがこれらのハートビートを受信しない場合、接続が切断されたと見なして接続を閉じます。つまり、アプリケーションからのコマンドを受け付けなくなります。ハートビートタイムアウトのデフォルト値は3000 msです。
アプリケーションのデバッグ中にブレークポイントにヒットすると、デバッガーはハートビートを送信するスレッドを含むすべてのスレッドを一時停止します。アプリケーションが一時停止している間やコードをステップ実行している間にカメラが接続を閉じるのを防ぐため、トランスポート層は自動的にハートビートタイムアウトを増やします(pylon 7.1以降を使用している場合は1時間に、それ以外の場合は5分に)。pylon 7.1以降を使用している場合、アプリケーションが終了またはクラッシュすると、カメラへの接続は自動的に閉じられます。
pylon 7.0以下を使用している場合の再接続の問題
アプリケーションがカメラとの接続を正常に切断する前に終了またはクラッシュした場合、ハートビートのタイムアウトが切れるまでカメラは接続を開いたままにします。ハートビートのタイムアウトが切れるまで、カメラはそれ以降の接続試行をすべて拒否します。アプリケーションを再起動するか、カメラへのアクセスを要求する別のアプリケーションを起動すると、デバイスが現在使用中であるというエラーを受け取ります。
これは通常、デバッガーを使用してアプリケーションを停止した場合や、アプリケーションが予期せず終了した場合に発生します。カメラを再度オープンするには、タイムアウトが経過するまで待つか、カメラをネットワークから一時的に切断する必要があります。
これを回避するには、デバッガーの制御下でアプリケーションを実行しているときに、環境変数を次のように設定することで、ハートビートタイムアウトの自動調整を上書きできます。 GEV_HEARTBEAT_TIMEOUT 目的のタイムアウト値をミリ秒単位で指定します。または、サンプルプログラムに示されているように、pylon APIを使用してアプリケーションでハートビートタイムアウトを設定することもできます。 DeviceRemovalHandling サンプルプログラム。