pylonを使用したフレームグラバーの設定#
情報
このトピックでは、基本的なユースケースについて説明します。フレームグラバーのソフトウェア機能に関する詳細情報については、次のドキュメントを参照してください:
フレームグラバーの設定は、次のような場合に特に役立ちます:
- フレームグラバーで使用するアプレットを変更したい場合。
- フレームグラバー経由で接続されたBasler boostカメラをトリガーしたい場合。
- イメージングシステムのパフォーマンスを向上させるために、フレームグラバーでデベイヤリングを実行したい場合。
- 16-bit monoフォーマットなど、カメラで使用できない出力フォーマットを使用したい場合。
- フレームグラバーが受信または送信するトリガー信号を設定したい場合。
アプレットの変更#
フレームグラバーで実行されるアプレットがその機能を定義します。特定のカメラ設定では、デフォルトのアプレットを変更する必要がある場合があります。
フレームグラバーで使用されるアプレットを変更するには、次のように設定します。 InterfaceApplet パラメータをロードするアプレットの名前に設定します(例: Acq_DualCXP12Area.
利用可能なアプレットについては、Acquisition Applets for imaWorx CXP-12 Quadを参照してください。
フレームグラバーを使用したBasler boostカメラのトリガー#
情報
このセクションは、特にフレームグラバー経由でカメラをトリガーする場合にのみ関連します。通常、カメラはカメラのI/Oコネクタ経由でトリガーされます。詳細については、トリガー画像取得を参照してください。
ハードウェアトリガー(外部)#
外部トリガーが有効な場合、フレームグラバーにトリガー入力信号を送信でき、フレームグラバーはその信号をBasler boostカメラに転送します。
外部ハードウェアトリガー用にフレームグラバーを設定するには:
- パラメーターを
AreaTriggerModeパラメータをExternal. - パラメーターを
TriggerInSourceパラメータを目的の「Front GPI」入力ラインに設定します。
たとえば、外部トリガーにGPI0(フレームグラバーのピン11および12)を使用する場合は、パラメータを次のように設定します。FrontGpiTriggerSource0. - パラメーターを
TriggerCameraOutSelectパラメータを対応する「Bypass」オプションに設定します。
たとえば、次を選択した場合FrontGpiTriggerSource0、TriggerCameraOutSelectパラメータをBypassFrontGpi0. - パラメーターを
TriggerStateパラメータをActive. - 必要に応じて、以下の説明に従ってトリガー信号を設定します。
すべてのトリガー信号は、カメラのソース信号に転送されます CxpTrigger0 および CxpTrigger1 (現在、2つの回線の動作に違いはありません)。信号はさまざまな目的に使用できます。最も一般的なユースケースは画像取得です。 以下の例.
ハードウェアトリガー(内部)#
内部トリガーが有効な場合、フレームグラバーは指定された周波数で内部的にトリガー信号を生成します。すべての外部トリガー信号は無視されます。
内部ハードウェアトリガー用にフレームグラバーを設定するには:
- パラメーターを
AreaTriggerModeパラメータをGenerator. - パラメーターを
TriggerOutputFrequencyパラメータを希望のトリガー出力周波数に設定します。たとえば、パラメータを8に設定すると、フレームグラバーは1秒あたり8個のトリガー信号を生成します。 - パラメーターを
TriggerCameraOutSelectパラメータを目的の出力ラインに設定します(例:PulseGenerator0. - パラメーターを
TriggerStateパラメータをActive.
これで、画像取得を開始するたびに、フレームグラバーが指定された周波数でトリガー信号を生成します。
すべてのトリガー信号は、カメラのソース信号に転送されます CxpTrigger0 および CxpTrigger1。これらの信号はさまざまな目的に使用できます。最も一般的なユースケースは画像取得です。次を参照してください: 以下の例.
例:画像取得のトリガー信号の使用#
フレームグラバーによって生成された外部または内部トリガー信号を使用して画像を取得するには:
- カメラ側で、次のように設定します。
TriggerSelectorパラメータをFrameStart. - パラメーターを
TriggerModeパラメータをOn. - パラメーターを
ExposureModeパラメータをTimed. - パラメーターを
TriggerSourceパラメータをCxpTrigger0またはCxpTrigger1.
現在、2つの回線の動作に違いはないため、どちらか一方を選択できます。
これで、フレームグラバーがトリガー信号を受信または生成するたびに、カメラが画像を取得します。
情報
トリガー信号は、信号ソースによって制御できるBasler boostカメラの機能のソースとして使用できます。例えば、次のように設定します。 CounterTriggerSource パラメータを CxpTrigger0 は、 Counter フレームグラバーを使用したフィーチャー。
フレームグラバーでのデベイヤリングの実行#
frame grabberでデベザリングを実行できます。これにより、カメラとホストコンピューターの計算負荷が軽減されます。
これを行うには:
- カメラ側で、次のように設定します。
PixelFormatパラメータをBayer Pixel Formatに設定します(例:BayerRG12. - frame grabberで、
AutomaticFormatControlパラメータをfalse.
これにより、カメラで使用されるピクセルフォーマットとは独立して出力フォーマットを設定できます。 - frame grabberで、
Formatパラメータを対応するRGB Pixel Formatに設定します。
ビット深度は、Bayer Pixel Formatのビット深度の3倍である必要があります。たとえば、BayerRG12(カメラ)= Color36bit(フレームグラバー)となります。
これで、frame grabberがカメラのRAW画像データのデベザリングを実行し、RGB画像データを出力します。
情報
上記のステップ3で正しいRGBのPixel Formatを設定していることを確認してください。設定していない場合、画像が正常に取得されません。
カメラでは使用できない出力形式の使用#
Basler boostカメラは、いくつかのピクセルフォーマットで画像データを出力できます(Bayer RG 8やRBG 8など)。詳細については、ピクセルフォーマットのトピックを参照してください。
必要なPixel Formatがカメラで利用できず、ホストコンピューターでの画像変換を避けたい場合は、frame grabberが提供するPixel Formatのいずれかを使用できる可能性があります。
frame grabberは次のフォーマットを提供します:
| Gray8bit | Gray10bit | Gray12bit | Gray16bit |
| Color24bit | Color30bit | Color36bit | Color48bit |
| Bayergr8 | Bayergr10 | Bayergr12 | Bayergr16 |
| Bayerrg8 | Bayerrg10 | Bayerrg12 | Bayerrg16 |
| Bayergb8 | Bayergb10 | Bayergb12 | Bayergb16 |
| Bayerbg8 | Bayerbg10 | Bayerbg12 | Bayerbg16 |
カメラで使用できない出力形式を使用するには:
- カメラ側で、次のように設定します。
PixelFormatパラメータを希望のカメラのPixel Formatに設定します(例:Mono12. - frame grabberで、
AutomaticFormatControlパラメータをfalse.
これにより、カメラで使用されるピクセルフォーマットとは独立して出力フォーマットを設定できます。 - frame grabberで、
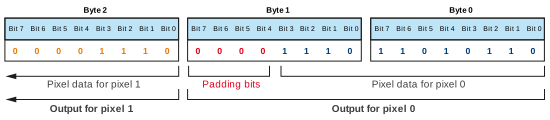
Formatパラメータを希望の出力フォーマットに設定します(例:Gray16bit.
上記の例文の値を使用すると、frame grabberは12ビットのカメラ画像データに基づいて16ビットの画像データを出力します。以下に示すように、パディングビット(ゼロ)が挿入されます。
gpioToolを使用したトリガー信号の設定#
コマンドラインツールのgpioToolを使用すると、フレームグラバーが受信または送信するトリガー信号の物理的特性を設定できます:
gpioToolはFramegrabber SDKおよびpylon Software Suiteに含まれています。
詳細については、gpioToolを参照してください。
サンプルコード#
// Select the Acq_SingleCXP12Area applet
camera.GetTLParams().InterfaceApplet.SetValue(Acq_SingleCXP12Area);
// Configure the frame grabber for external triggering
camera.GetTLParams().AreaTriggerMode.SetValue(AreaTriggerMode_External);
camera.GetTLParams().TriggerInSource.SetValue(TriggerInSource_FrontGpiTriggerSource0);
camera.GetTLParams().TriggerCameraOutSelect.SetValue(TriggerCameraOutSelect_BypassFrontGpi0);
camera.GetTLParams().TriggerState.SetValue(TriggerState_Active);
// Configure the frame grabber for internal triggering
camera.GetTLParams().AreaTriggerMode.SetValue(AreaTriggerMode_Generator);
camera.GetTLParams().TriggerOutputFrequency.SetValue(8);
camera.GetTLParams().TriggerCameraOutSelect.SetValue(TriggerCameraOutSelect_PulseGenerator0);
camera.GetTLParams().TriggerState.SetValue(TriggerState_Active);
// Use the external or internal trigger signals for image acquisition
camera.TriggerSelector.SetValue(TriggerSelector_FrameStart);
camera.TriggerMode.SetValue(TriggerMode_On);
camera.ExposureMode.SetValue(ExposureMode_Timed);
camera.TriggerSource.SetValue(TriggerSource_CxpTrigger0);
// Perform debayering on the frame grabber (Bayer RG 12 --> RGB 36 bit)
camera.PixelFormat.SetValue(PixelFormat_BayerRG12);
camera.GetTLParams().AutomaticFormatControl.SetValue(false);
camera.GetTLParams().Format.SetValue(Format_Color36bit);
// Configure the frame grabber to output 16-bit mono image data based on
// 12-bit mono image data from the camera
camera.PixelFormat.SetValue(PixelFormat_Mono12);
camera.GetTLParams().AutomaticFormatControl.SetValue(false);
camera.GetTLParams().Format.SetValue(Format_Gray16bit);
このサンプルコードは、C++言語でのみ使用できます。
pylon Viewerを使用してパラメータを設定することもできます。