Creating Script Collections (Script Libraries)#
In a first step, you create a script collection that contains individual commands. You define each command to call a specific procedure in a specified Tcl or Python script.
Afterwards, the individual commands are graphically available directly in the VisualApplets GUI and you can start them via mouse click or drag & drop. This way, you can make use of your Tcl or Python procedures as library elements. When called, the commands are executed in the Scripting Console. If you open the Scripting Console, you can see how the command is carried out.
In the pane Script Collection, you see which script collections are already available in your VisualApplets installation and which commands are contained in each collection.
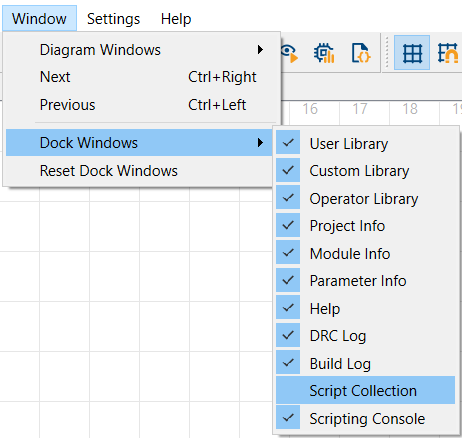
To open the Script Collection pane, open the Window menu, select Dock Windows and then Scripting Collection:
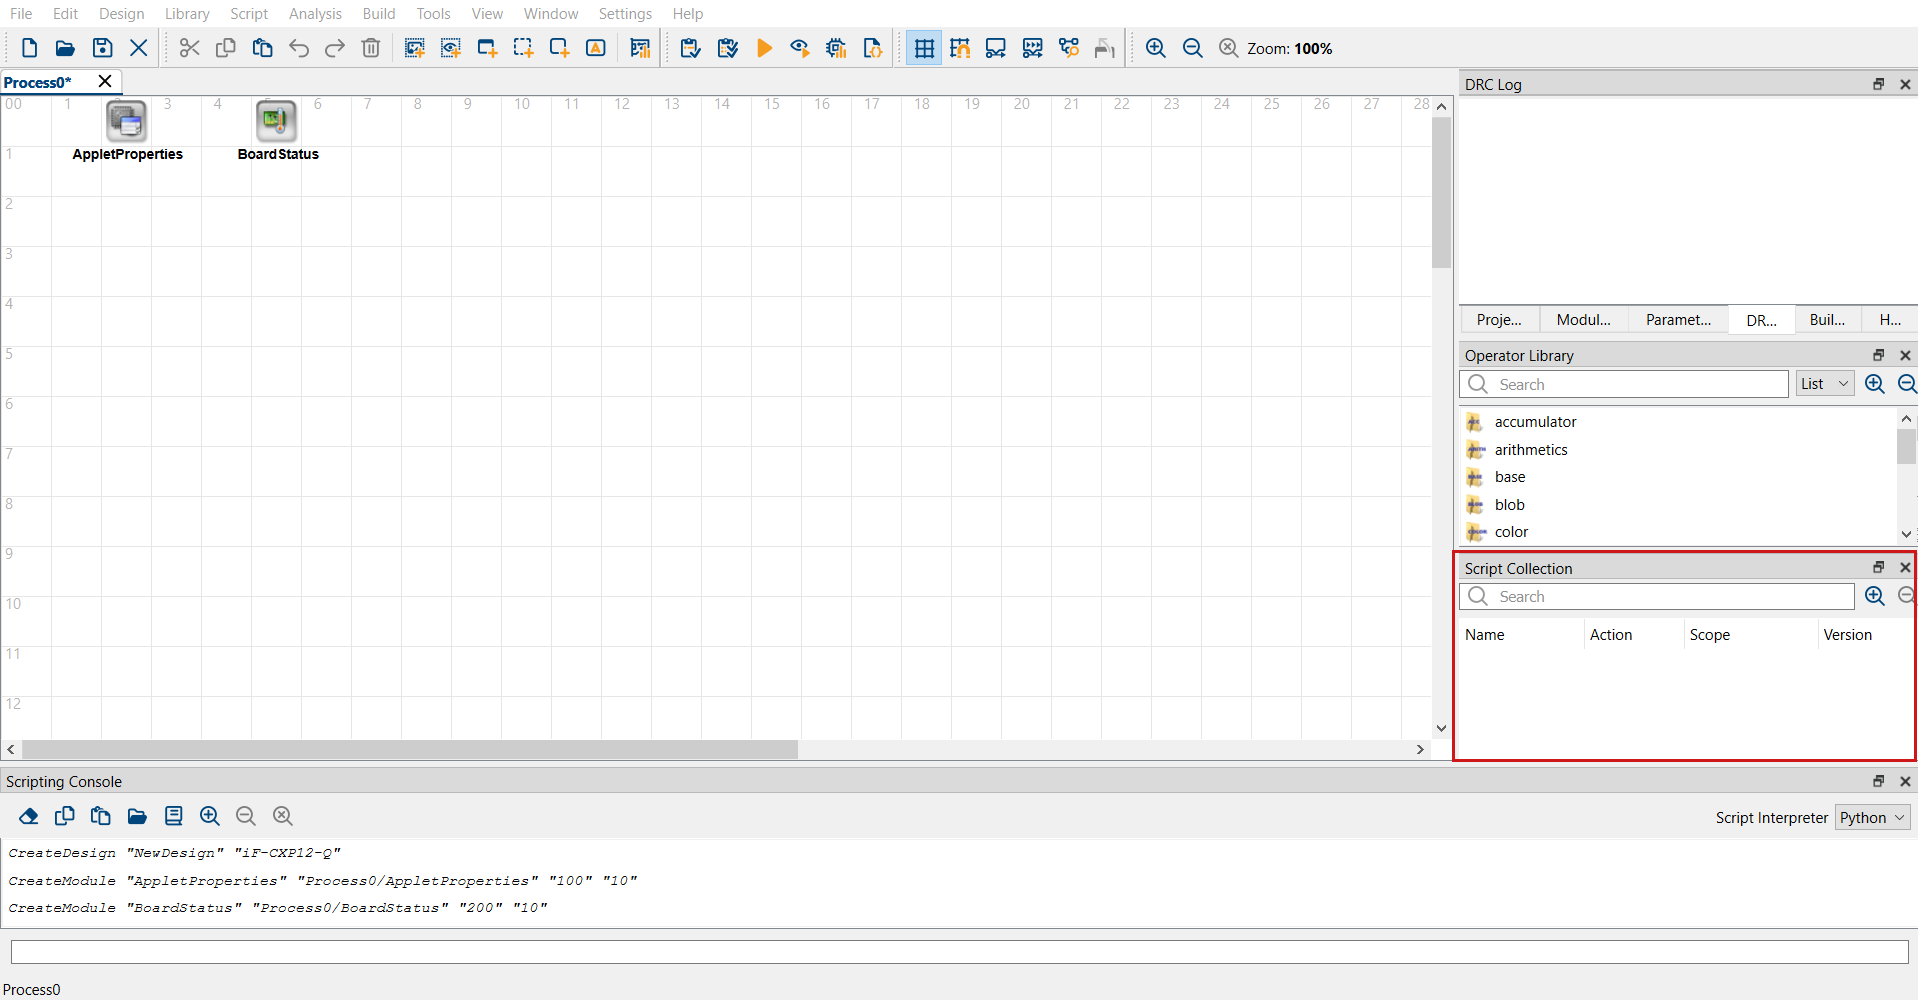
The Scrip Collection pane opens on the right side of the VisualApplets main window:
You can define a script collection in the following ways:
Info
VisualApplets supports script collections for scripts written in Python and in Tcl. The Scripting Console automatically switches to Python when using a Python script collection element and back to Tcl when the console has been set to Tcl.
Info
Storing all collection information in XML files allows you to use version control systems not only for the individual scripts, but also for the structure and content definitions of your script collections.
Structure of a Script Collection#
Each script collection contains a number of commands (elements of the script collection).
This is reflected in the GUI:
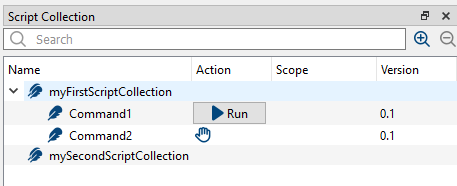
Each command points to one specific procedure within a specific script. When a command is carried out, the procedure it points to is called.
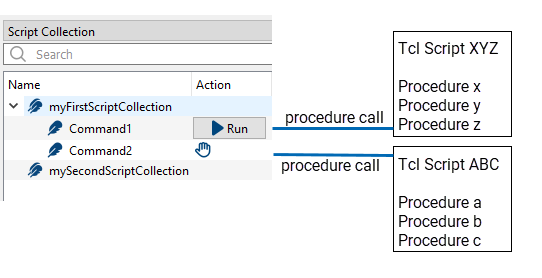
To define a script collection, you have to define:
- The name of the collection
- The commands contained in the collection
- Optionally: Some further information such as version number, description, etc.
- Optionally: A GUI icon representing the script collection.
- For each individual command:
- Command name
- Tcl or Python file the command points to
- Tcl or Python procedure within this file the command points to
- Arguments that must be passed to the Tcl or Python procedure (the values required are prompted when starting a command from the GUI)
- Command mode (see Adding a Command to a Script Collection below)
- Optionally: Command scope (see Adding a Command to a Script Collection below)
- Optionally: Further information such as version number, description, etc.
- Optionally: A GUI icon representing the command (see Adding a Command to a Script Collection below). If you don't provide an icon file, a default icon is used in the GUI.
All listed information describing exactly one script collection is stored in one XML file.
You can define multiple script collections.
What Happens Beneath the GUI?#
In the background, a new XML file is created in the directory you specified for your collection-defining XML files (see Required Settings):
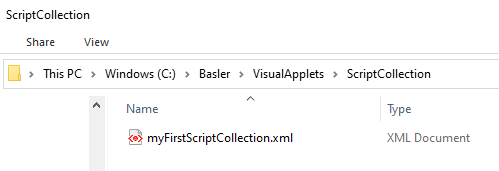
The file name is the same as the script collection name you have defined in the GUI. The XML file contains all information about the collection currently defined:

As you haven't specified any commands for your script collection yet, the <Elements> element is still empty.
Info
For creating new script collections, you can either use the GUI or create XML files from scratch. The results are the same. The GUI always displays the information defined in the XML files.
Command Options#
When defining a command, you can define whether your command can be started via a button ![]() (i.e. trigger mode) or via drag & drop, which is indicated in the GUI by a hand icon
(i.e. trigger mode) or via drag & drop, which is indicated in the GUI by a hand icon ![]() . You can also add a button to the toolbar for your command.
. You can also add a button to the toolbar for your command.
For commands set to trigger mode, you can define the command scope. In the command scope, you can limit the command to specific design elements (e.g. module or link) so that the command only applies to these elements.
Requirements#
File Requirements#
A script collection consists of the following files:
- An XML file that defines a script collection. The XML file contains the definition of the collection itself and the definitions of the commands contained in the collection.
- Tcl or Python files that contain the actual scripts. These files must meet the following requirements:
- They're Tcl or Python scrips.
- The files contain only procedures. They don't contain any commands that are carried out when loading the script file.
- To avoid naming conflicts, for a command CMD_NAME, stick to the following naming conventions:
- Command_CMD_NAME
- Store the .tcl or .py file in the same directory as the collection file (*.xml) or in a subdirectory of it.
- Optional: A PNG icon file for individual collection or command icons on the VA GUI. The PNG files need to meet the following requirements:
- They must contain a square image.
- The minimum resolution is 16 x 16.
- Store the icon files in the same directory as the collection file (*.xml) or in a subdirectory of it. If you don't provide an icon file, a default icon is used to represent the command representation in the GUI.
Info
All files required for a working script collection are plain text files. This allows you to store your script collection definitions in version control systems.
Required Settings#
You can specify the location of the script collection definition files (XML files) in Visual Applets. As you can define only one storage location for collection script files, Basler recommends to store all collection-defining XML files in the same directory.
To set the path to your script collection directory:
- From the menu Settings, select System Settings.
- Select tab Paths.
- Under Script Collection, specify the path to the directory where you store the collection-defining XML files you want to use. The default setting is <VA installation directory>/ScriptCollection:

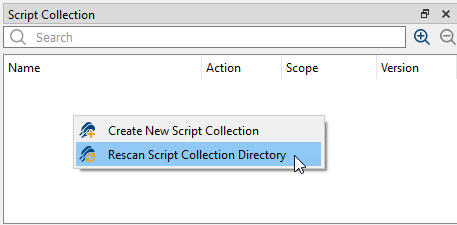
For each script collection you create via GUI, one XML file is written into the specified directory. If you add new collection-describing XML files to the directory or edit existing XML files stored there, you can make your changes visible in the VisualApplets GUI. To display your changes without re-starting VisualApplets, right-click into the Script Collection pane, and select Rescan Script Collection Directory.
Creating a Script Collection via the GUI#
You can define script collections completely via the GUI, without touching the underlying XML files. The XML files are created and updated in the background. As soon as you have defined a collection and the contained commands, the collection is displayed in the VisualApplets GUI.
Creating a New Script Collection#
To create a new script collection via graphical user interface:
- Right-click the Script Collection pane.
-
From the context menu, select Create New Script Collection.
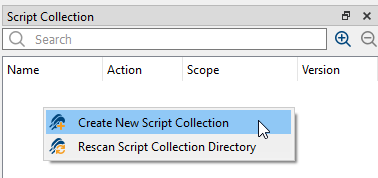
A dialog opens.
-
Enter a name for the new script collection and confirm with OK.
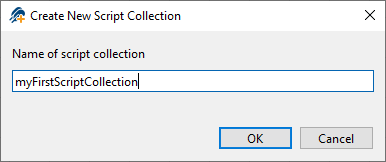
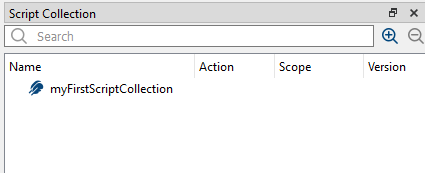
The new collection is displayed in the Script Collection pane:
Adding a Command to a Script Collection#
To add commands to a script collection via GUI:
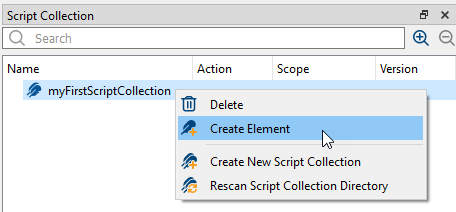
- Right-click the name of the script collection.
-
From the context menu, select Create Element.
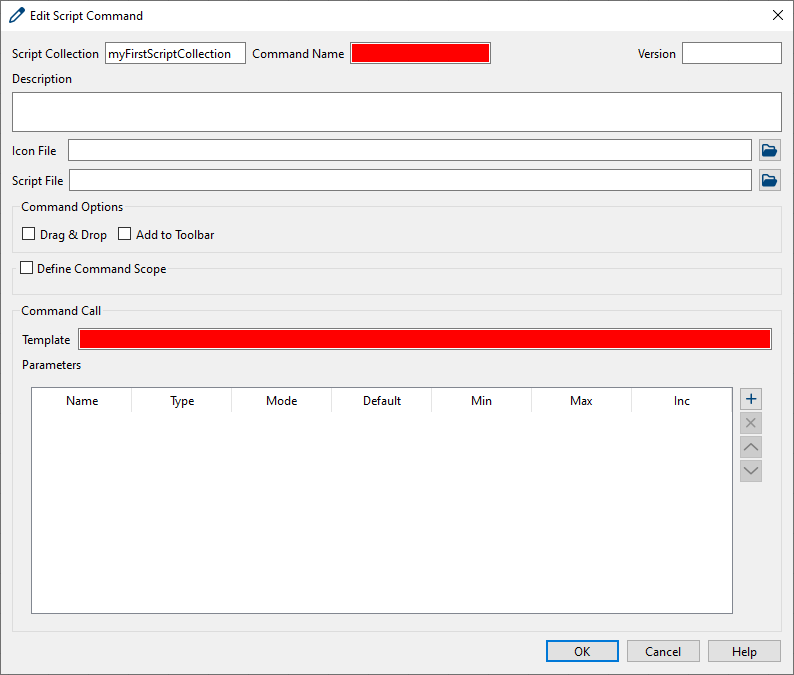
A dialog opens for describing the command you want to add. The fields highlighted in red are mandatory:
-
Command Name (mandatory): Give a name to your command.
- Version: You can provide version information for your command.
- Description: The description will be visible as tooltip information. Enter a description of the procedure the command will call.
- Icon File: If you want a specific command icon to be displayed in the Script Collection pane or in the toolbar, you can provide the path to an icon file here. You can set either an absolute path or a path relative to the collection file (*.xml). (See File Requirements for details). If you don't select an icon file, a default icon is used to represent your new command in the GUI.
-
Script File: Provide the path to and the name of the script that contains the procedure you want to be started via the command. You can define the path relative to the collection file (.xml). Alternatively, instead of defining a script file that contains the procedure the command is to call, you can enter a Tcl or Python procedure directly into the command. The Tcl or Python procedure defined directly in the command will be executed each time you call the command. If you prefer this option, leave the field Script File empty and provide the whole Tcl or Python procedure the command stands for under Command Call in the field Template.

If you try to carry out a command without selecting the design elements defined as command scope, the Invalid Scope message opens up:

-
Command Options: Define how you want the command to be started on the VisualApplets GUI. A command can be started either via clicking a button (trigger mode), or by drag & drop into the design window (Drag & Drop mode). If you use the trigger mode, you can add an additional button for the command in the toolbar of the program window and define under which conditions the command is carried out (scope).

-
Trigger mode: To create a button that starts the command as soon as you click it, clear the Drag & Drop field. The command will be displayed in the Script Collection pane with the Run button:
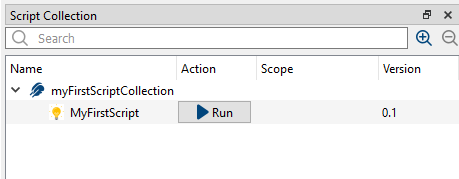
To start executing the command, click the Run button.
-
Toolbar option (only trigger mode): To make the command available in the toolbar of VisualApplets: Check the Add to Toolbar option; this is only possible if you clear the Drag & Drop checkbox. On the GUI, a new tool bar is created for the collection and the command icon is displayed:

Clicking at the command icon in the toolbar has the same effect as clicking the Run button. The text you entered under Description is then visible as tooltip in the toolbar:

-
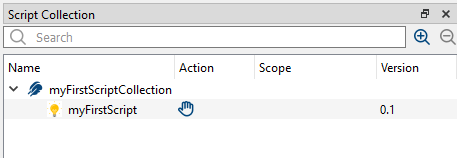
Drag & Drop mode: Select the Drag & Drop checkbox, if you want to start execution via drag & drop operation on the GUI. In this case, a hand icon is displayed in column Action:
-
-
Define Command Scope (only available in trigger mode): If you want to limit the command to a specific design element in the design, select the Define Command Scope check box. This option is only available, if Drag & Drop is disabled.

The following options are available:
- Module: You must select exactly one module to start this command.
- Link: You must select exactly one link to start this command.
- CommentBox: You must select exactly one comment box to start this command.
- SimModule: You must select exactly one simulation module to start this command.
- SingleSelect: You must select exactly one design element to start this command. It's not relevant which kind of element you select (module, link, …).
- MultiSelect: You must select two or more design elements to start this command. It's not relevant which kind of elements you select (module, link, …).
You can combine these options: For example, if you combine the options Module and Link, the command is carried out if you select either exactly one module OR exactly one link. Combining SingleSelect and MultiSelect allows starting the command, if one ore more design elements are selected.
The scope of a command (i.e., the scope of the Tcl procedure) is displayed in the Script Collection pane on the VA GUI:
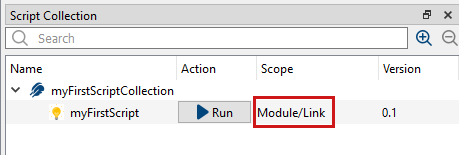
If you try to carry out a command without selecting the design elements defined as command scope, the Invalid Scope message opens up:

-
Command Call: Define here how the command is called.
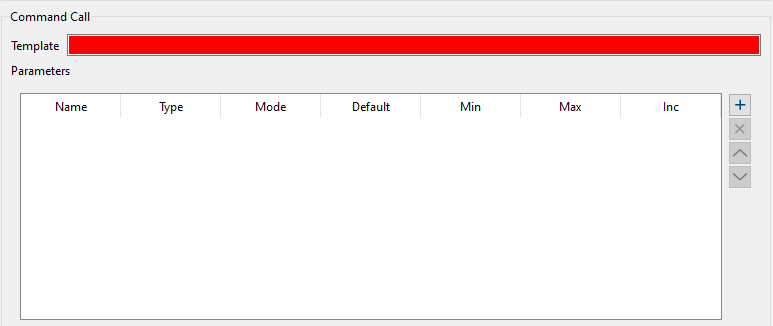
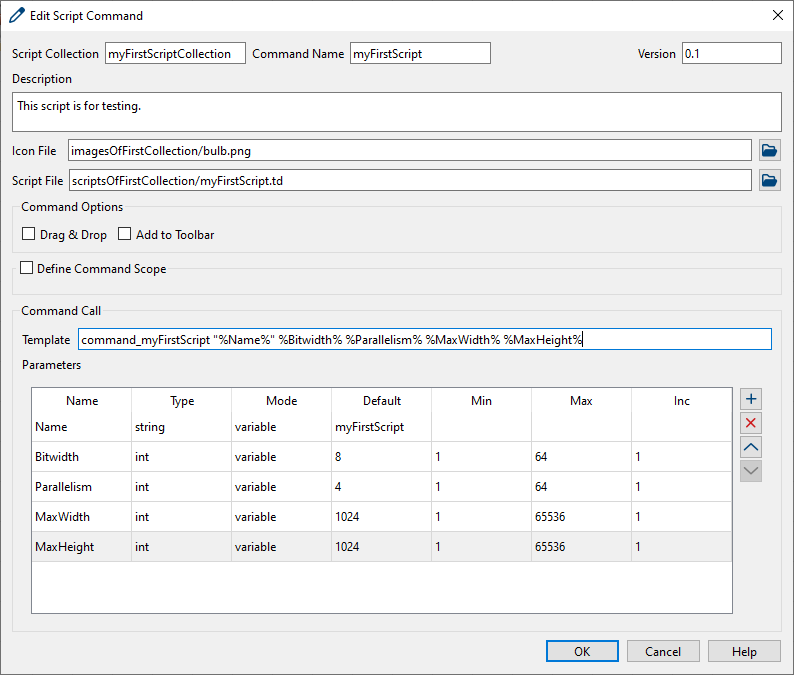
- Template: Enter here the template for the command call. Typically, it starts with the name of the Tcl or Python procedure, followed by a list of parameters. The parameters are given as place holders, wrapped in %. For each place holder you define the according parameter in the list below. Follow the syntax of Tcl or Python commands. Alternatively, you can enter here a complete Tcl or Python console command line if you left field Script File above empty.
- Parameters: Define here the parameters used in the template. The order of the parameters listed here is of no consequence. Just ensure that the parameter names match the place holder names of the template. To add a new parameter to the command definition, click the
 plus button.
- Name: Provide a name for each parameter. Use the name you used for the argument that carries the value at command call.
- Type: Define the data type of the parameter. You can define parameters of type string, integer, or double.
- Mode: Define if your parameter contains a fix value or a variable, or a drop position.
dropXanddropYprovide the position where the mouse pointer was released during drop. Note thatdropXanddropYare only available in Drag & Drop mode. If you define the parameter as variable, you will be asked at starting the command to enter a value for the parameter. - Default: Enter here a default value.
- Min/Max: Enter here the value range for the parameter.
- Inc: Enter here the step size within the value range.
Example:
Creating a Script Collection via XML#
You can define script collections completely in XML, without using the VisualApplets GUI.
For each script collection, create one XML file.
As soon as you have defined a collection and the contained commands in the XML file, the collection is displayed in the VisualApplets GUI. Prerequisite: You have specified the location of the XML files in the System Settings of VisualApplets, see Required Settings.
All information regarding structure and content of a script collection is defined in one XML file per script collection. You can provide multiple XML files, each defining one script collection. If an XML file defining a script collection is located in the directory you specify in VisualApplets under menu Settings -> System Settings -> Paths -> Script Collection, the script collection is displayed in the VisualApplets GUI in the Script Collection pane.
Examples#
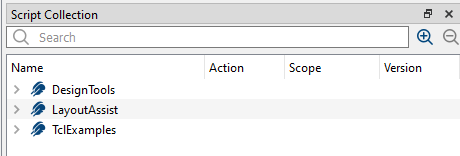
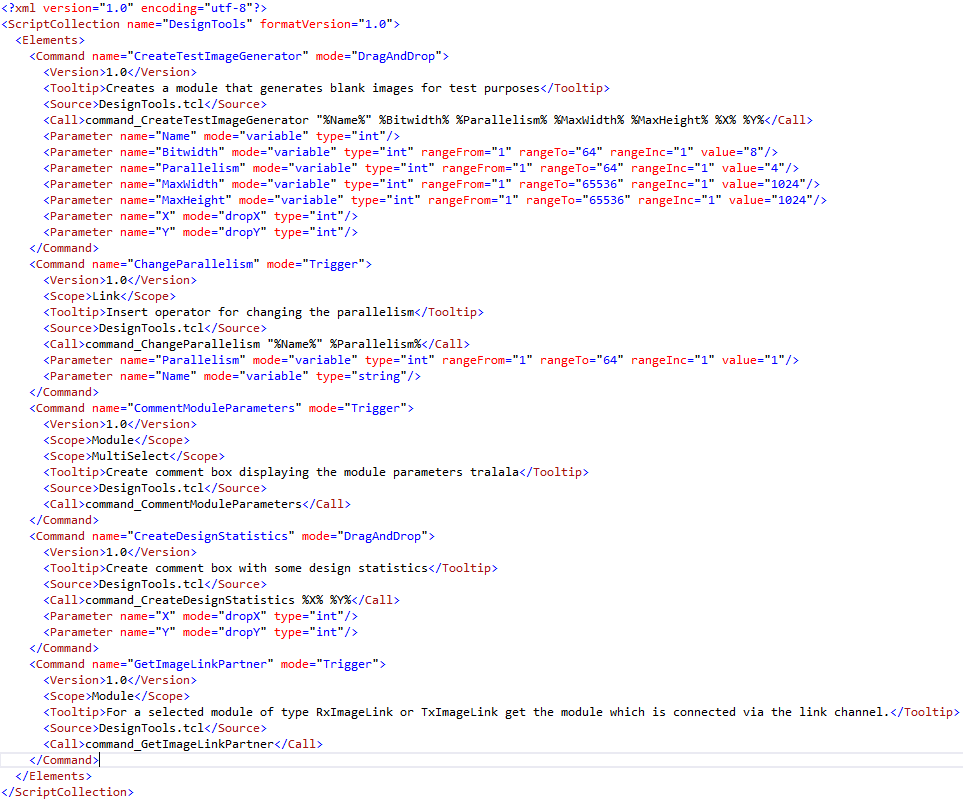
VisualApplets provides the three example script collections DesignTools, LayoutAssist, and TclExamples. You find them as .xml file as well as as .tcl file in the directory <VA installation directory>/Examples/AdvancedVAFunctions/Script Collection.
To display the example script collections in the GUI of VisualApplets:
-
Define the path to the folder where the example script collections are stored in Settings -> System Settings -> Paths.

-
Right-click into the Script Collection pane and select Rescan Script Collection Directory.

The GUI now displays the example script collections in the Script Collection pane:
-
You can now play around with the GUI options and the content of the XML files to see the impact of your actions.
This is how the example DesignTools.xml looks like:
Syntax#
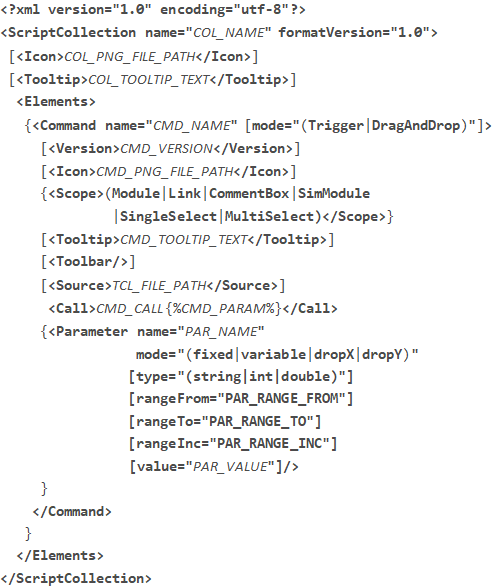
The syntax of the XML file is the following:
Info
Make sure you use the same name for the XML file name as in tag <ScriptCollection> of the XML file.
Example:
File name:
myCollection.xml
Collection name within XML file:
<ScriptCollection name ="myCollection" formatVersion="1.0">.
The format is defined the in accordance to the following convention:
- Optional, individual elements are enclosed in square brackets [ ].
- Syntax elements that are allowed to be non-existent, to be there once or to be there multiple times, are enclosed in curly brackets { }.
- Syntax (..|..) indicates that one of the provided elements can be stated.
- Parameter values are stated in italic capital letters.
The Tags <Scope> and <Toolbar>#
<Scope>:
Use the tag <Scope>, if you want to limit the command to a specific design element in the design.
This is an optional tag, allowed only when you set the command mode to Trigger. You can define <Scope> multiple times to specify multiple scopes. The tag isn't allowed when Command mode is set to DragAndDrop.
The following options are available:
- Module: You must select exactly one module to start this command.
- Link: You must select exactly one link to start this command.
- CommentBox: You must select exactly one comment box to start this command.
- SimModule: You must select exactly one simulation module to start this command.
- SingleSelect: You must select exactly one design element to start this command. It's not relevant which kind of element you select (module, link, …).
- MultiSelect: You must select two or more design elements to start this command. It's not relevant which kind of elements you select (module, link, …).
You can combine these options: For example, if you combine the options Module and Link, the command is carried out if you select either exactly one module OR exactly one link. Combining SingleSelect and MultiSelect allows starting the command, if one ore more design elements are selected.
If you try to carry out a command without selecting the design elements defined as command scope, the Invalid Scope message opens up:

<Toolbar>:
Optional tag, allowed only when you set Command mode to Trigger. If you include the tag, the commando is added to the toolbar of the collection. The tag is not allowed when Command mode is set to DragAndDrop.
Parameters#
You must write the following values into the parameters written in italic in the image above:
- COL_NAME: Name of the script collection.
- COL_PNG_FILE_PATH: Path to the icon file for the script collection (PNG format, for details see File Requirements). Specify the path relative to the XML file.
- COL_TOOLTIP_TEXT: Text displayed as tooltip describing the script collection.
- CMD_NAME: Name of command.
- CMD_TOOLTIP_TEXT: Text displayed as tooltip describing the command.
- CMD_VERSION: Command version in the format MAJOR.MINOR (for example, 1.0)
- TCL_FILE_PATH: Path to the Tcl script that contains the procedure you want to call when executing the command. Specify the path relative to the XML file.
- CMD_PNG_FILE_PATH: Icon file for the command (PNG format, for details see File Requirements). Specify the path relative to the XML file.
- CMD_CALL: Name of the procedure within the Tcl script (or whole Tcl procedure) that is called by the command.
- CMD_PARAM: Parameter names (arguments) that are substituted by actual values at command call. Only specify parameter names that are defined in the following
tags. - PAR_NAME: Parameter name.
- PAR_RANGE_FROM: Start of value range (only for data types int or double).
- PAR_RANGE_TO: End of value range (only for data types int or double).
- PAR_RANGE_INC: Step size within the value range (only for data types int or double).
- PAR_VALUE: Default value for the parameter.
Loading the Script Collection into the GUI#
For each script collection you create via GUI, one XML file is written into the directory you have specified under Settings → System Settings → Path. If you add new collection-describing XML files to the directory or edit existing XML files stored there, you can make your changes visible in the VisualApplets GUI. To display your changes without re-starting VisualApplets, right-click into the Script Collection pane, and select Rescan Script Collection Directory.
